
Home›Forums›Members’ Builds and Rides›VN – VP – VR – VS›VR Senator with LSx454
This topic has been reported for inappropriate content
This topic contains 2,102 replies, has 82 voices, and was last updated by ![]() VRSenator065 3 years ago.
VRSenator065 3 years ago.
-
AuthorPosts
-
December 13, 2015 at 3:34 pm #12120

VRSenator065Participant- Adelaide SA
- VR Senator LSx454 1960 Kombi (project) 1921 Nash Hot Rod (future project)
View build HERE
Posts: 5 777
Thanks guys, been away from a computer for a while, always nice to receive positive feedback. Had another look at it just then its way neater, and has to be more reliable. So I have done some pre-wiring of the trans indicator, got roped into Suesies Xmas show today so haven’t been able to do anything more. Hopefully next week will get that done. Then I am just going to have to get those JDM purple fitting re anodized black, it really bugs me now. Its like painting the Sydney harbor bridge, just as you “finish” time to start again.
-
This reply was modified 8 years, 5 months ago by
 VRSenator065.
December 13, 2015 at 3:35 pm #12121
VRSenator065Participant- Adelaide SA
- VR Senator LSx454 1960 Kombi (project) 1921 Nash Hot Rod (future project)
View build HERE
Posts: 5 7777 fittings for that little piece coming in at $20 each, it’s a expensive little section you just replaced there
I would hate to add up how much $$ I have spent on redundant fittings, one day I might do a bit of a clean out and try and sell some of them on eBay or something.
December 13, 2015 at 5:04 pm #121267 fittings for that little piece coming in at $20 each, it’s a expensive little section you just replaced there
I would hate to add up how much $$ I have spent on redundant fittings, one day I might do a bit of a clean out and try and sell some of them on eBay or something.
LOL yep know that feeling…
Looks great well done Gary! :XD:
December 13, 2015 at 5:12 pm #12129
VRSenator065Participant- Adelaide SA
- VR Senator LSx454 1960 Kombi (project) 1921 Nash Hot Rod (future project)
View build HERE
Posts: 5 777Cheers mate, your advice re purging helped a lot. Glad I took the time to do it
 December 13, 2015 at 5:25 pm #12130
Well worth the effort if you want it pretty inside ( a bit important for the fuel system)
Have you had a crack without the purge?
December 13, 2015 at 5:36 pm #12132
VRSenator065Participant- Adelaide SA
- VR Senator LSx454 1960 Kombi (project) 1921 Nash Hot Rod (future project)
View build HERE
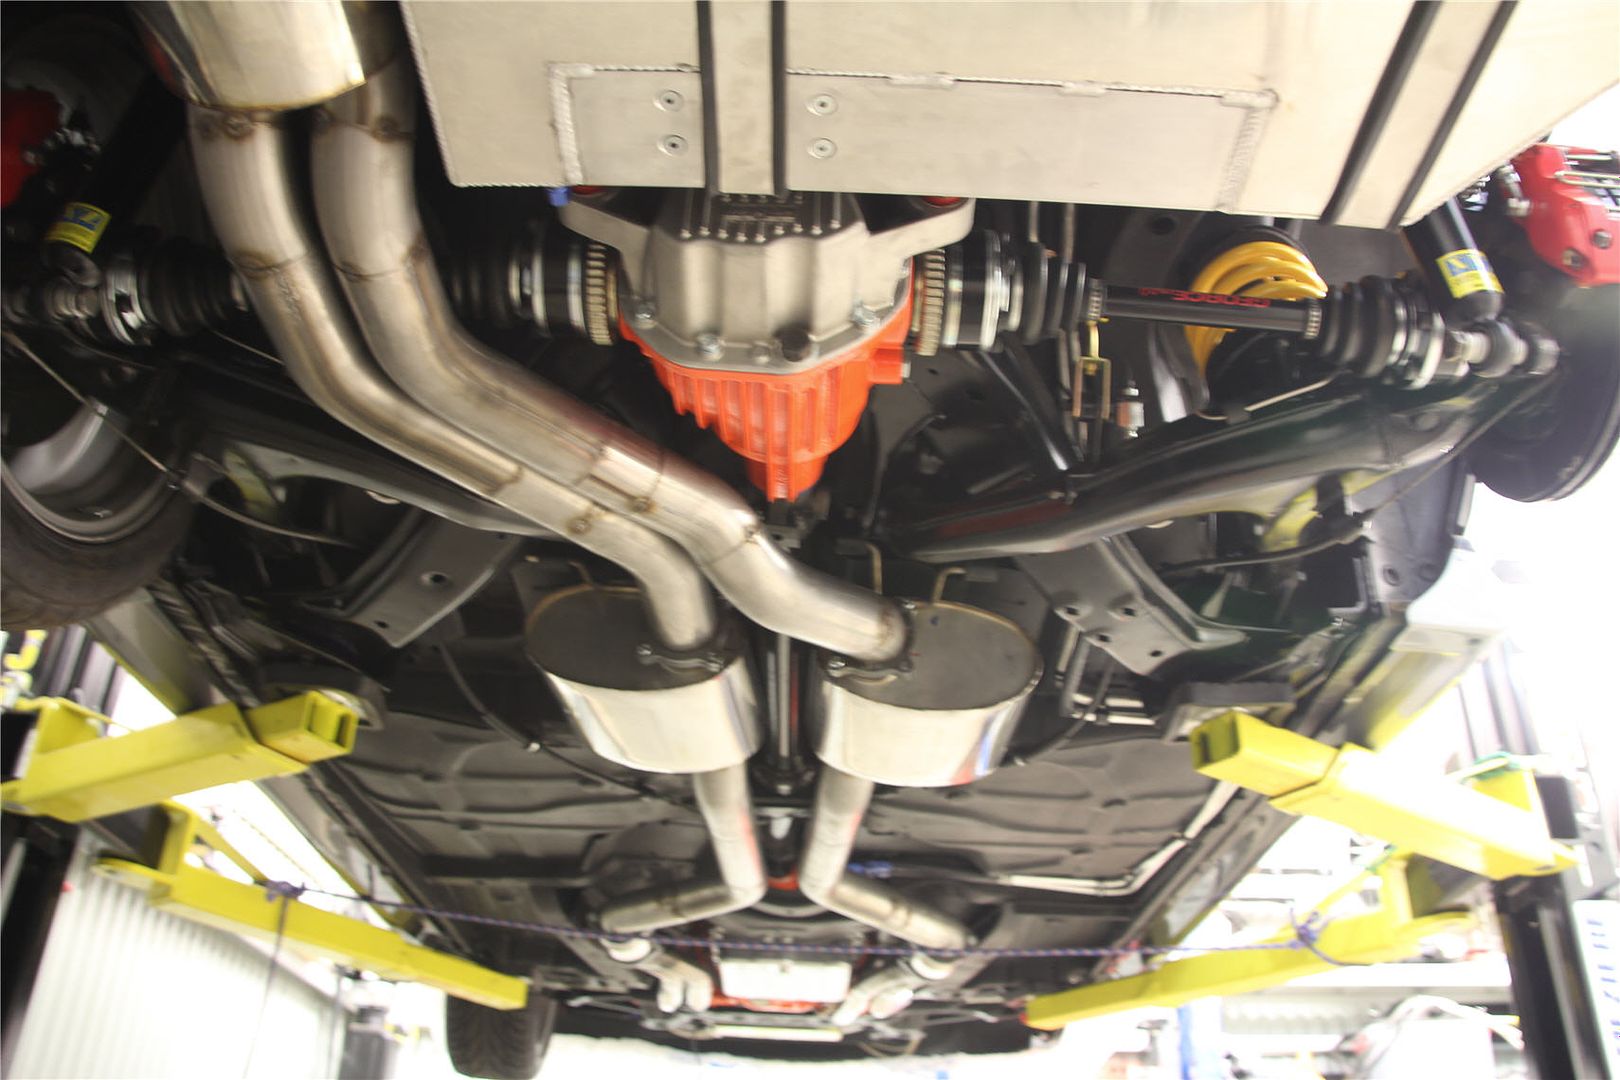
Posts: 5 777I fabricated my full exhaust system from the collectors back that’s actually why I bought the tig, I got stupid quotes and had always wanted to have a go at tig, my grandfather taught me how to oxy weld, I find it very similar tbh. I didn’t bother purging that although I had read about it. It is a road car after all and I am not chasing the last 1 or 2 killawasps
 December 13, 2015 at 6:00 pm #12135
If it’s 400 series I don’t bother with Purging it seems fine, 300 is another story, inside of the weld ends up looking like it’s sugar coated..
December 13, 2015 at 8:55 pm #12147
VRSenator065Participant- Adelaide SA
- VR Senator LSx454 1960 Kombi (project) 1921 Nash Hot Rod (future project)
View build HERE
Posts: 5 777Yea mine was 409, so pretty magnetic, which I have to say made it easier.
December 13, 2015 at 9:41 pm #12148I did the Headers on the Lexcen out of 409, may as well be rust free Mild Steel it’s so easy to work with!
December 14, 2015 at 5:53 am #12151I did the Headers on the Lexcen out of 409, may as well be rust free Mild Steel it’s so easy to work with!
where do you get 409 from? My local steel shop only has 316
December 14, 2015 at 8:19 am #12154I did the Headers on the Lexcen out of 409, may as well be rust free Mild Steel it’s so easy to work with!
where do you get 409 from? My local steel shop only has 316
Just bought a DiY Header kit from Difillipo’s Ben, awesome value with LOTS of bends!
December 14, 2015 at 9:13 am #12155
VRSenator065Participant- Adelaide SA
- VR Senator LSx454 1960 Kombi (project) 1921 Nash Hot Rod (future project)
View build HERE
Posts: 5 777Yep I got mine from DiPhillipo. I actually did a full detailed write up summary of the exhaust fab back at post #475 page 4 of the build. http://www.commodoresplus.com.au/forums/topic/vr-senator-with-lsx454/page/4/ One of the benefits of using 409 is its magnetic, which makes it easier for holding it together, as IJ says its so easy to work with. the downside is that it doesn’t polish up like 316, so if you want that chrome look its not the go.
December 14, 2015 at 12:55 pm #12158
VRSenator065Participant- Adelaide SA
- VR Senator LSx454 1960 Kombi (project) 1921 Nash Hot Rod (future project)
View build HERE
Posts: 5 777One set of Uscar connectors for the injectors ordered, my mates also sorted to help across the Xmas break to rewire them, that should tidy it up quite a bit.
December 14, 2015 at 8:40 pm #12166One set of Uscar connectors for the injectors ordered, my mates also sorted to help across the Xmas break to rewire them, that should tidy it up quite a bit.
are you have a LS wiring harness with ev1 plugs ??
I got USCAR plugs fitted to my harness when I got it made to get rid of them stupid adapters that can only cause problems
fitting the plugs is easy as, just like fitting any plug witch is pretty straight foward, I was goin to do it my self before I decided to go with LS PCM
December 15, 2015 at 8:39 am #12184Thanks guys, good to know a source of the pipe and bends.
December 15, 2015 at 10:14 am #12186
VRSenator065Participant- Adelaide SA
- VR Senator LSx454 1960 Kombi (project) 1921 Nash Hot Rod (future project)
View build HERE
Posts: 5 777[quote=12158]are you have a LS wiring harness with ev1 plugs ??
Yes, in my case the adapters just make everything so bulky, and my injectors angle into each other from the individual runners so there is little room with adapters fitted if that makes sense so it is all a bit messy.
The loom to the injectors from day 1 tbh is not the prettiest I have ever seen either so we will take the time to make it much neater. I actually wanted it to run under the manifold then come up between the runner to the injectors. In my experience, neater with electrical/electronics means more reliable which is a bonus. I could do it myself no probs, I have an electronics trade but Mike my friend is an auto elec so the two of us will just do it so much easier, he has a bit more auto specific gear than me.
Thanks guys, good to know a source of the pipe and bends.
Easy as, I wont lie I wasn’t overly impressed with the follow up service when I rang DiPhillipo and asked some questions whilst making mine, but I might have just caught them on a bad day.
-
This reply was modified 8 years, 5 months ago by VRSenator065.
December 15, 2015 at 6:19 pm #12199Yeah under the runners is the go
I have done that on myn And made it 100% neater
yeah good help is always good exspecially with little fiddle wires that you need to hold while soldering the ends on end and then need to hold solder gun and solder witch means you need 3 arms
hay what size wire you got from alternator back to where your big wire from battery is under dash ??
December 15, 2015 at 6:55 pm #12200
VRSenator065Participant- Adelaide SA
- VR Senator LSx454 1960 Kombi (project) 1921 Nash Hot Rod (future project)
View build HERE
Posts: 5 777hay what size wire you got from alternator back to where your big wire from battery is under dash ??
Not sure mate tbh, is it something I should look at?
December 15, 2015 at 7:55 pm #12201
ImmortalityParticipant- 97 HSV Senator 185i 02 VX L67 Calais
View build HERE
Posts: 535Yes. Did you upgrade the cable size from what was originally used as the charge cable from the alternator to battery? The original alternator was probably an 85amp unit and the charge cable is really only designed to handle that load. Running a larger alternator at higher loads could very well see voltage drops across the cable as it gets to hot.
December 15, 2015 at 8:04 pm #12202
VRSenator065Participant- Adelaide SA
- VR Senator LSx454 1960 Kombi (project) 1921 Nash Hot Rod (future project)
View build HERE
Posts: 5 777Thanks for that Pete. When my mates ovef at Xmas its one of the things on the list.
-
AuthorPosts

You must be logged in to reply to this topic.
