
Home›Forums›Members’ Builds and Rides›VN – VP – VR – VS›VR Senator with LSx454
This topic has been reported for inappropriate content
This topic contains 2,102 replies, has 82 voices, and was last updated by ![]() VRSenator065 2 years, 11 months ago.
VRSenator065 2 years, 11 months ago.
-
AuthorPosts
-
February 18, 2015 at 1:53 am #447

VRSenator065Participant- Adelaide SA
- VR Senator LSx454 1960 Kombi (project) 1921 Nash Hot Rod (future project)
View build HERE
Posts: 5 777
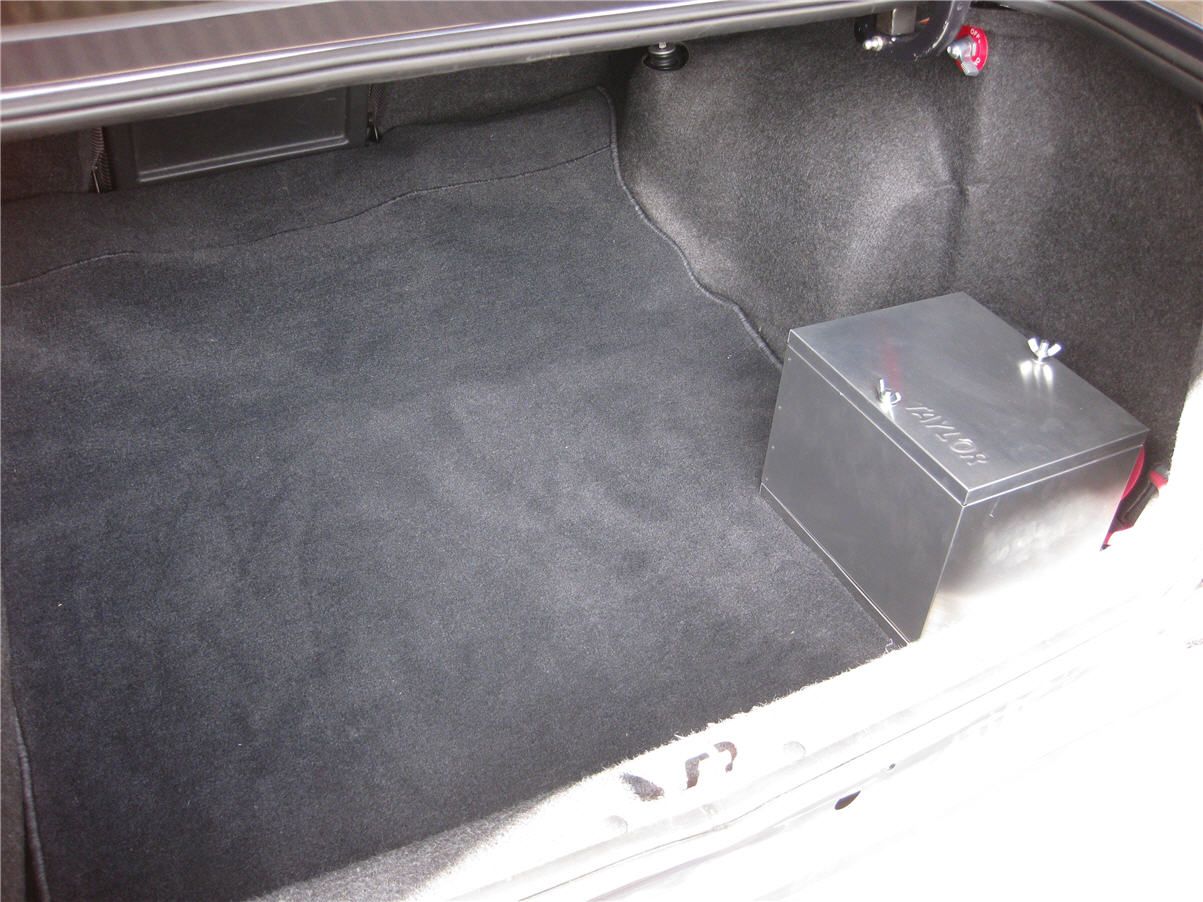
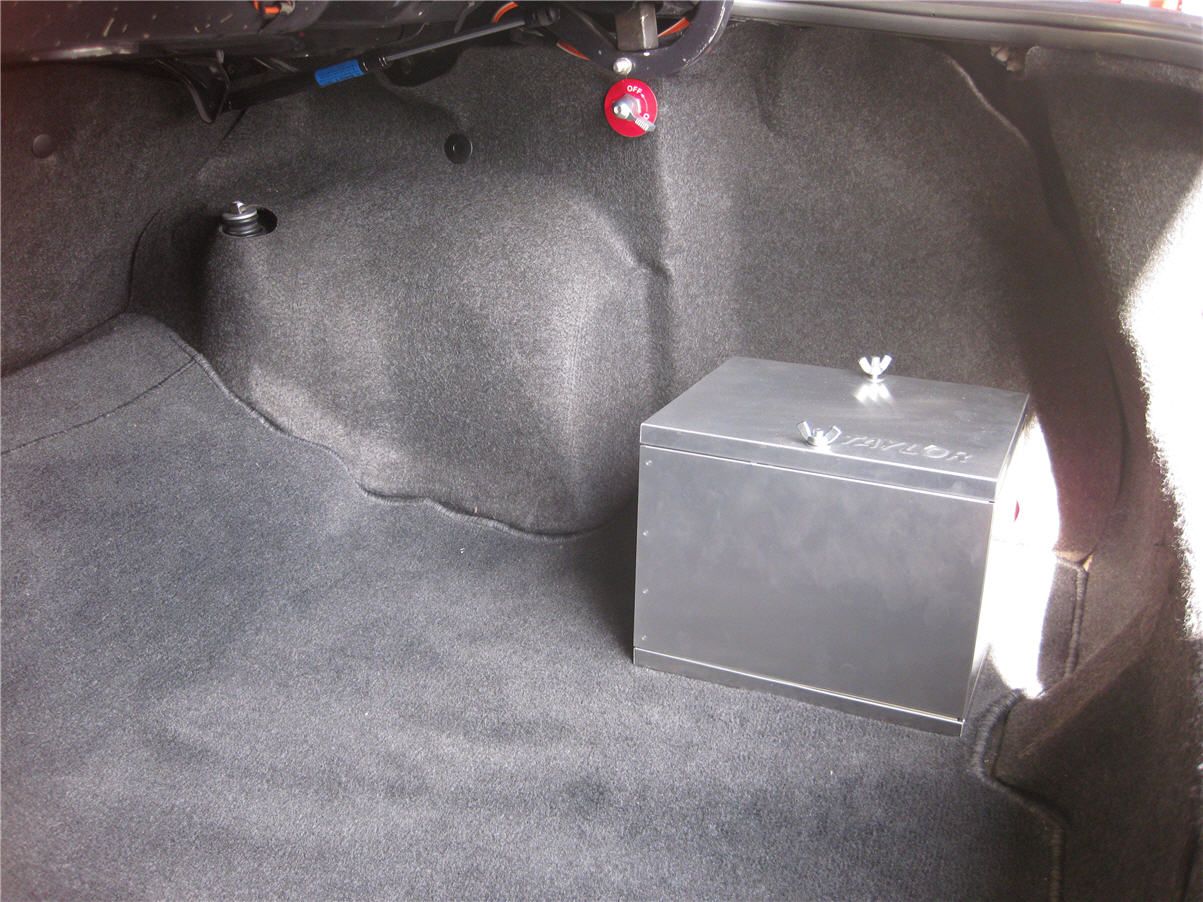
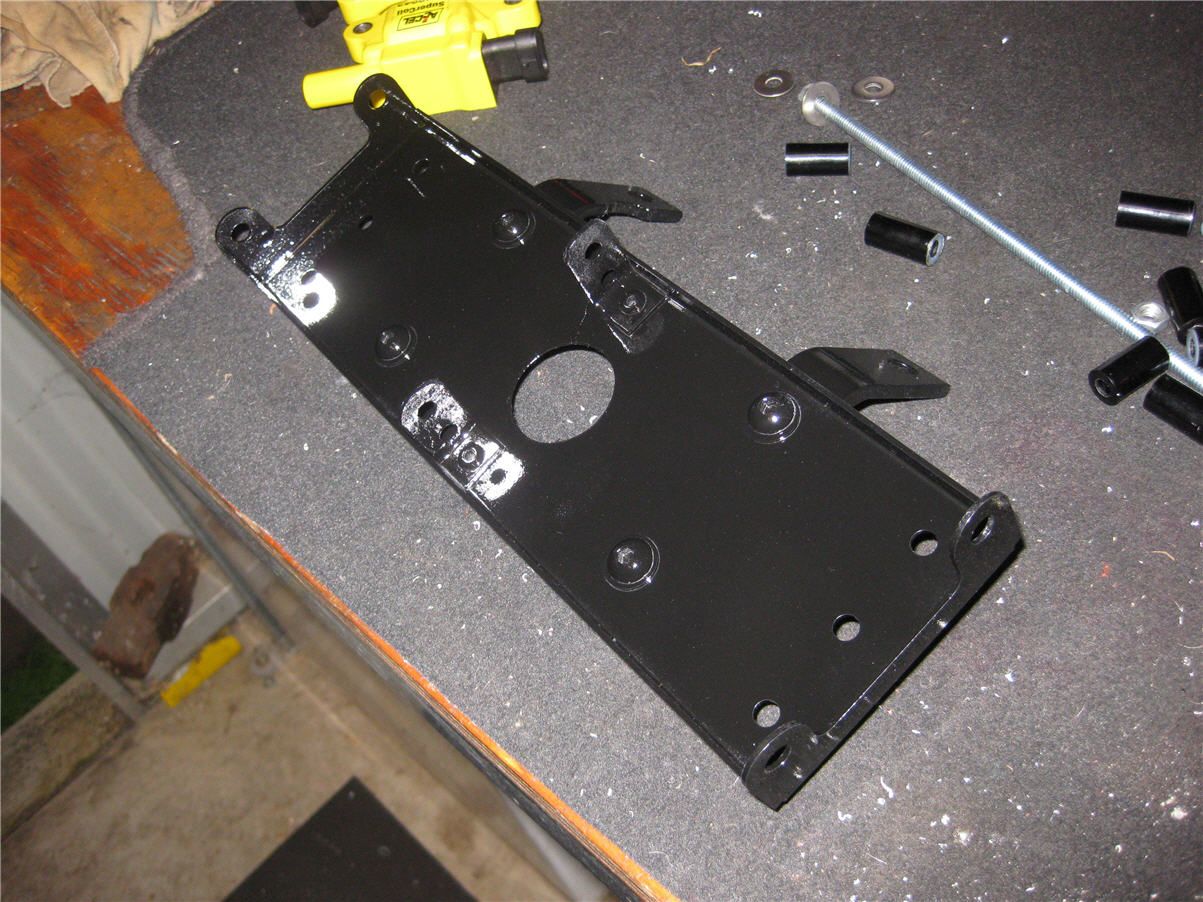
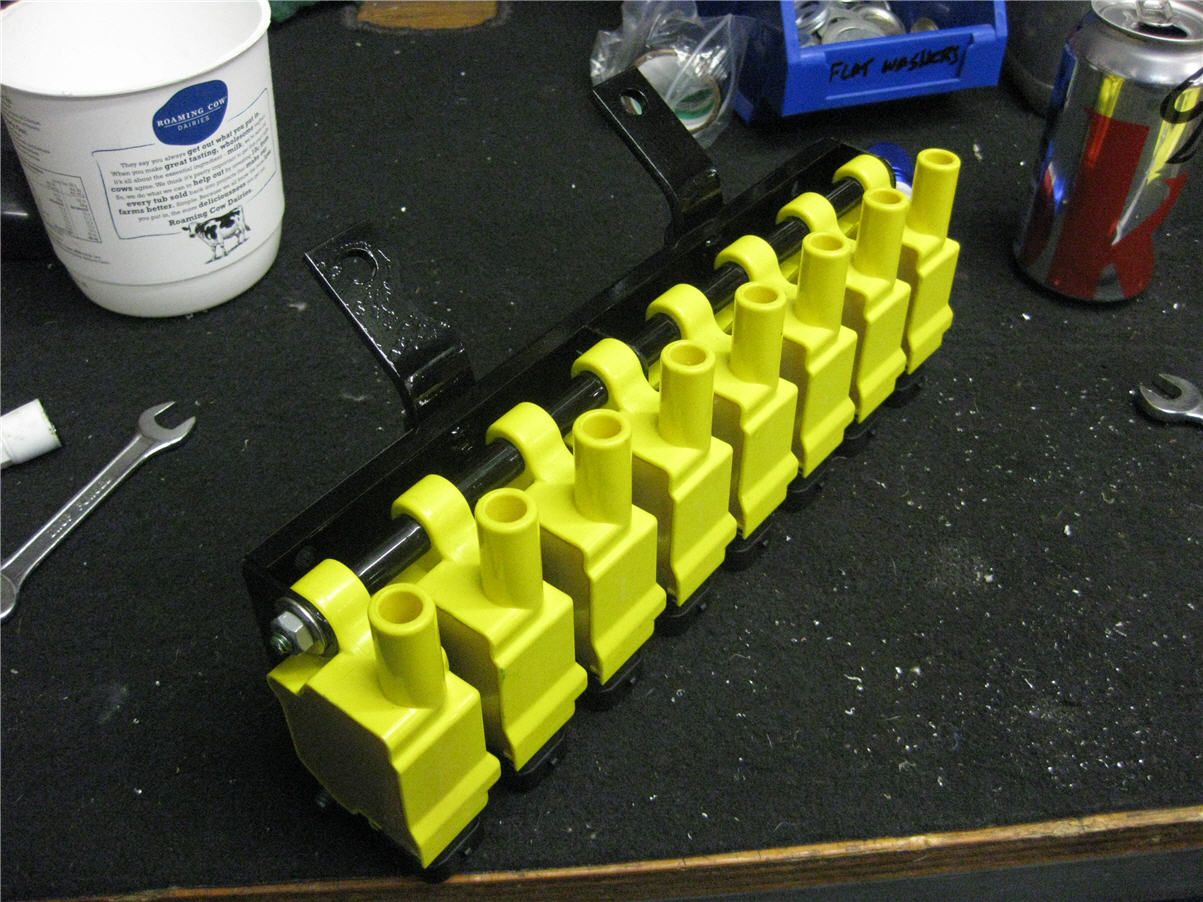
Got the battery relocation totally finished. Thought I would post some pics of it completely done, that’s with all the ends crimped and I used some heat shielded flexible tubing where it goes across to the starter.
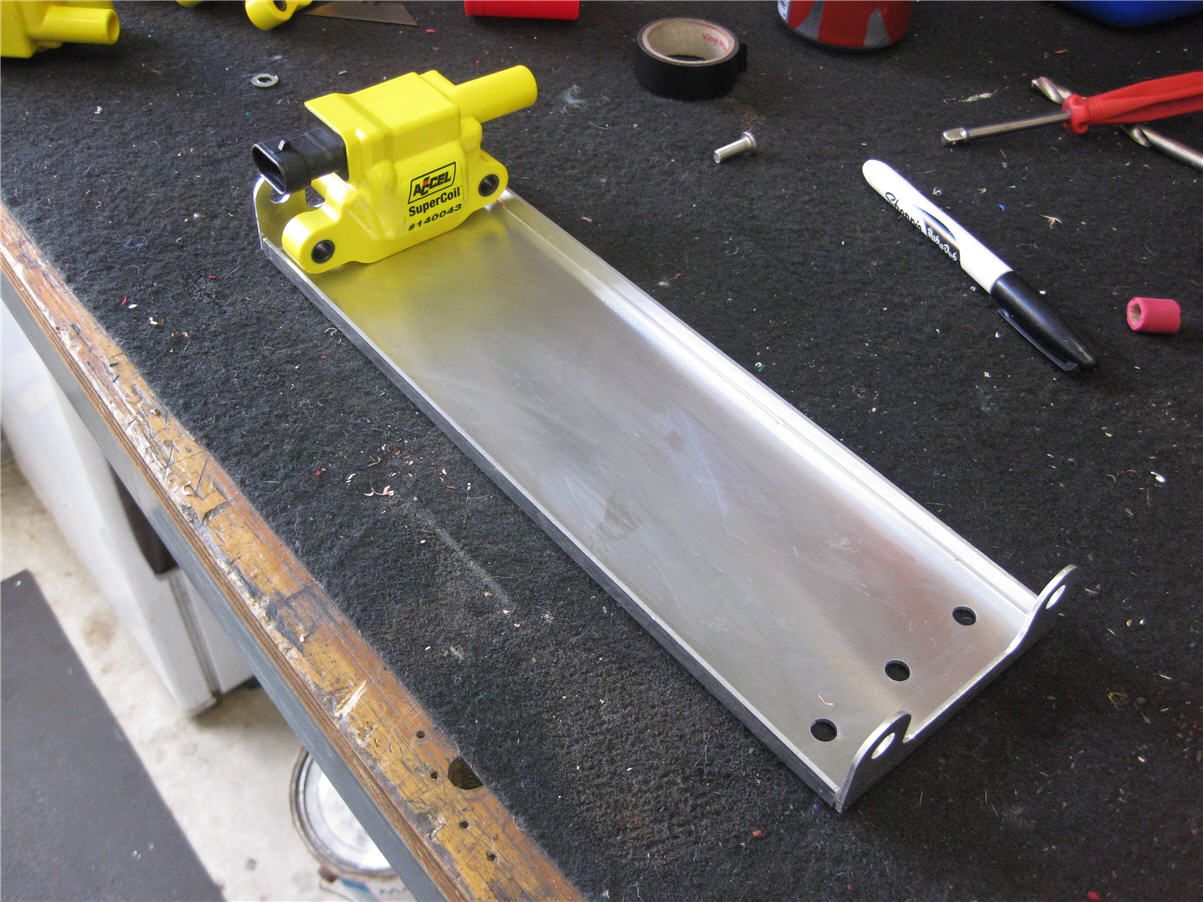
Also got the coil packs all mounted, I like the way its turned out. Got a nice set of Accel leads but tonight went to fit them and I think they have supplied the wrong style. Oh well poop happens I guess.
 February 18, 2015 at 1:53 am #448
VRSenator065Participant- Adelaide SA
- VR Senator LSx454 1960 Kombi (project) 1921 Nash Hot Rod (future project)
View build HERE
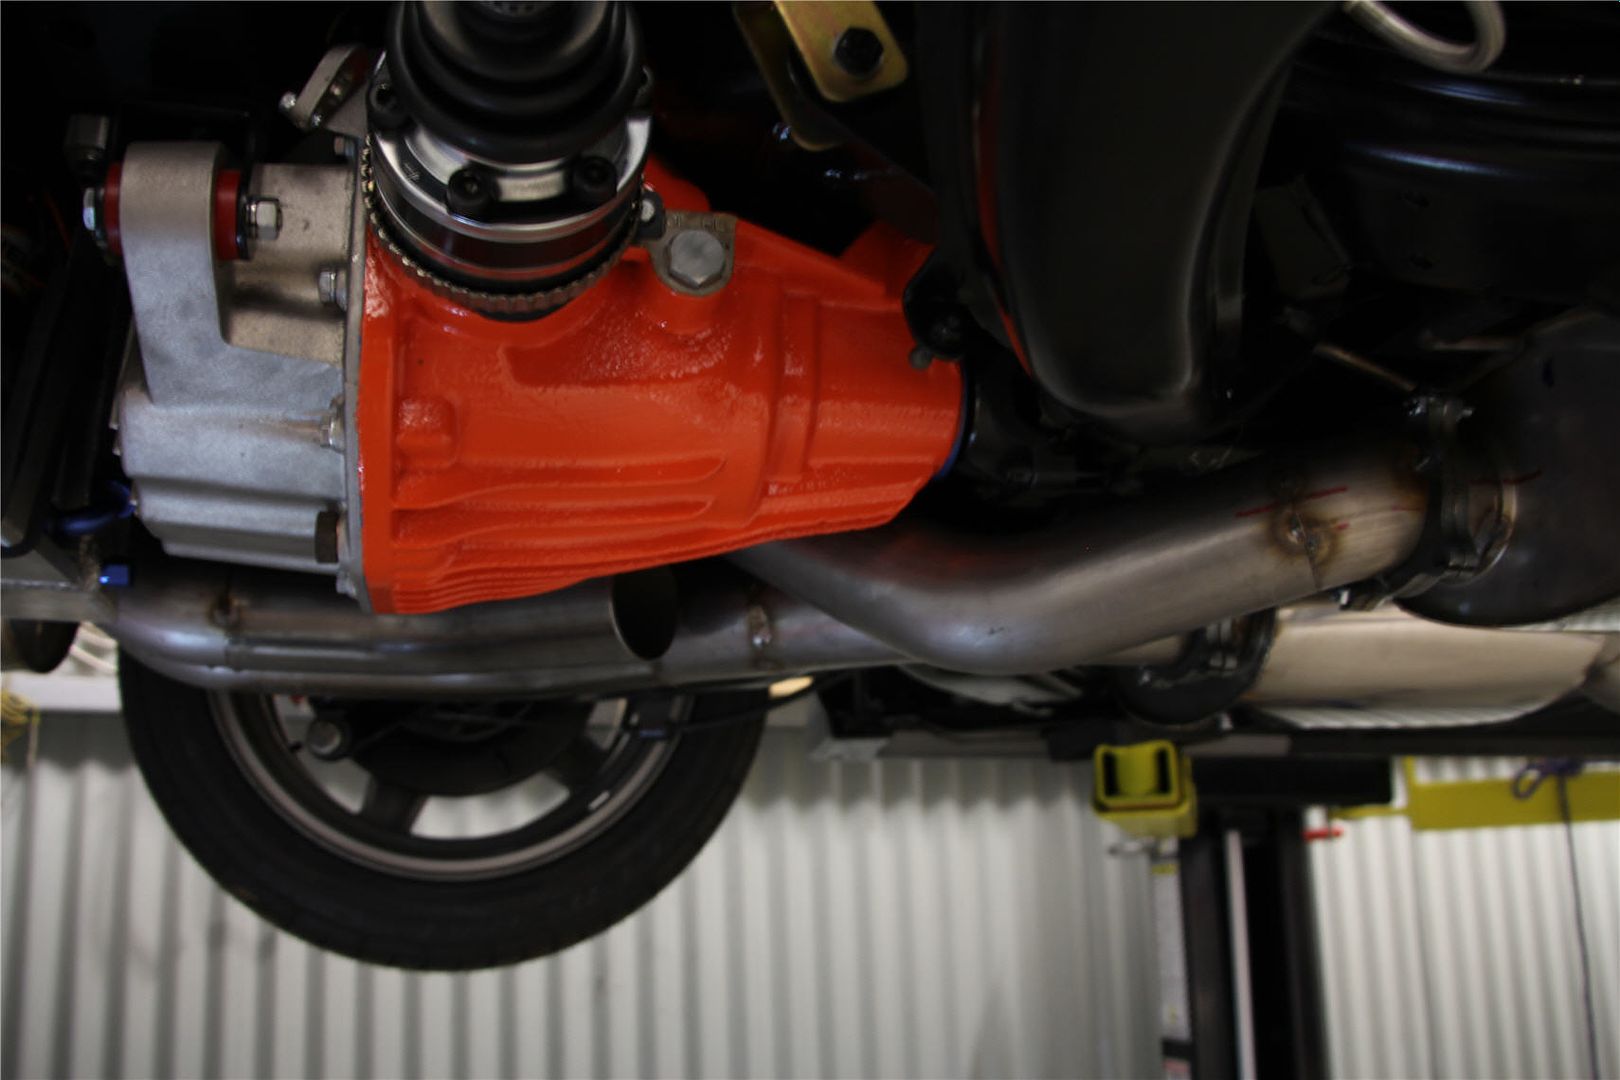
Posts: 5 777Well, to say I am peaking is an understatement, just dropped them on for now, enjoying a nice beer with my lad just looking at them. I just think it looks so tough, that poor gearbox!!
 February 18, 2015 at 1:54 am #449
VRSenator065Participant- Adelaide SA
- VR Senator LSx454 1960 Kombi (project) 1921 Nash Hot Rod (future project)
View build HERE
Posts: 5 777February 18, 2015 at 1:54 am #450
VRSenator065Participant- Adelaide SA
- VR Senator LSx454 1960 Kombi (project) 1921 Nash Hot Rod (future project)
View build HERE
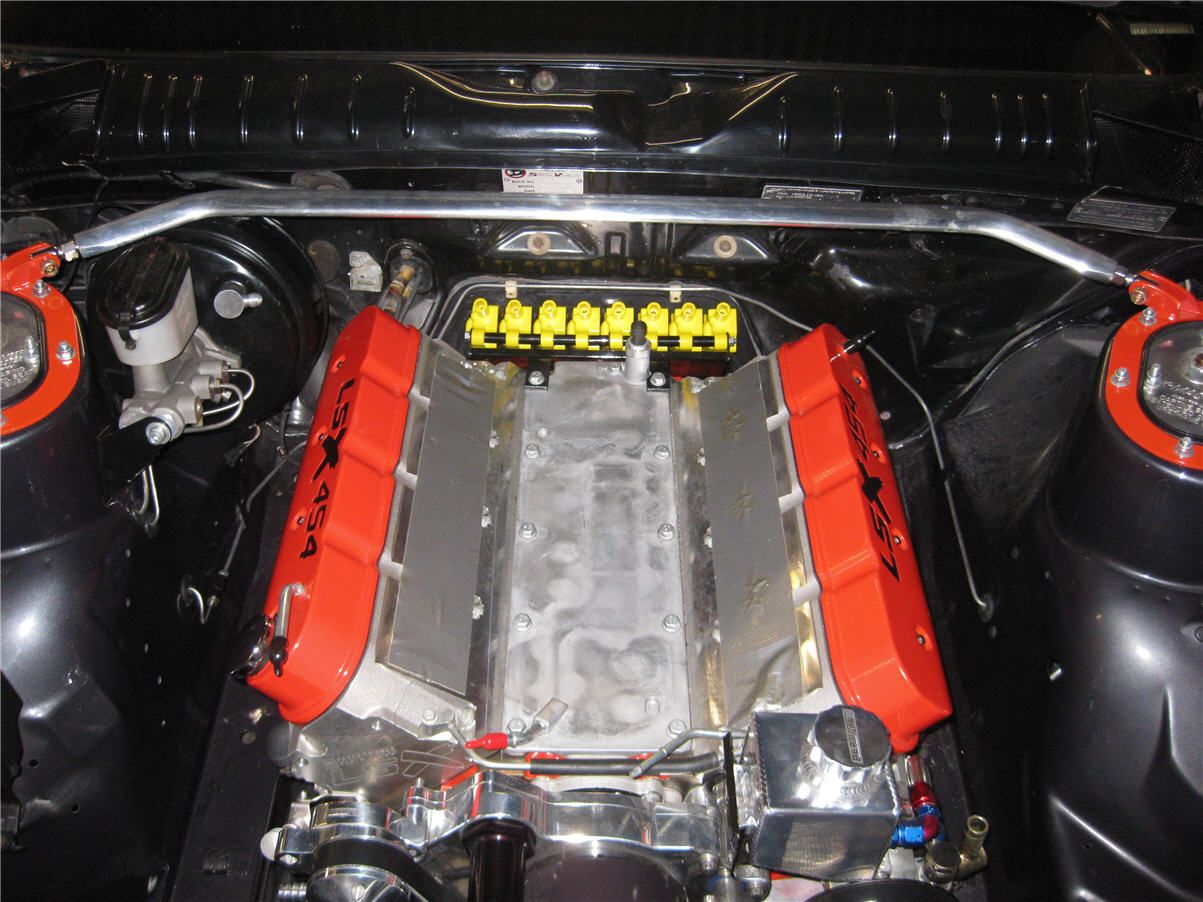
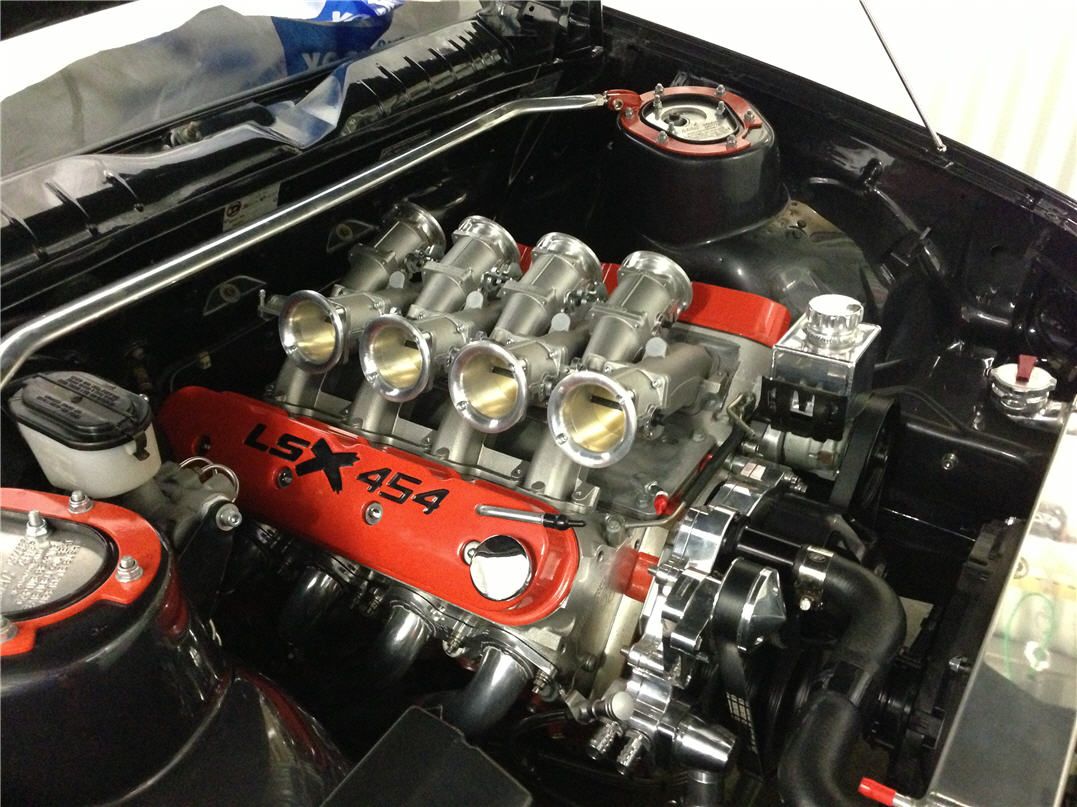
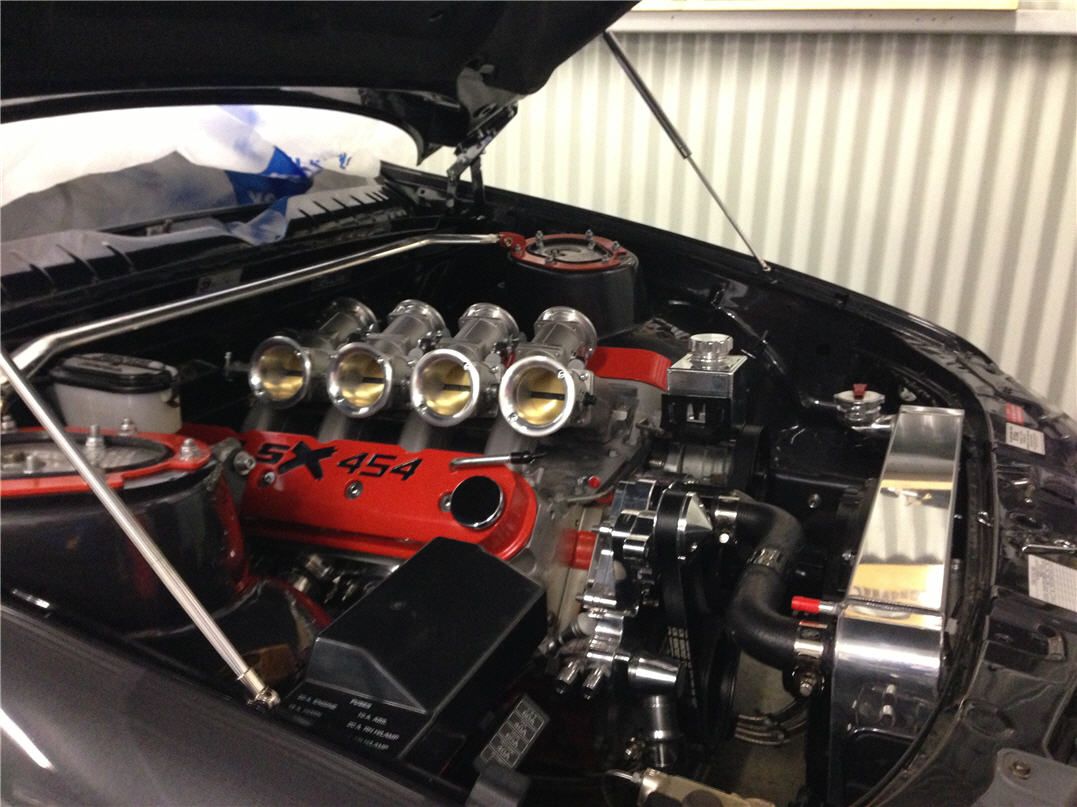
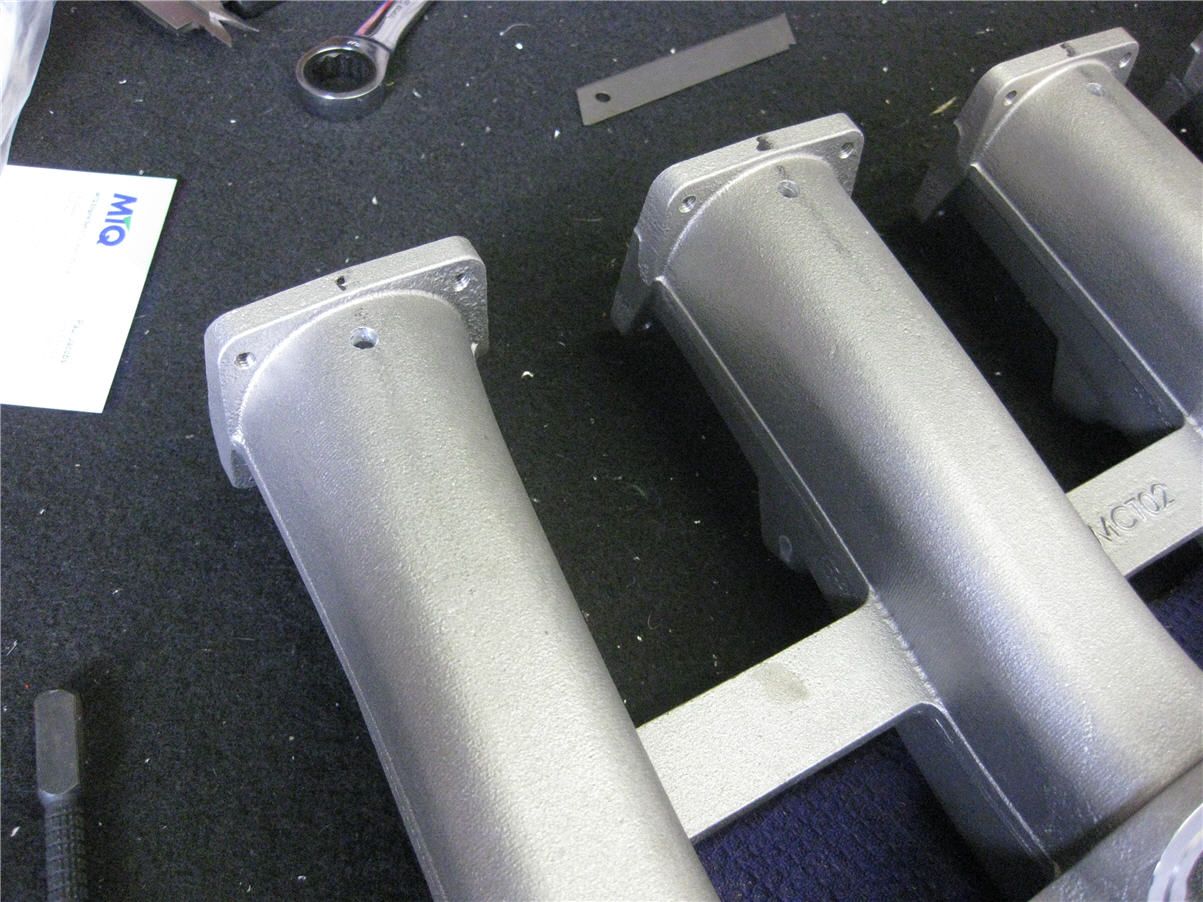
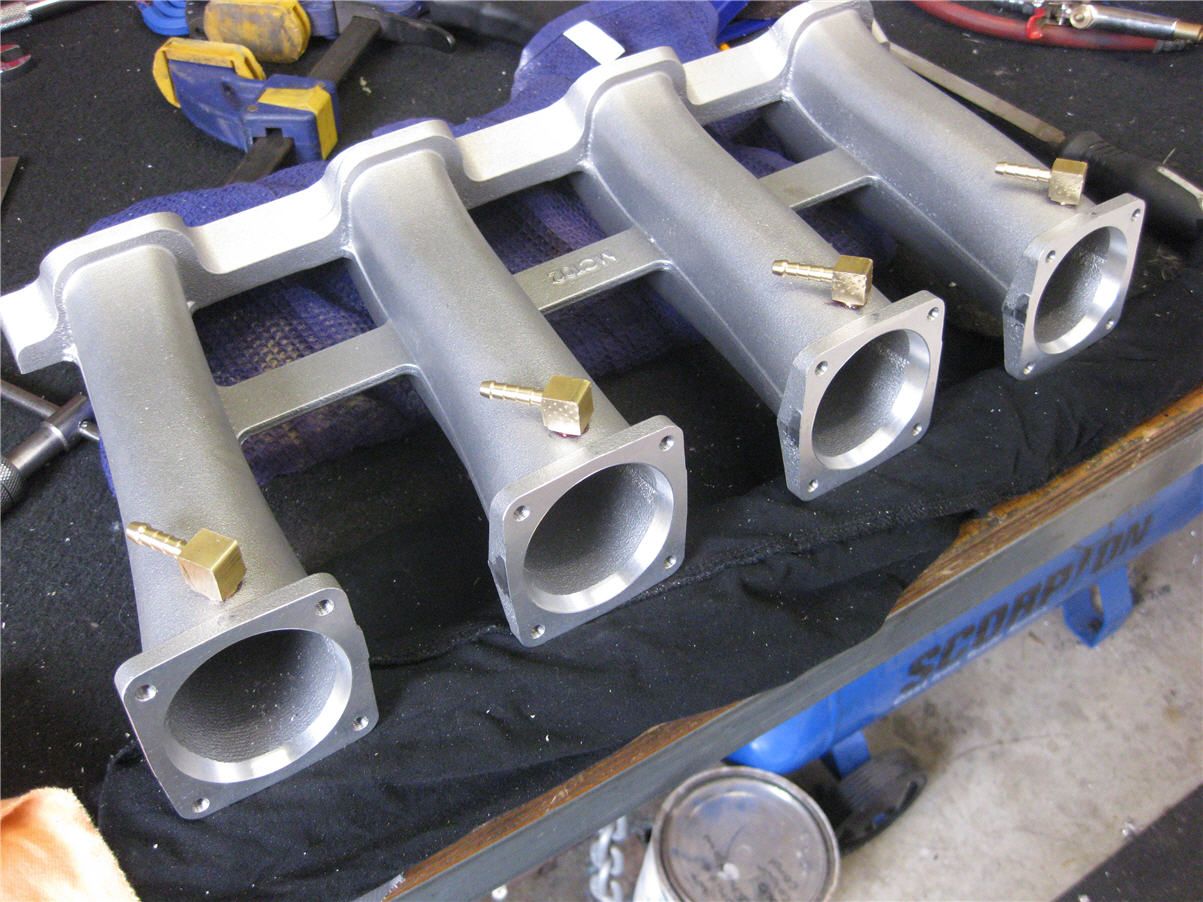
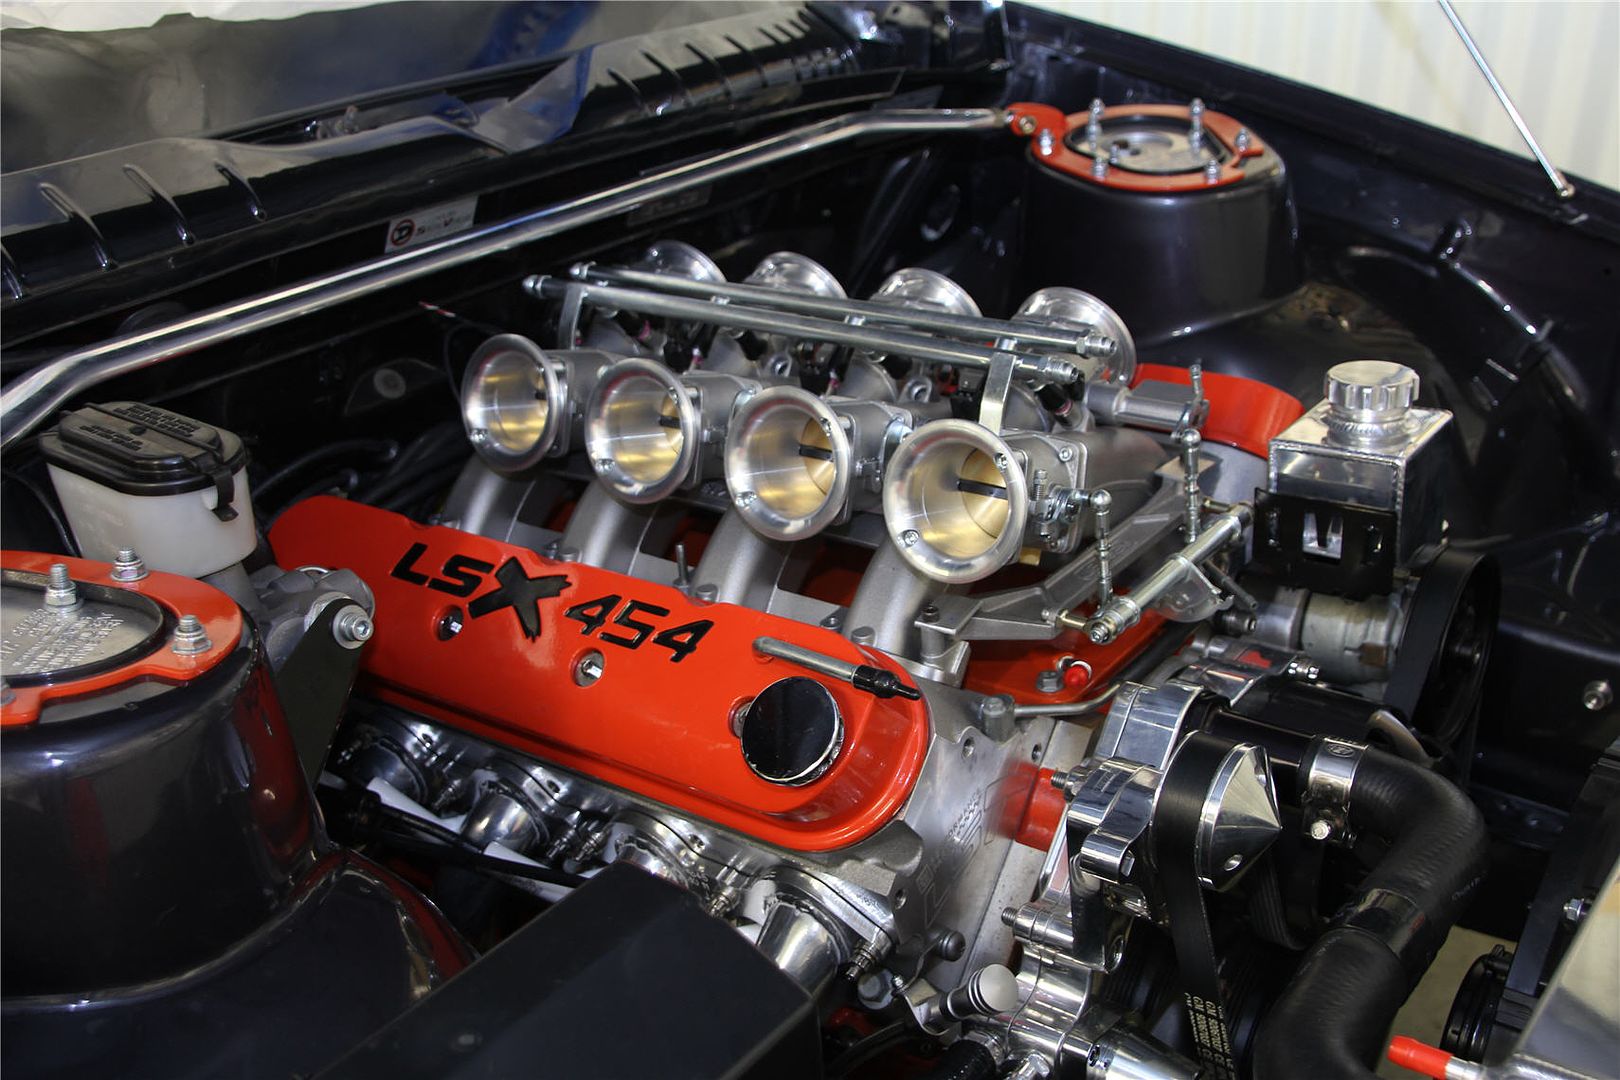
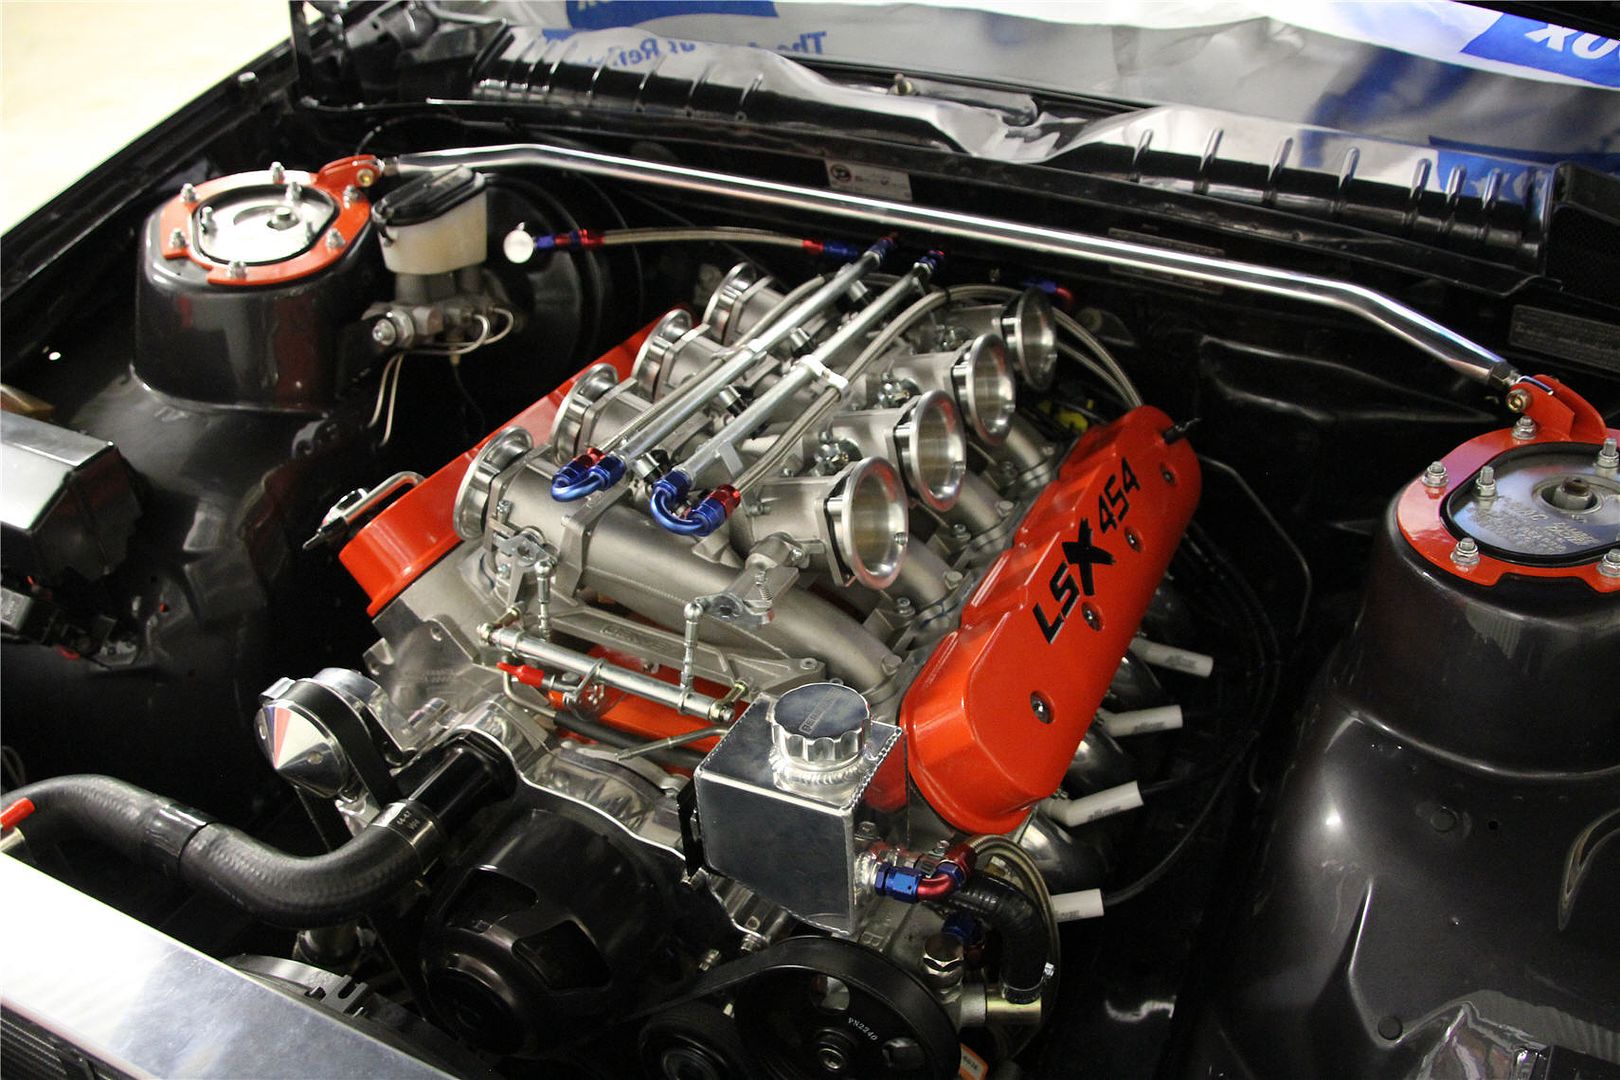
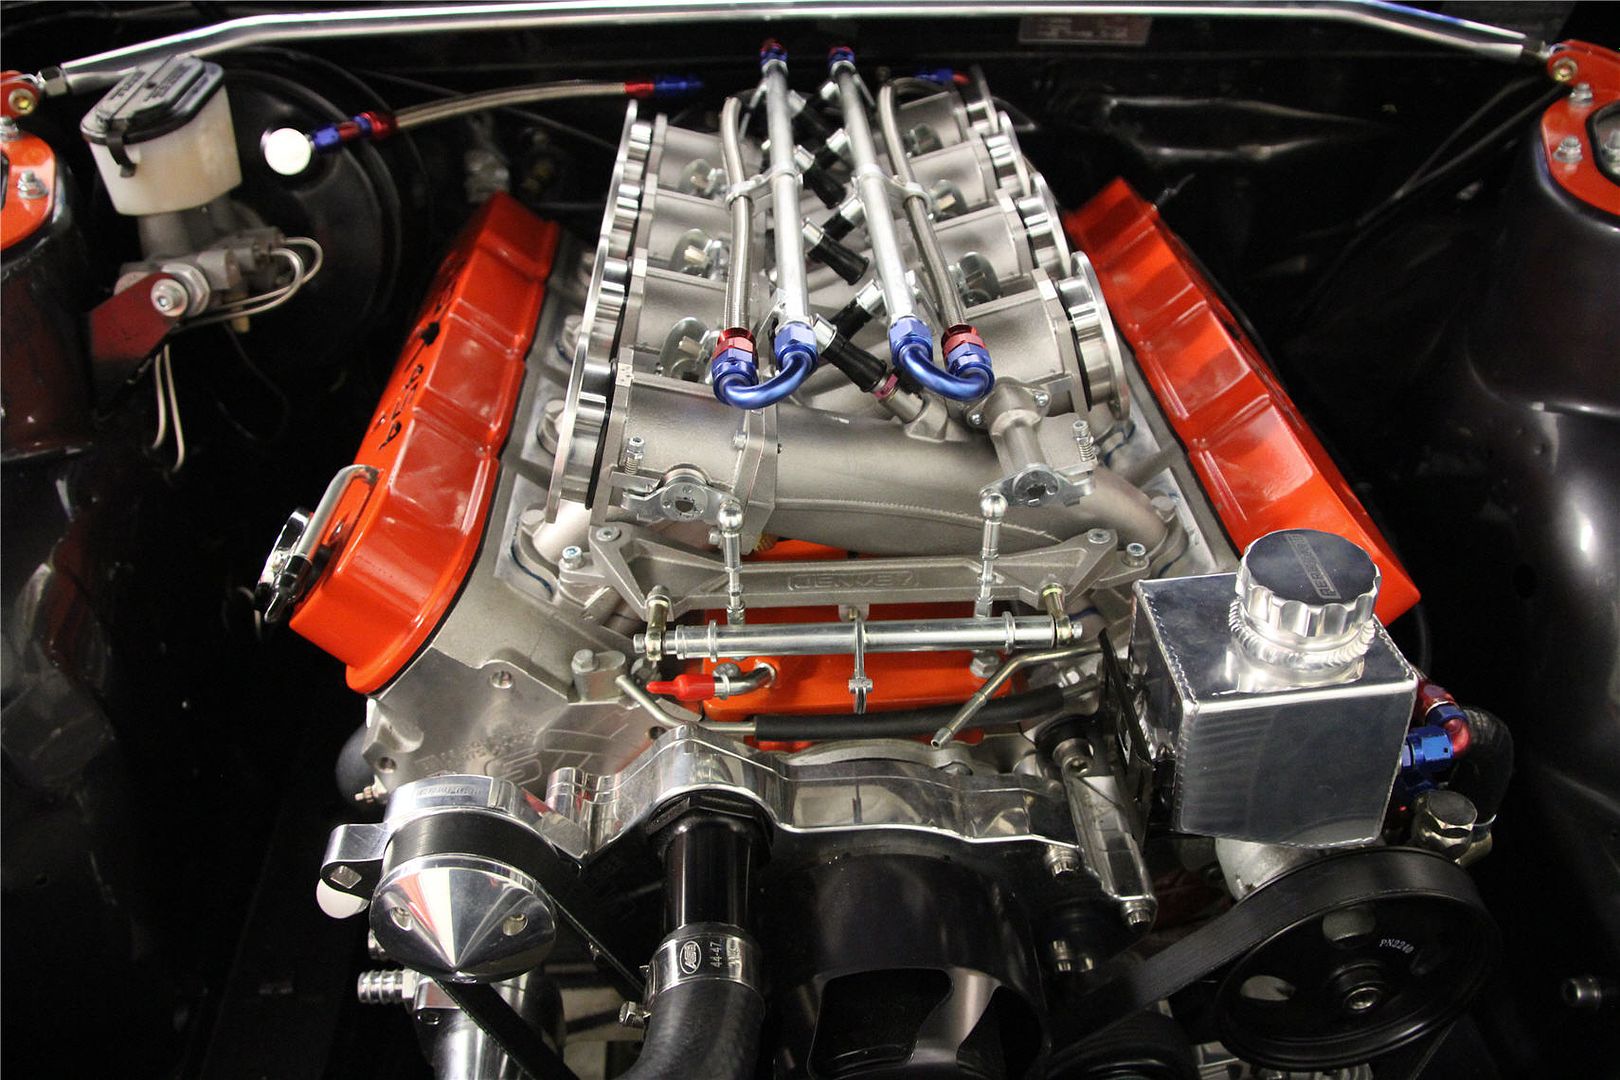
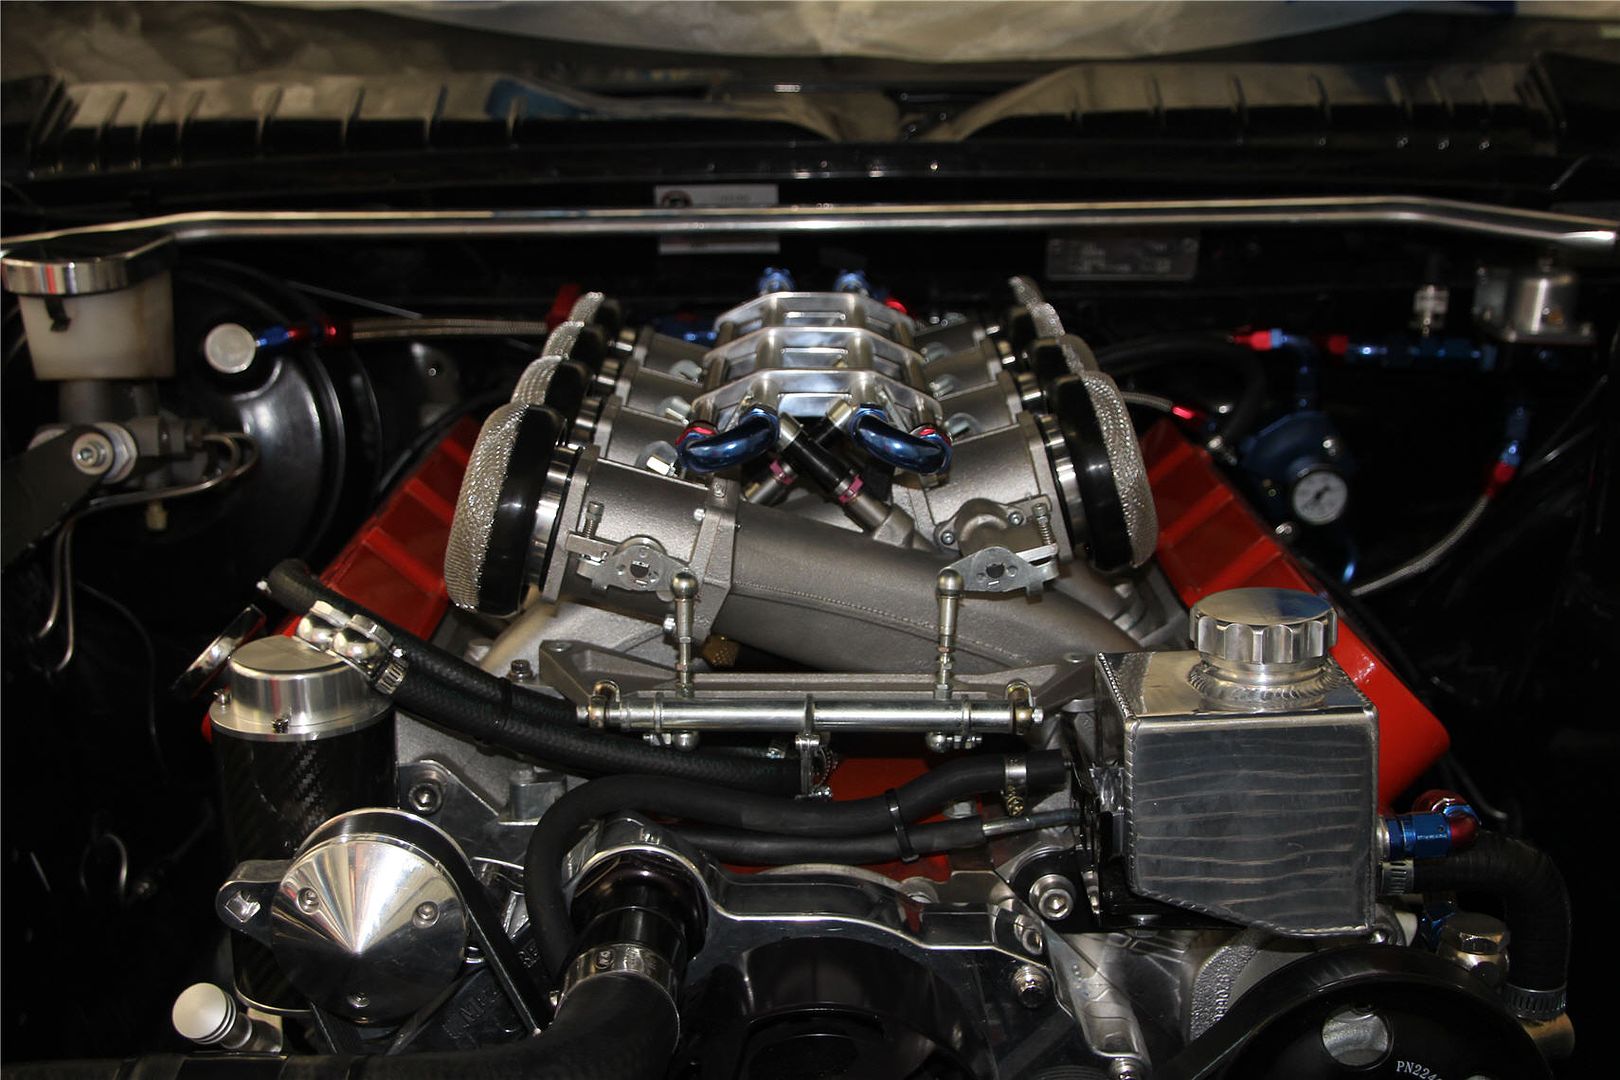
Posts: 5 777Had a good week end, first chance to post. First things first, had a really good look at both ways and have decided to go with the aluminium trumpets. I just prefer it, although the cf looks nice too. I am going to keep the cf, so I could change them for a display at a show or something.
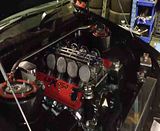
Got all the plug leads made and fitted up, bit of a false start as the set I was given weren’t suited to the coil packs, so I had to get some different ends and boots. All good though, really happy with how that’s all worked out, the coil packs are tucked away nicely.
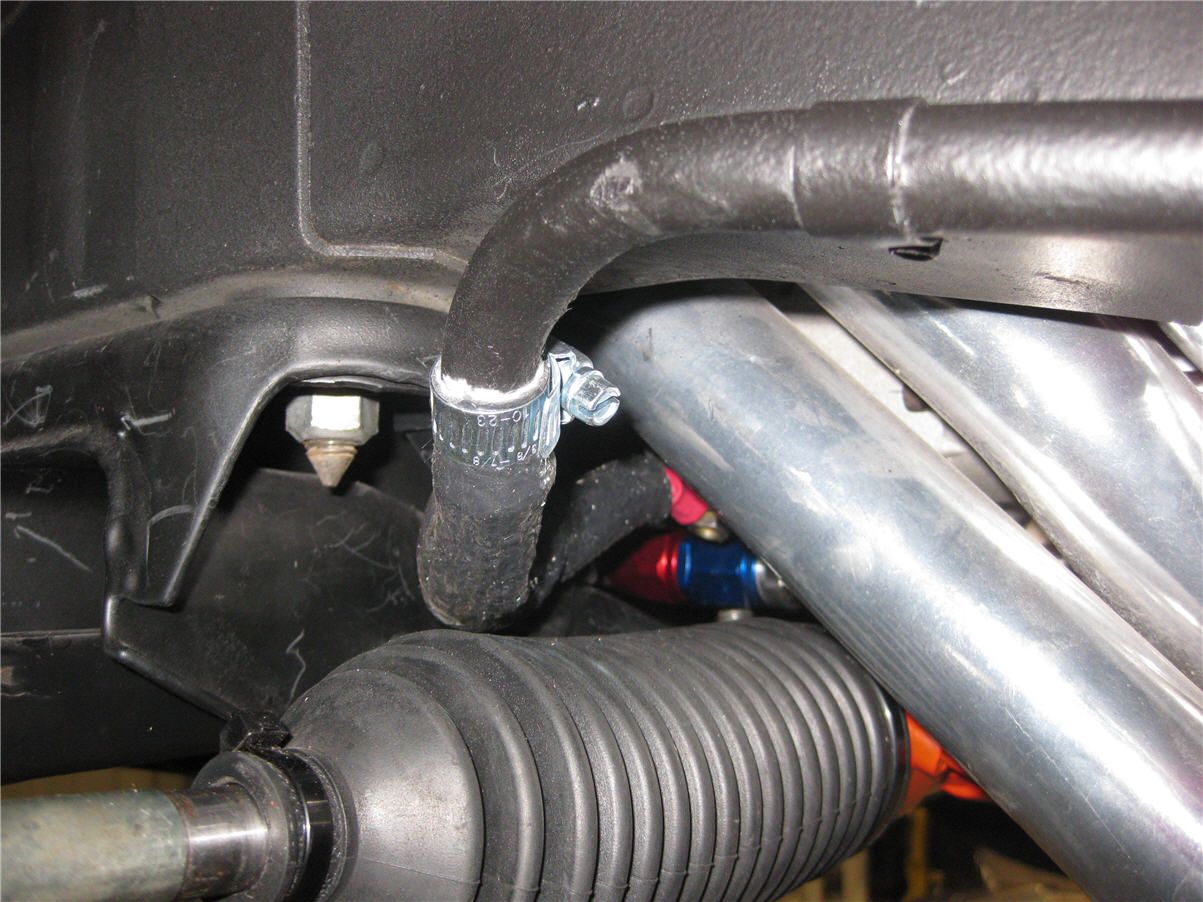
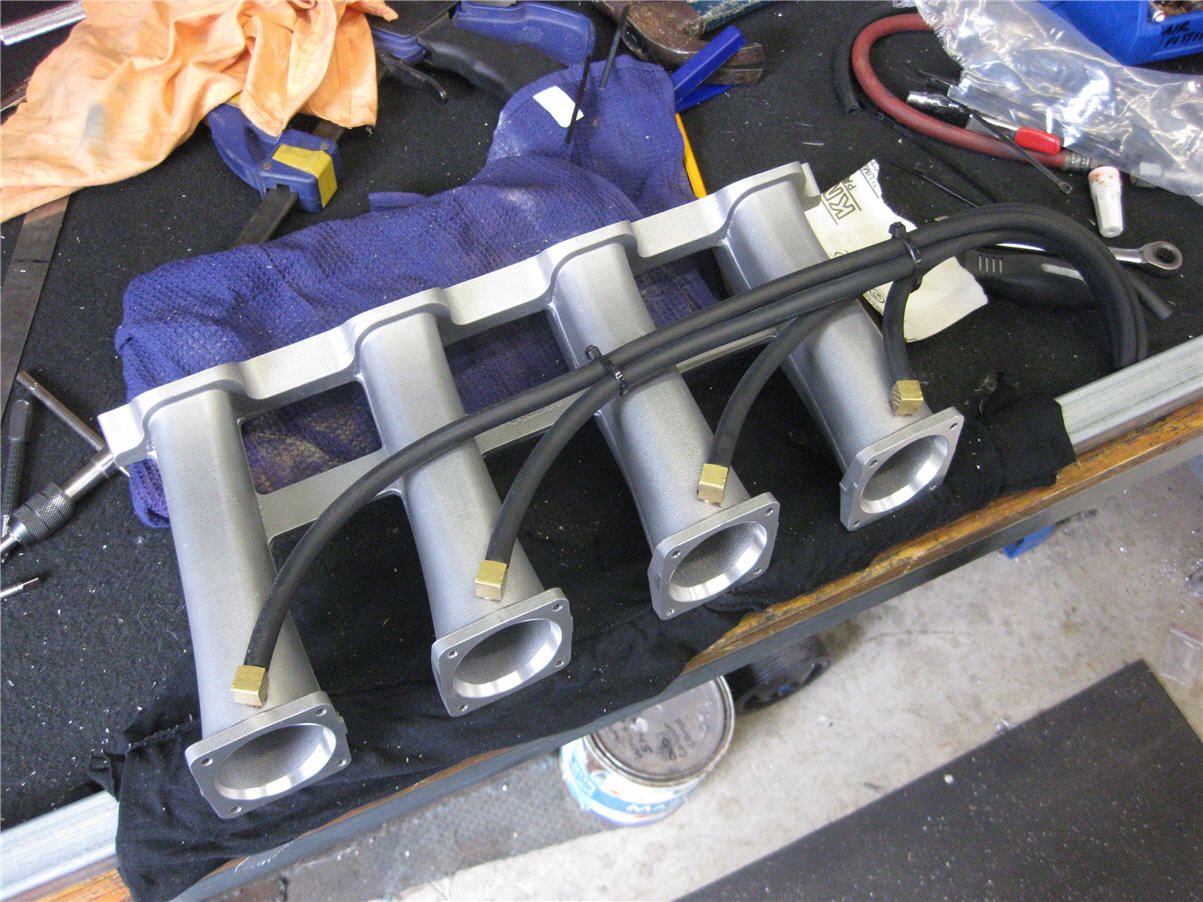
Big job was the vacuum for the manifold. As its a racing set up its not made for vacuum for brake boost. I spoke to Mike Jenvey and came up with a good layout. I probably could have got away with only drilling and tapping one runner but this way I get a nice even vacuum. I wont know if I need an auxiliary tank until its all running. My guess is with the standard cam in it I should be OK, if I go a bit more aggressive we will see. Going to run a rectangular log manifold across behind the injection, with a 6AN fitting on the end for the booster hose. Would be lying if I said I wasn’t shitting pellets when i was marking out where to drill and tap, must have checked and double checked it 4 or 5 times. Pretty happy with how neat it all worked out.
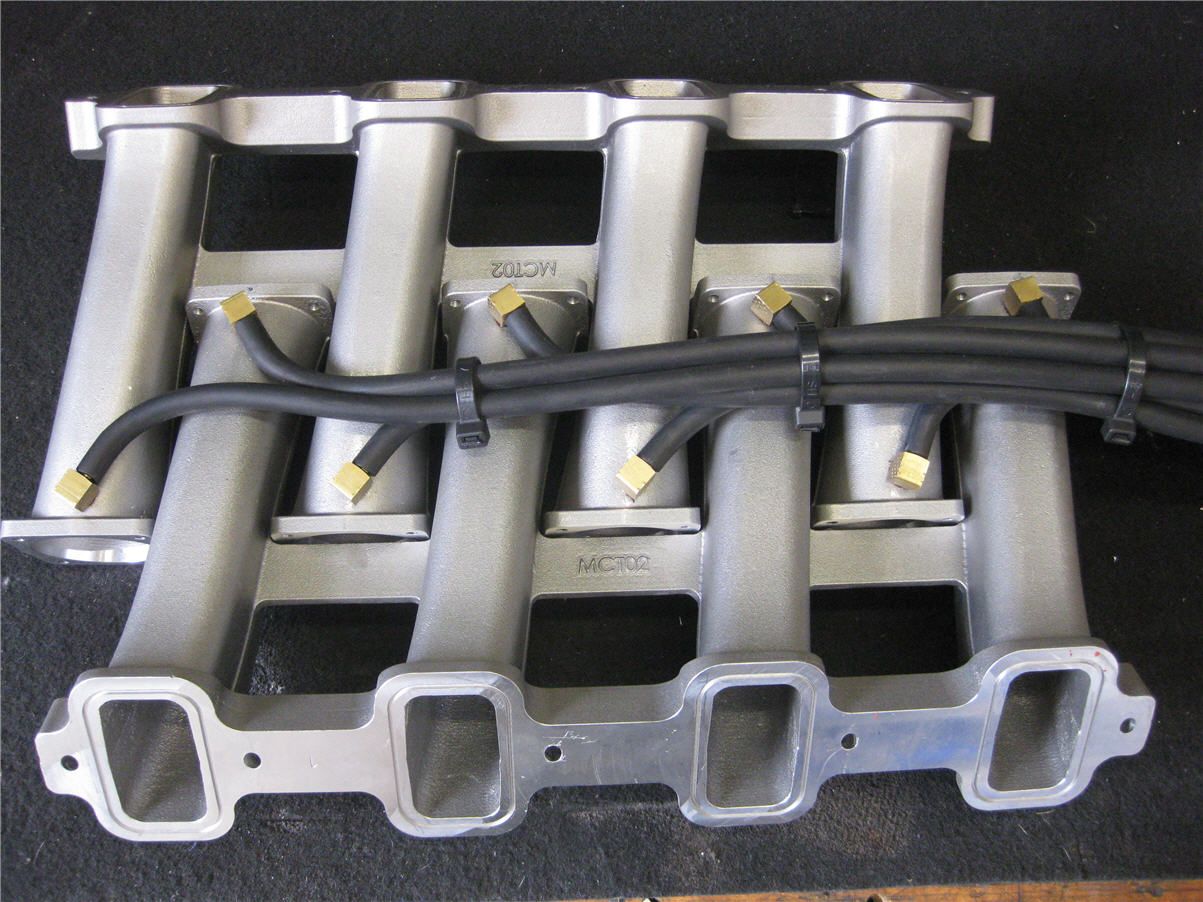
And this is how it looks in position, haven’t got the rear manifold yet, but once it arrives should be pretty straight forward to plumb up.
Just working through all the fuel fittings, think I have worked out a nice way to do them, hopefully I get that stuff by the week end for a bit of a go at it, may have the fuel tank by then also.
February 18, 2015 at 1:55 am #452
VRSenator065Participant- Adelaide SA
- VR Senator LSx454 1960 Kombi (project) 1921 Nash Hot Rod (future project)
View build HERE
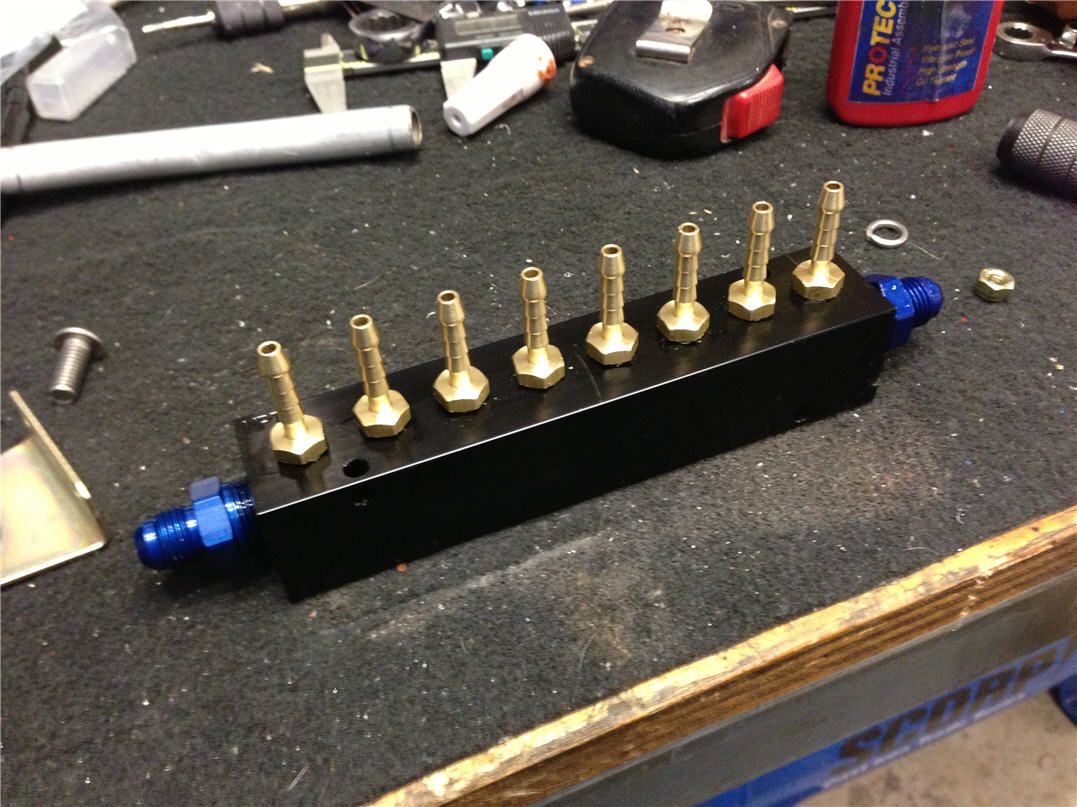
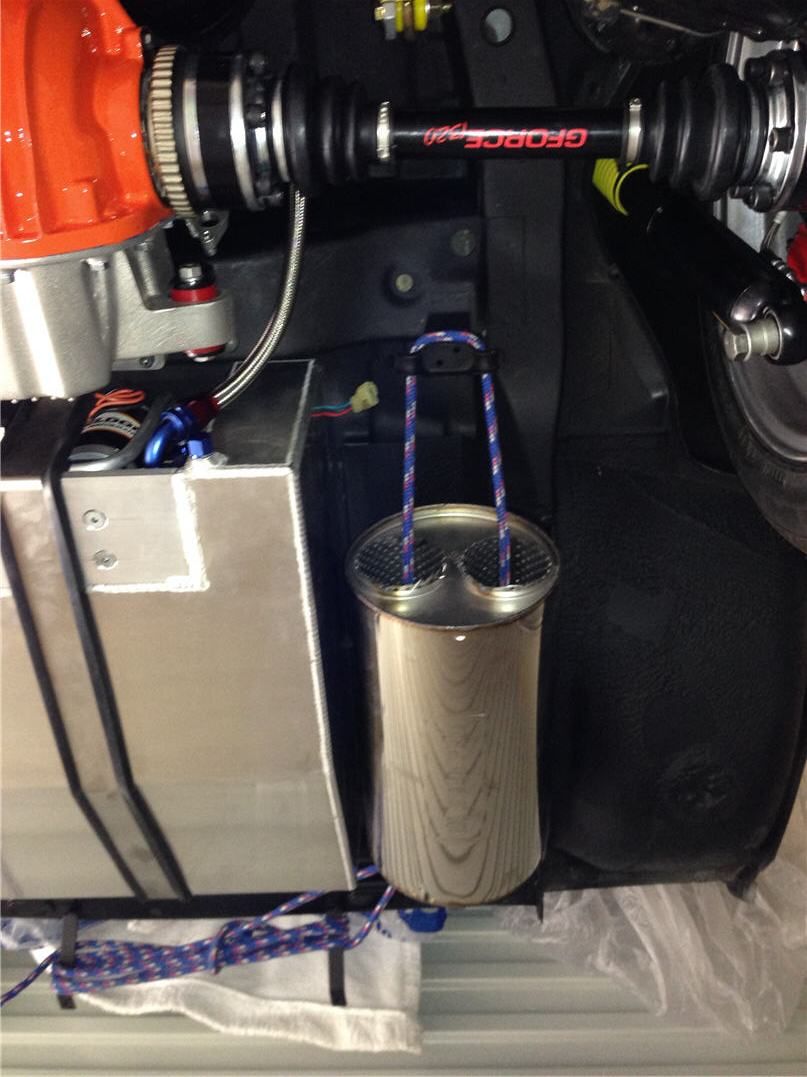
Posts: 5 777Didn’t get a great deal of time on the week end, had a wedding to go to and my sons birthday. Got stuck into it tonight. Took a bit of finding but came up with a really nice vacuum manifold block from the US. Was tapped NPT, so had to re-tap it 1/8 bsp, mounted really nicely up on the firewall. Also spent a fair bit of time massaging the power steering reservoir bracket and managed to get it sitting quite a bit lower, imo looks much better, doesn’t stand out so much. Also have started sorting the fuel lines, have modelled up some nice custom clamp plates so sit on top of the manifold, but in the mean time have just used some clamps I had lying around. Really happy with hows it turned out.

 February 18, 2015 at 1:55 am #454
VRSenator065Participant- Adelaide SA
- VR Senator LSx454 1960 Kombi (project) 1921 Nash Hot Rod (future project)
View build HERE
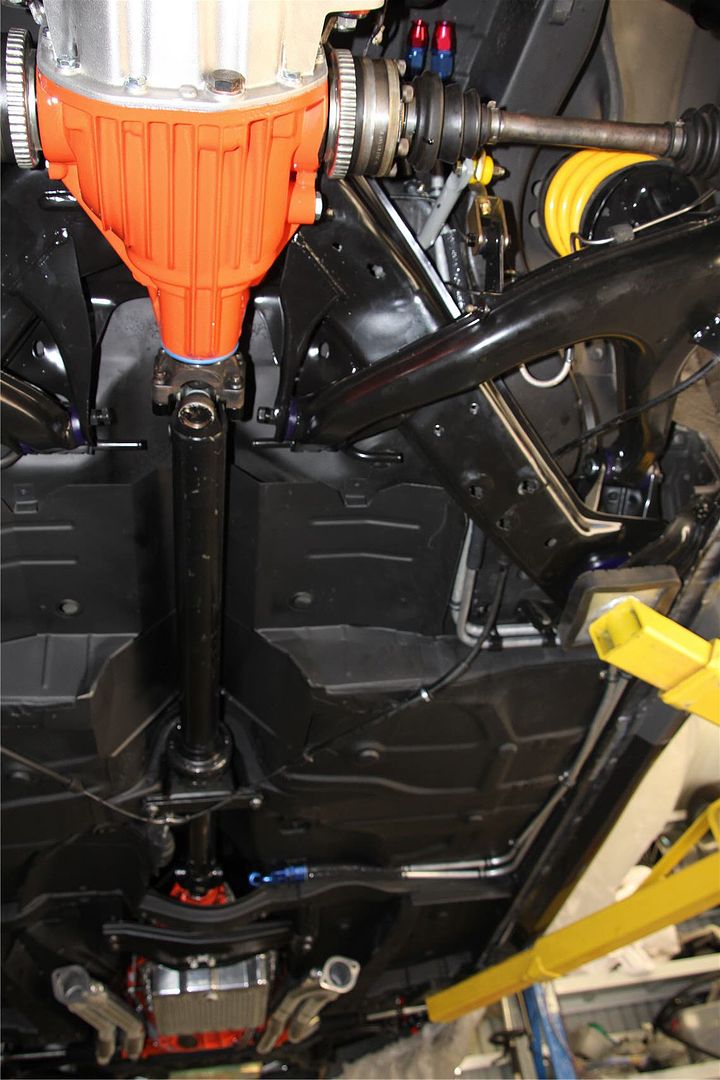
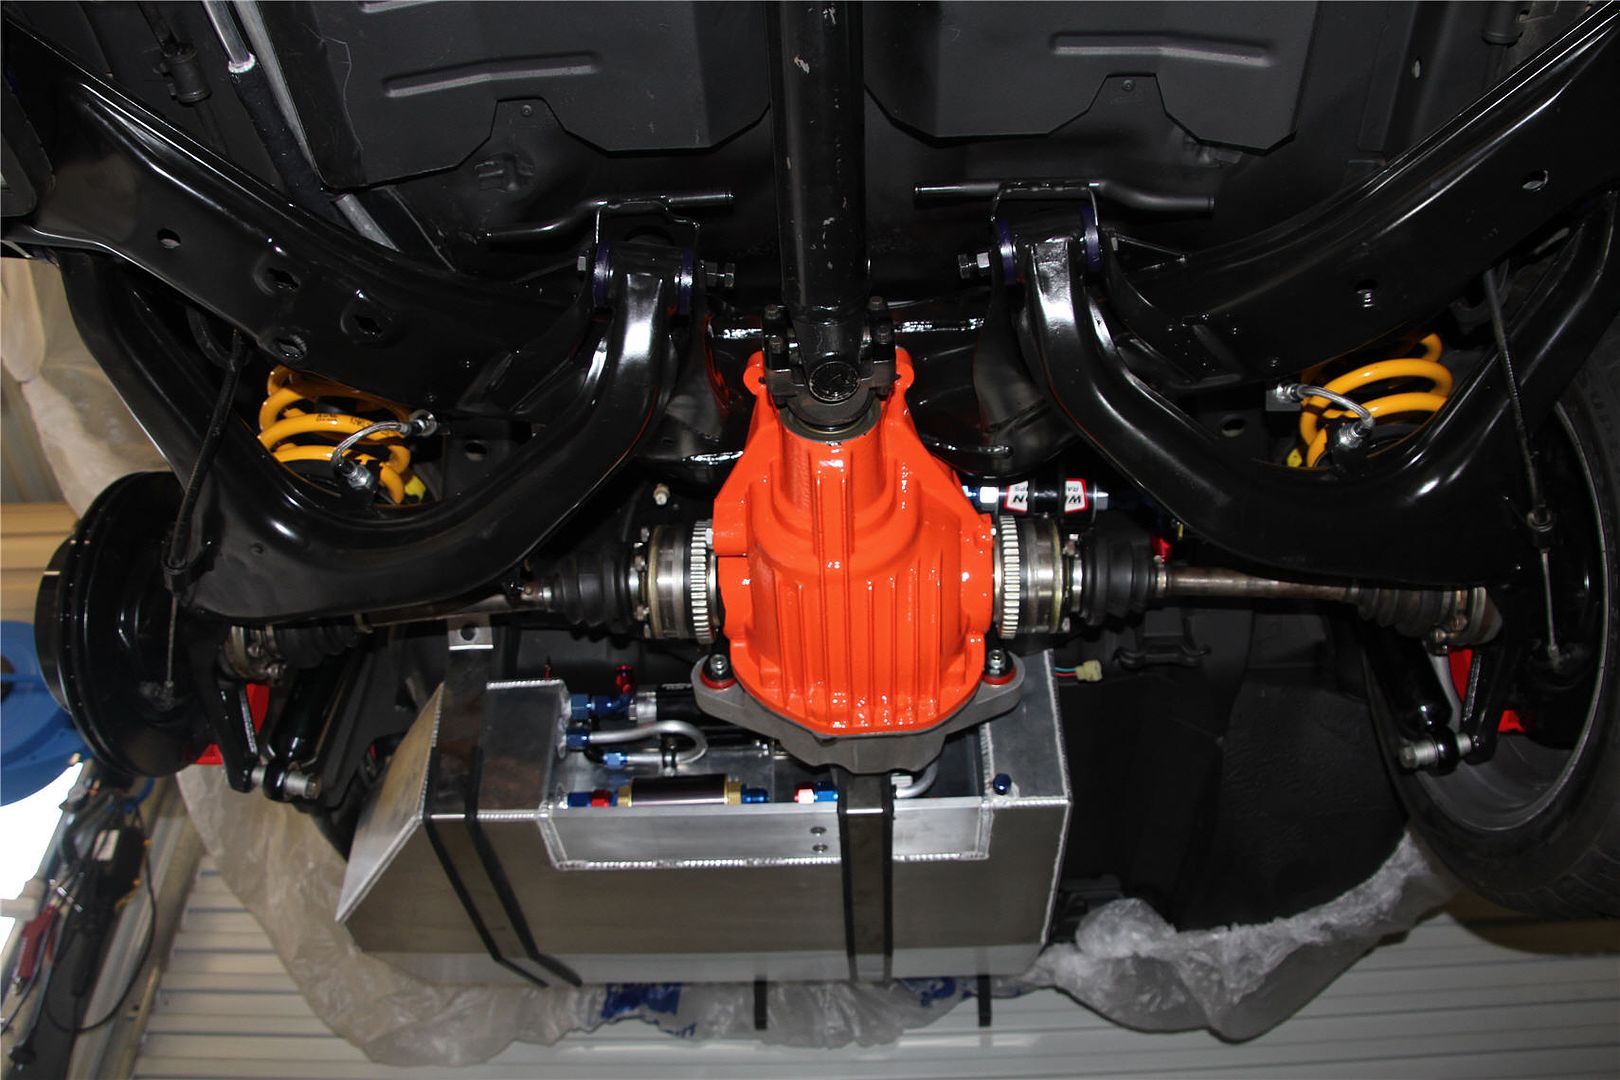
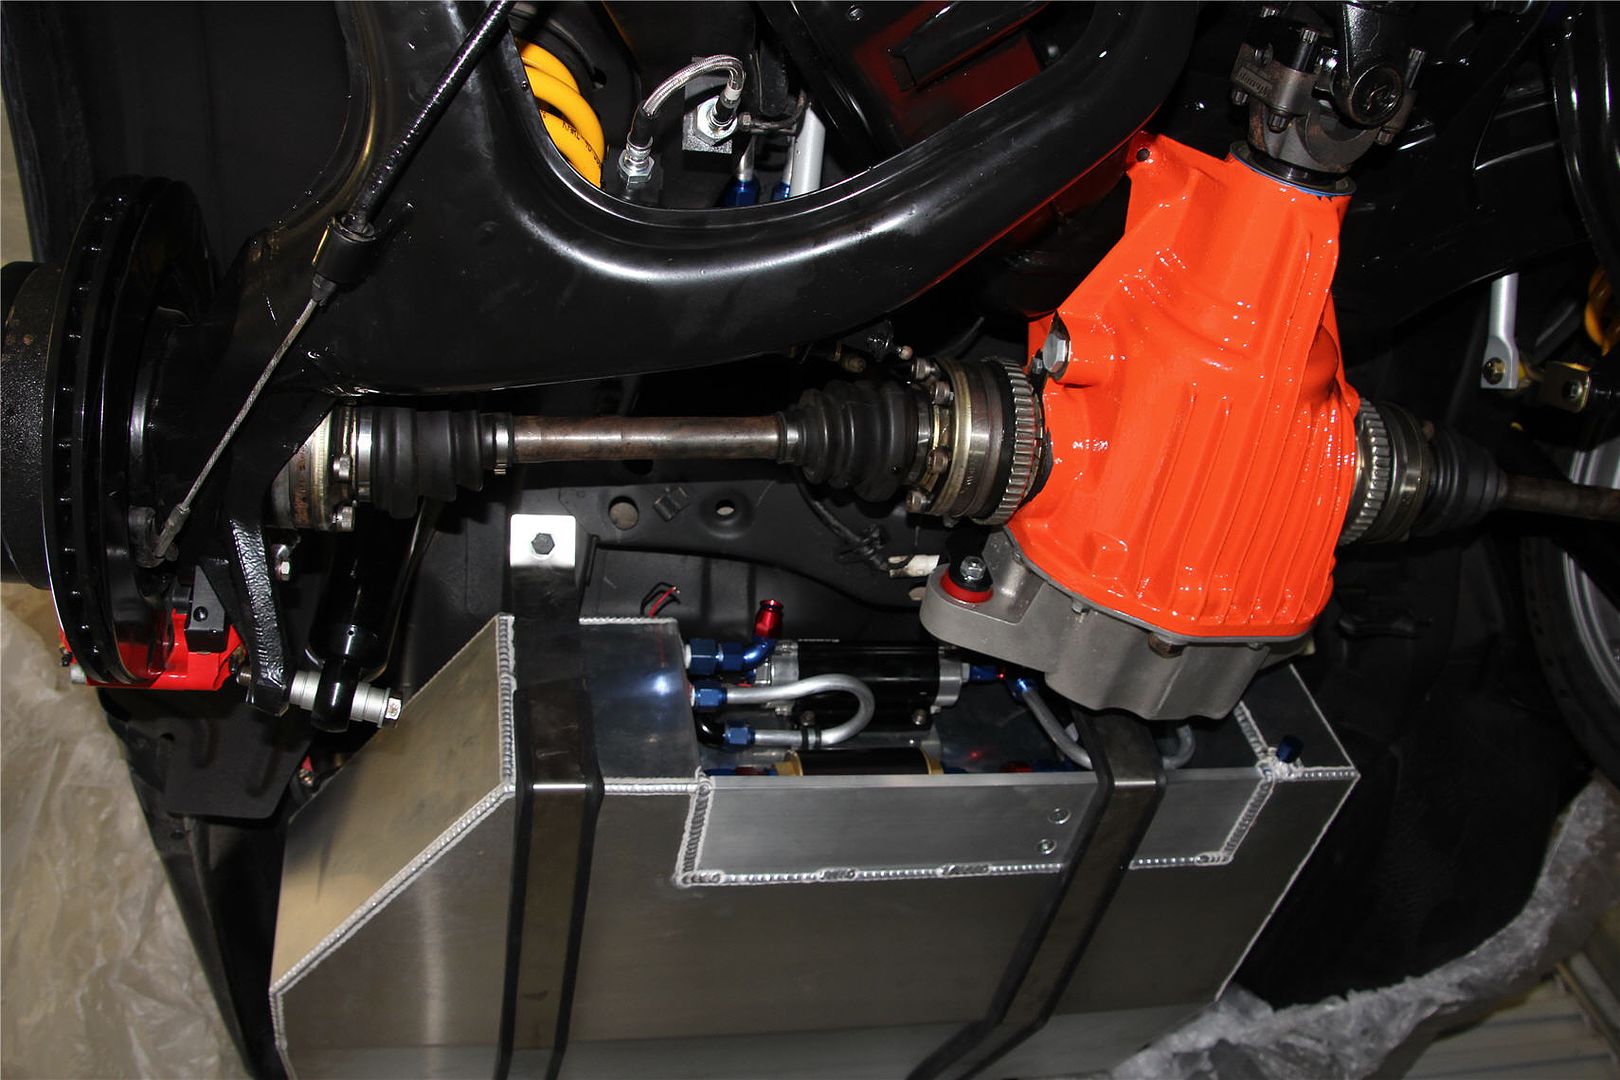
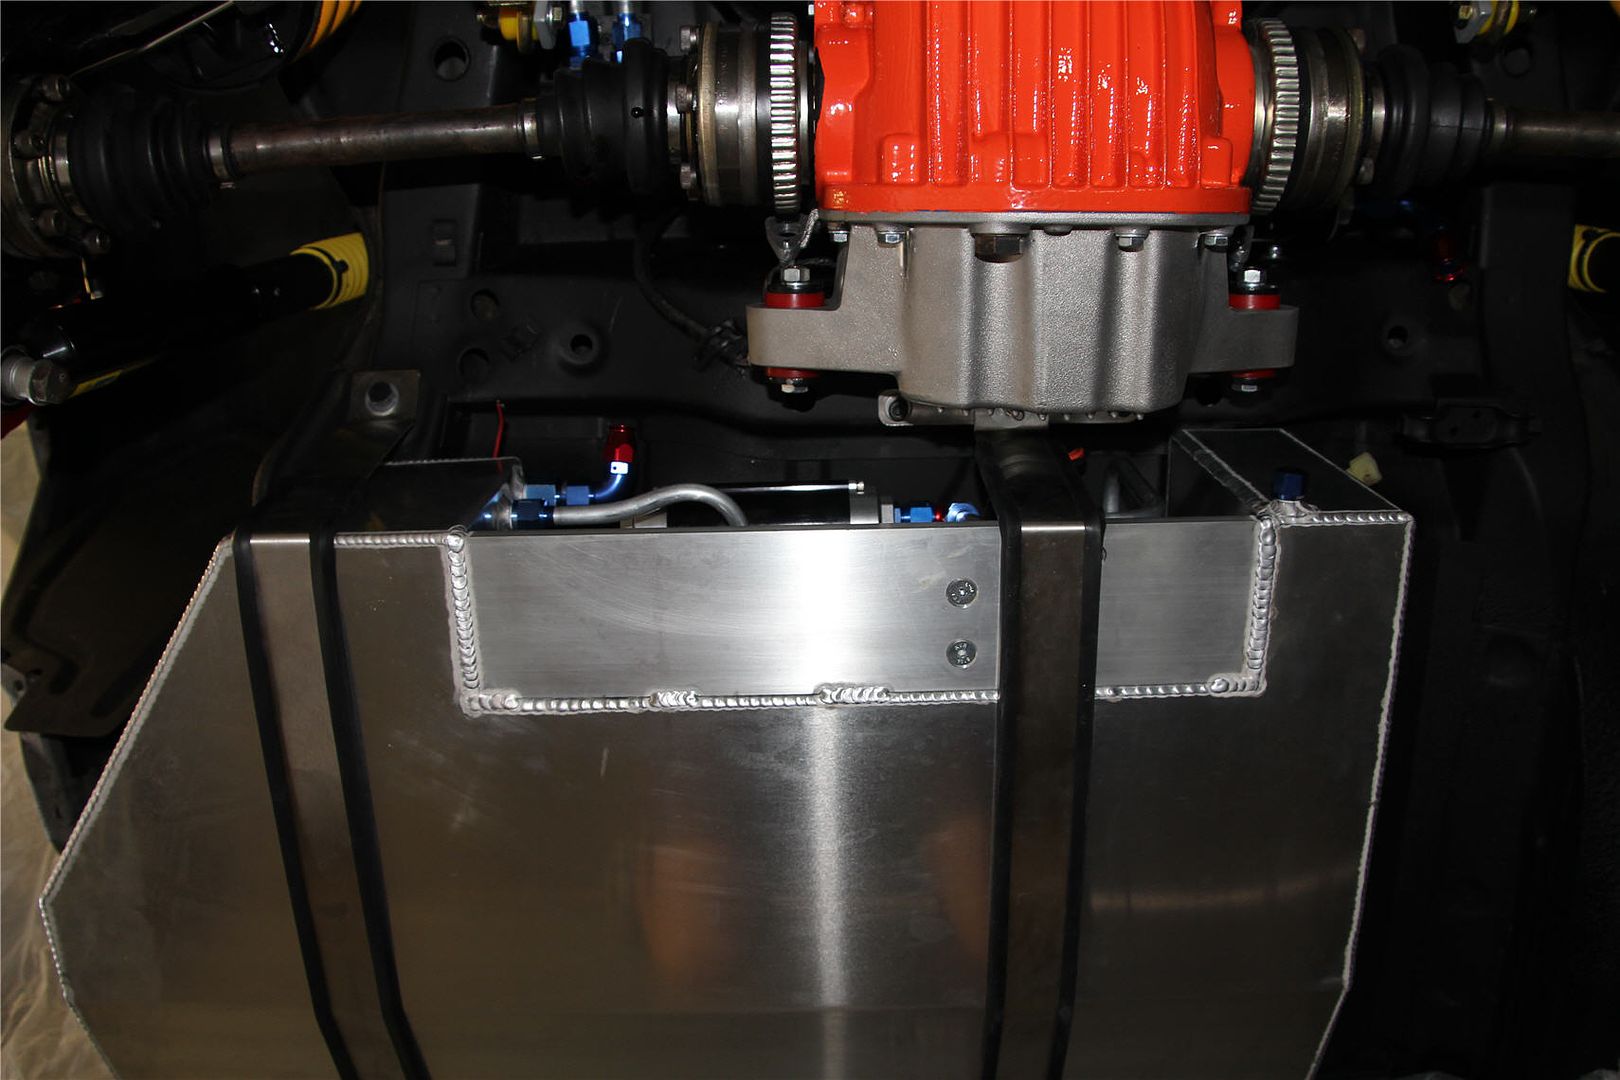
Posts: 5 777Well a lot of bloody work with not that much to show for it! Got the fuel hard lines made up and routed. Decided to go 5/8″ feed, and 1/2″ return. Made up two bulkhead plates, one at the back up tucked up high above the drive shaft area. Will then go 200 series braid to the tank. At the other end decided to go across the car to a bulkhead then going to go through two swept bends and braid up to the engine. Just waiting on Bain to send me down the regulator, when I have that I will tackle the under bonnet part. I think if I ever have the engine and trans out I may make up hard lines up through the tunnel but for now the braid will work. The hard lines are a very finicky job, I have never done them before so pretty happy with it. Hugged up under the sill as much as possible so its quite well protected, also used some heat shield sleeving where the exhaust will run, also at the rear. Made up a neoprene rubber piece at the rear where it sits along the floor between the cradle so it should be nice and solid and protected
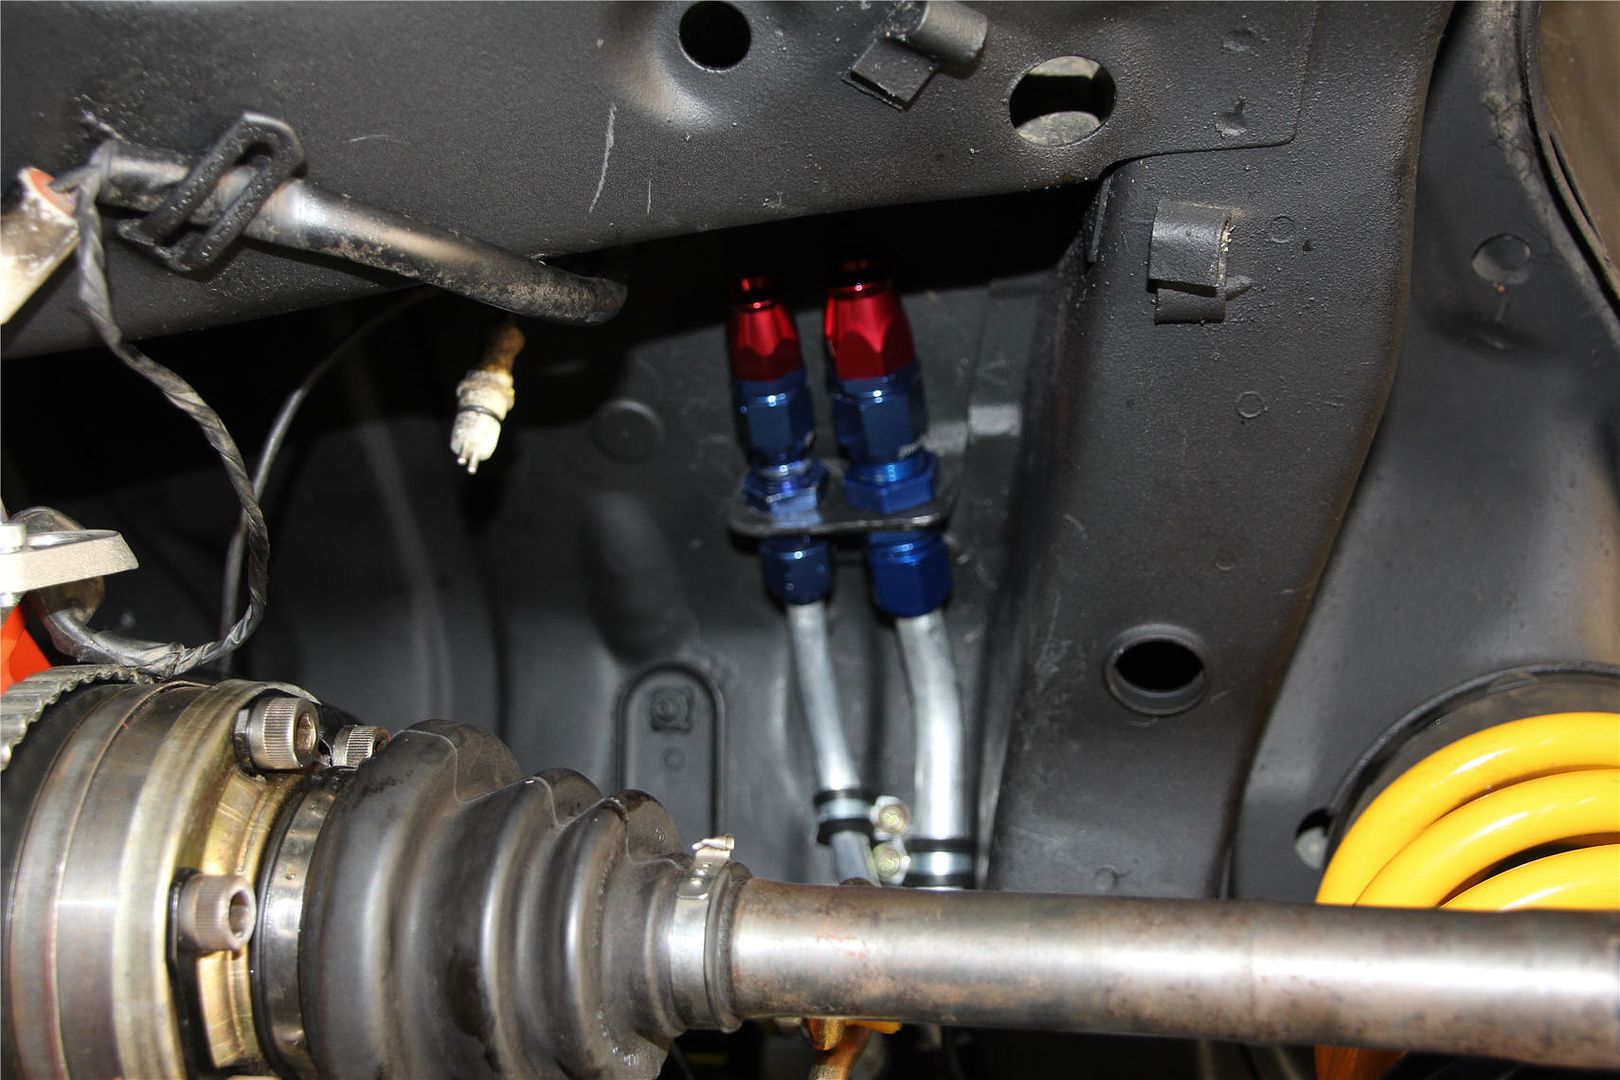
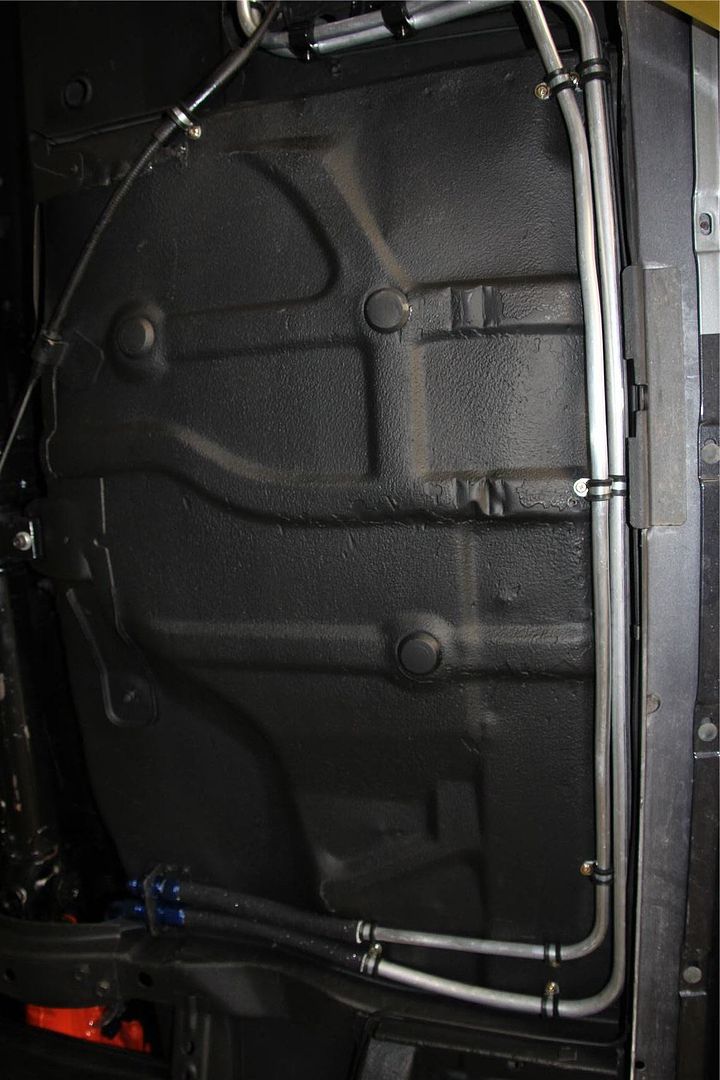
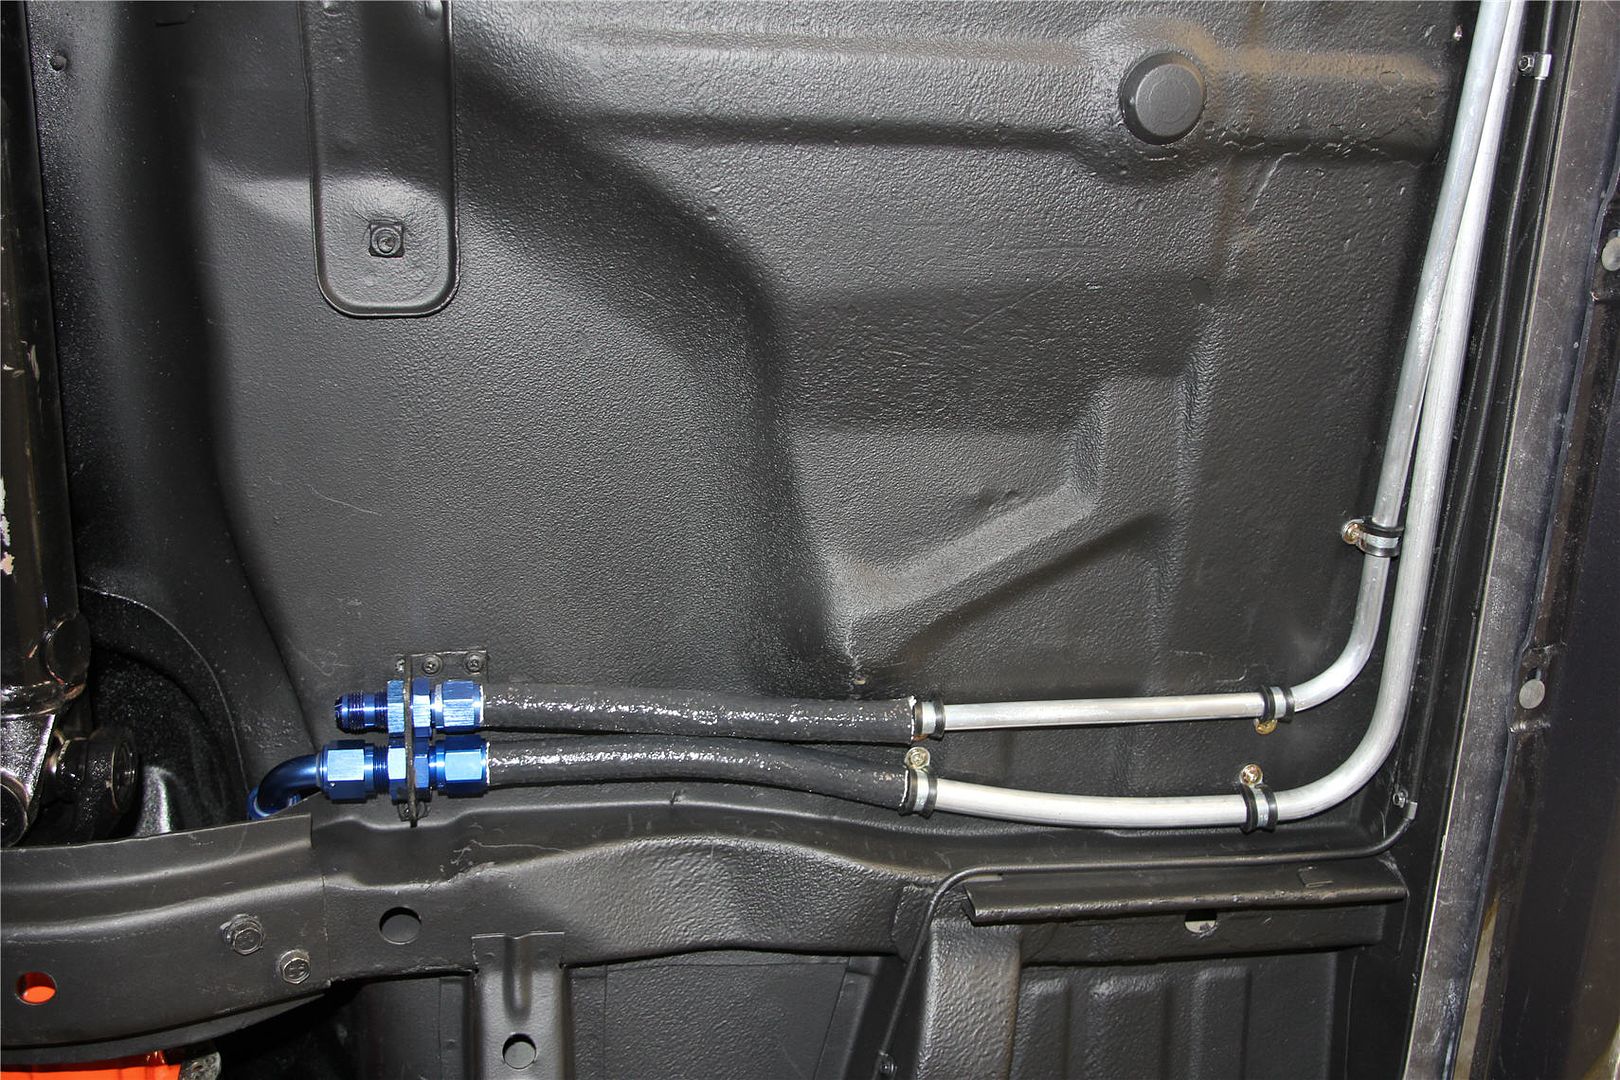
Also started on finishing off the front of the tank, had some clearance issues, spoken to Jack at earls (who’s bloody brilliant btw) and have some slimline fitting he’s sending down. Unfortunately at least for now most likely will have a couple of black fitting on the there as he didn’t have red/blue but it will get me moving and you wont really see them under the car I guess.
 February 18, 2015 at 1:56 am #455
VRSenator065Participant- Adelaide SA
- VR Senator LSx454 1960 Kombi (project) 1921 Nash Hot Rod (future project)
View build HERE
Posts: 5 777Sorry didn’t see the posts above, have to have a think about that

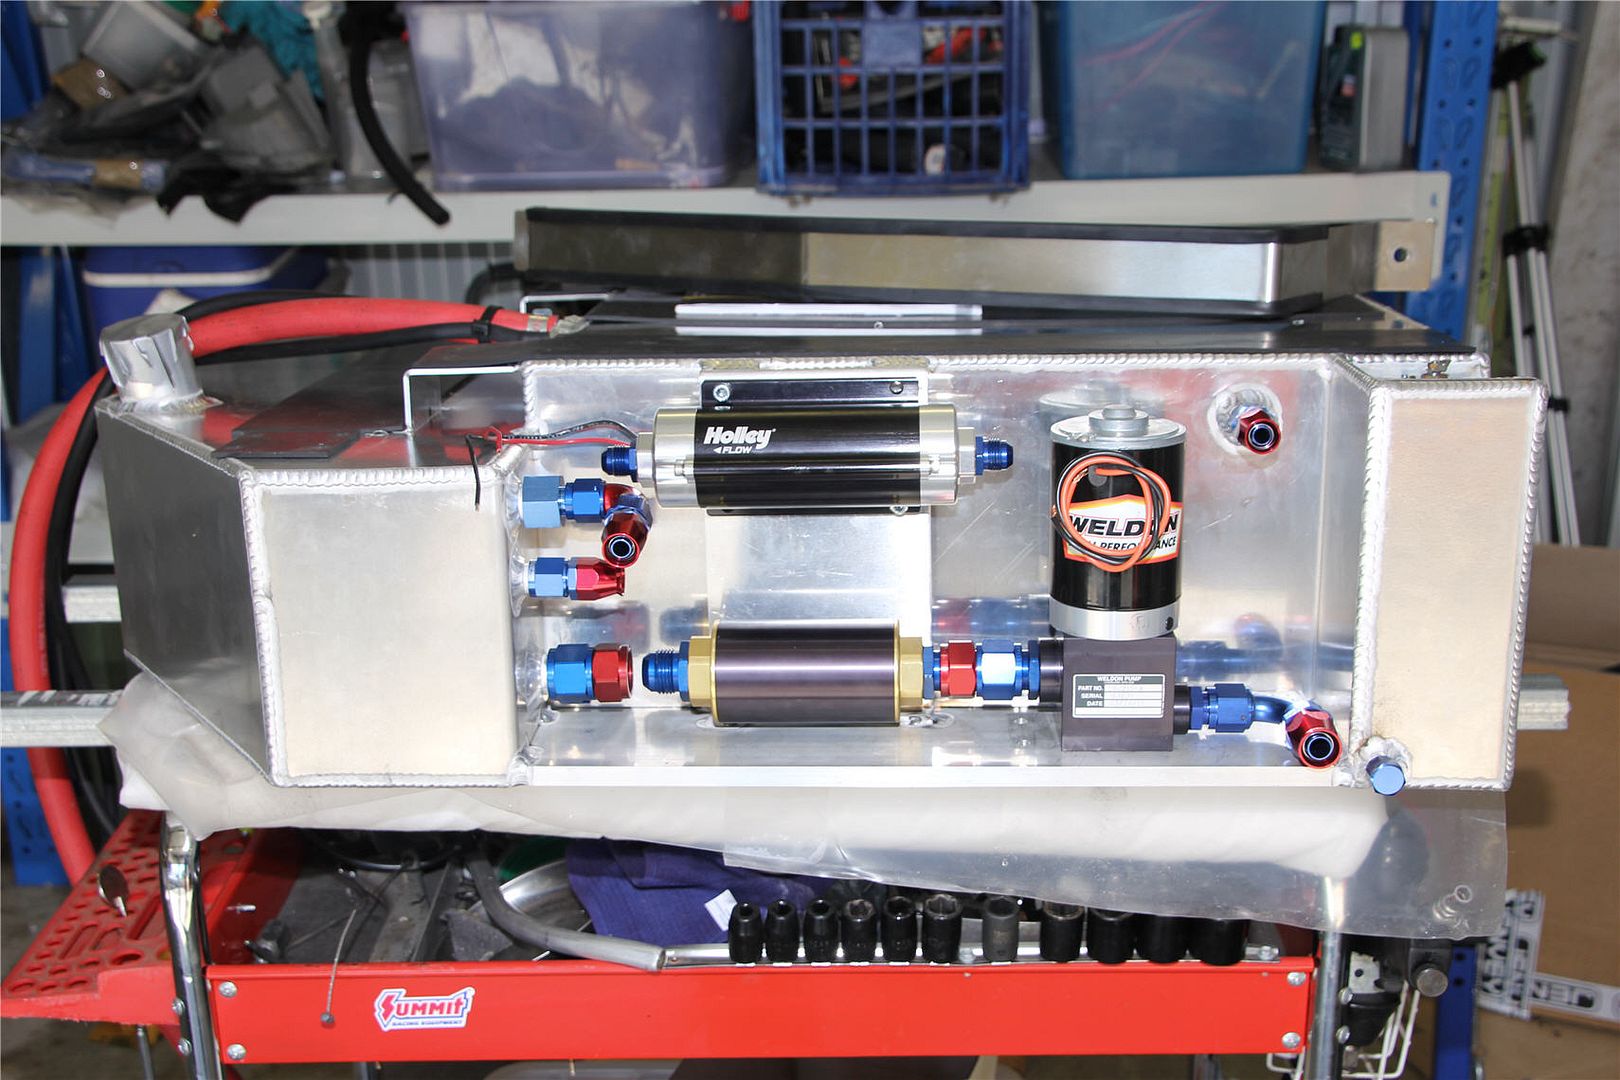
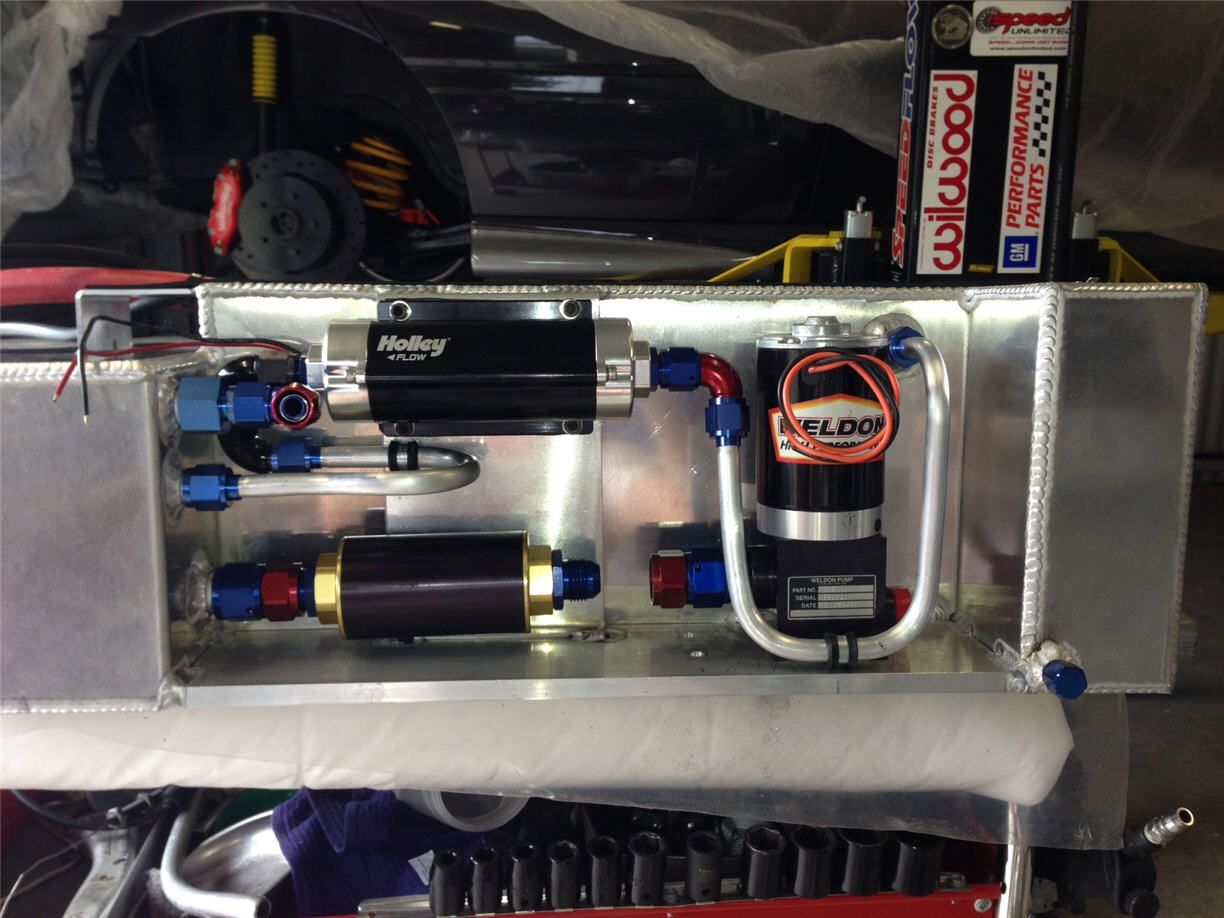
Well bloody stoked with how the tank has worked out. Took ages to try and work out a neat way to do the lines to the lift pump. Tried a lot of different ways but in the end I decided to make up hard lines, truly thought of taking a picture of all the bends that didn’t work out in the bin for a laugh but decided against it. Took my misses out an showed proudly showed off my handiwork and she just shrugged and said why did that take so long. Sometimes it takes a lot of time and effort to make something simple I guess. Just need to sort an extension for the 12AN to the Weldon.
Have to say a word about “full flow fittings” to me they are a con. They have exactly the same bore through them as the regular 200. Yes they are a tighter radius, but actually from the fluid point of view it would make them worse flow wise. Only thing in their favour is the outside is larger so maybe they are physically stronger, and if room is an issue the tighter bend is a good option. To me either will work as well as each other.
Anyhow, a few pics of how it sits, out of action tomorrow at the Bay to Birdwood but hopefully will get time to make up a list of the fittings I need so I can do the under bonnet, and hopefully that’s the fuel system sorted
Not long now, exhaust, ecu and loom etc, and some odds and sods.
 February 18, 2015 at 1:57 am #456
VRSenator065Participant- Adelaide SA
- VR Senator LSx454 1960 Kombi (project) 1921 Nash Hot Rod (future project)
View build HERE
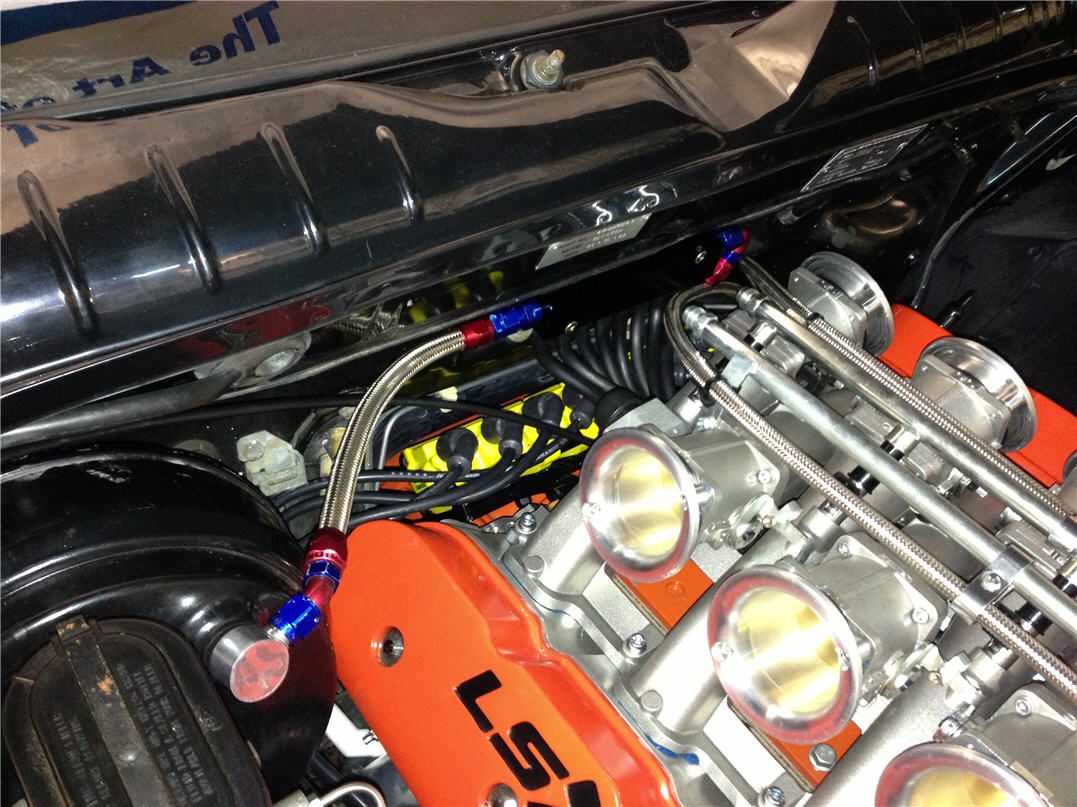
Posts: 5 777Yes you could, but the two “inputs” to the reg are on either side of it, with return to tank at the bottom. The only sensible place to put the reg was off to the side on the firewall, so I would have had two hoses, with one having to go to a 180 degree bend to get to the other side of the reg if that makes sense. The way I am going to do it just ties the two return hoses (running alongside the fuel rails) to a tee at the back you can’t really see, then a -8 single hose to one side of the reg, the other port is blanked.
Its really 6 of one, half dozen of the other, I like how its turned out, but I would I guess, I did it ha ha. Its quite busy back there, and the firewall isn’t flat which doesn’t help either.
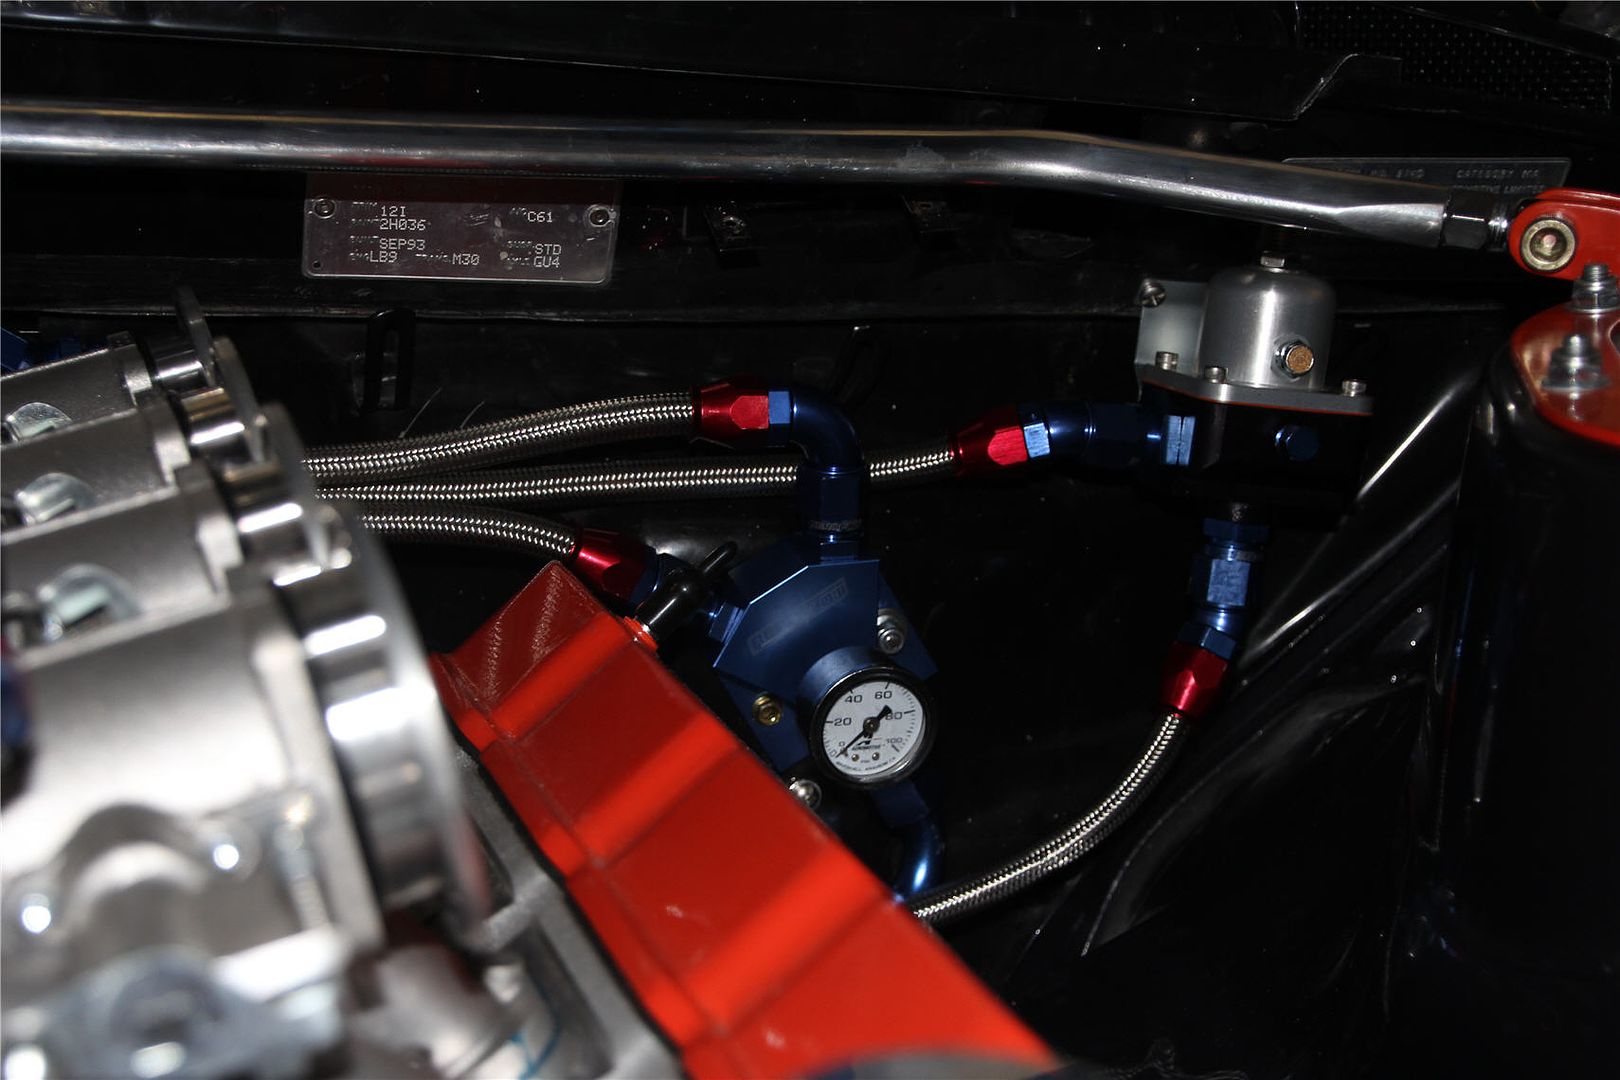
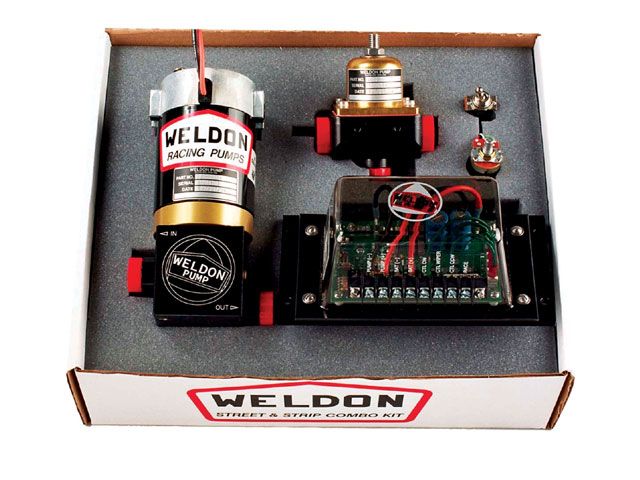
This is the Weldon kit I got, which had the regulator included.
 February 18, 2015 at 1:57 am #458
VRSenator065Participant- Adelaide SA
- VR Senator LSx454 1960 Kombi (project) 1921 Nash Hot Rod (future project)
View build HERE
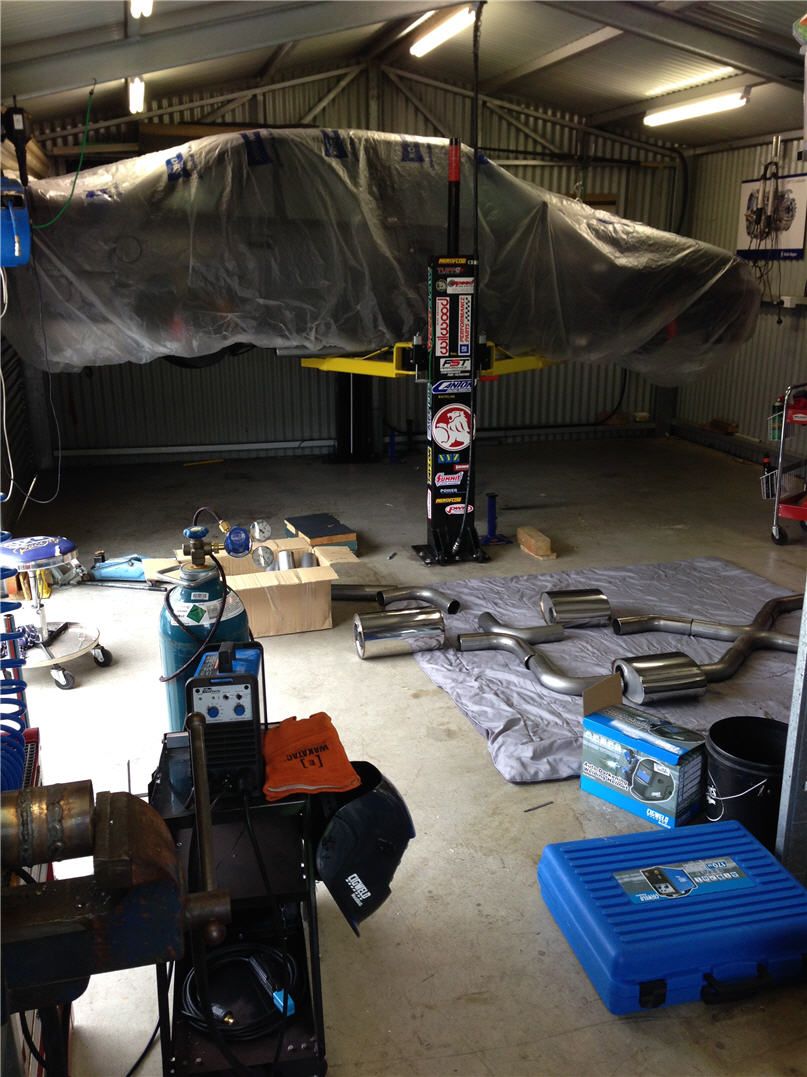
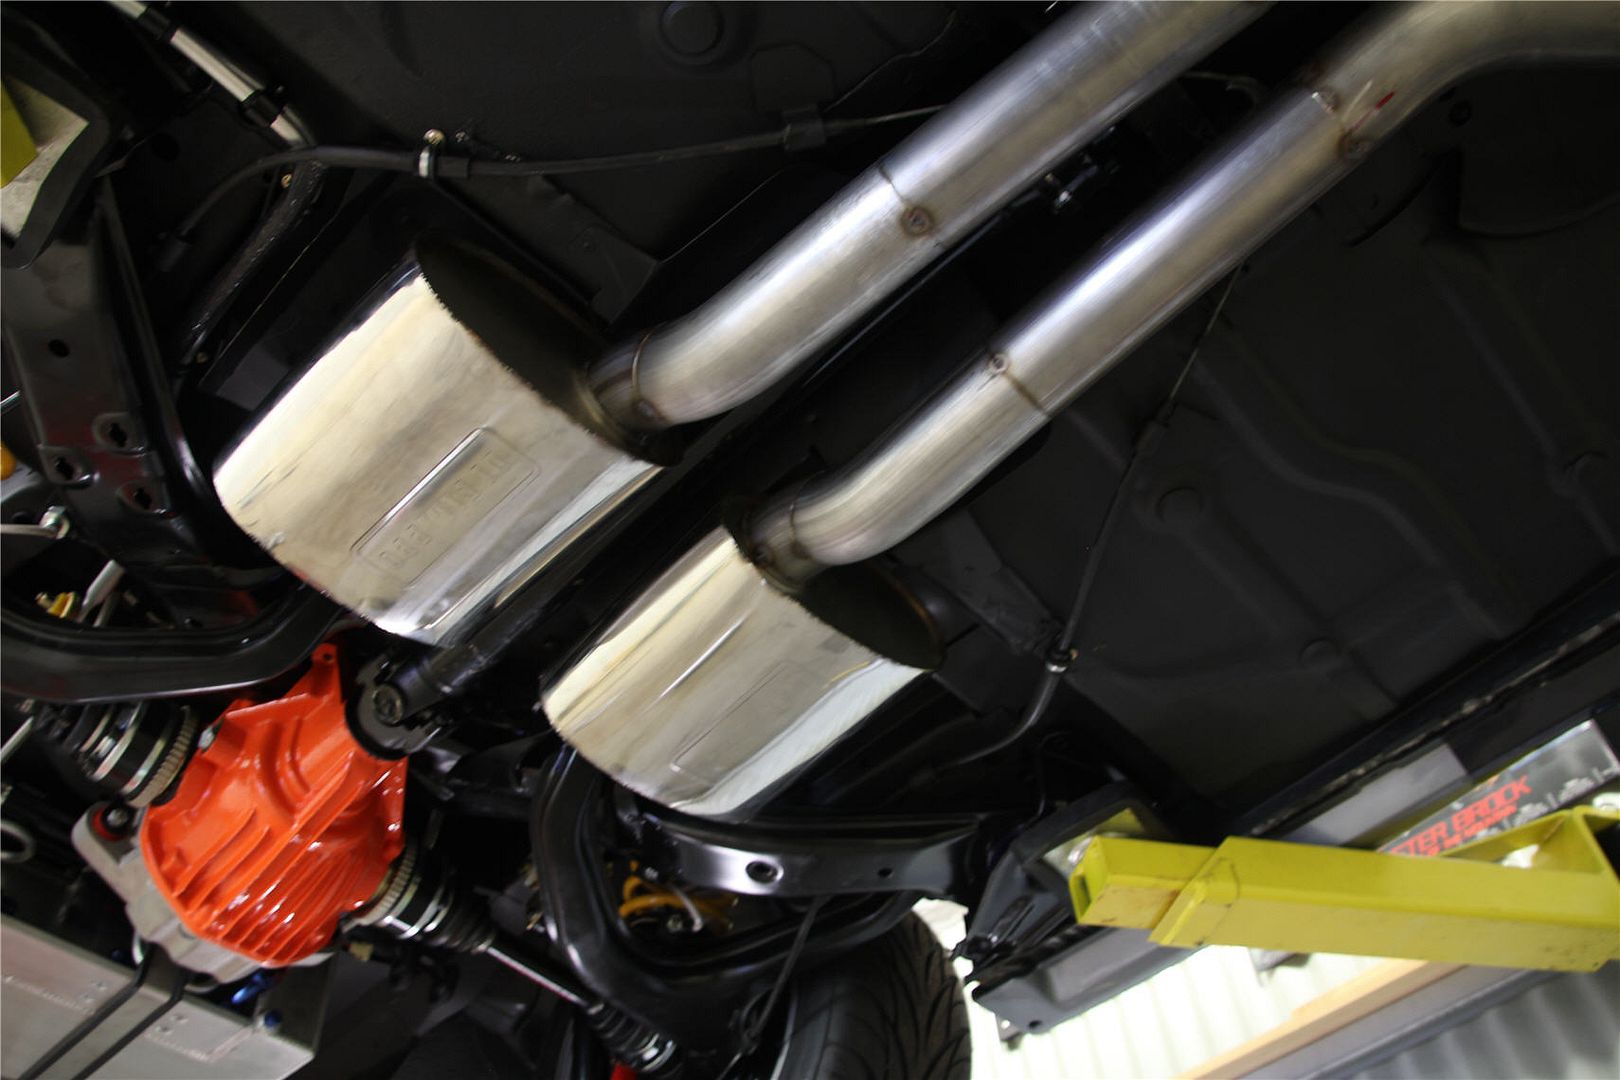
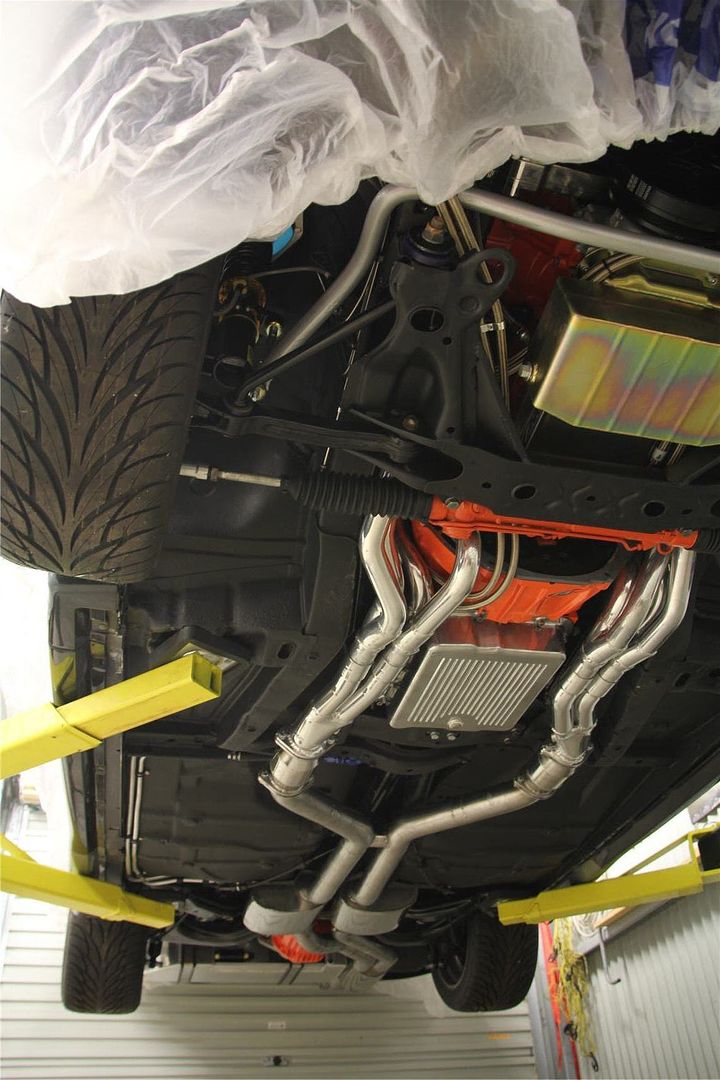
Posts: 5 777Well a week end spent doing a lot of mucking around but not a huge amount to “show” for it I guess, really just wanted to get my head around what’s in front of me. Unpacked it all, sorted through it all, for some reason the cats weren’t included with the stuff, but will sort that tomorrow.
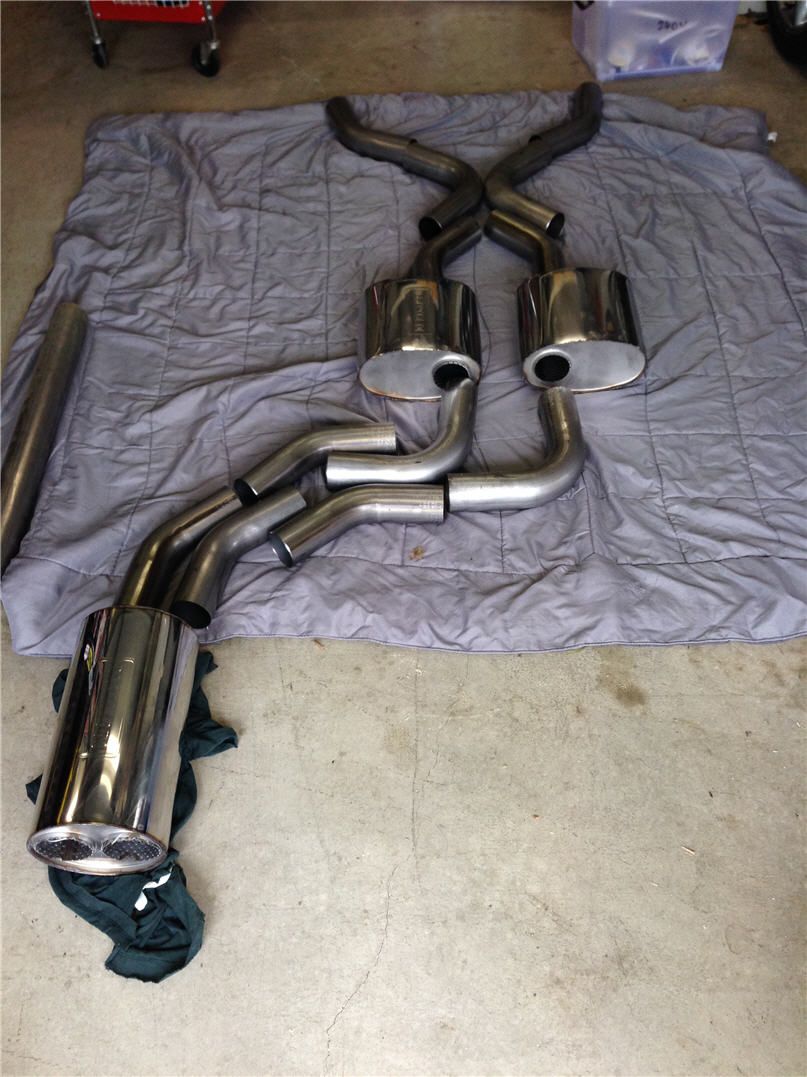
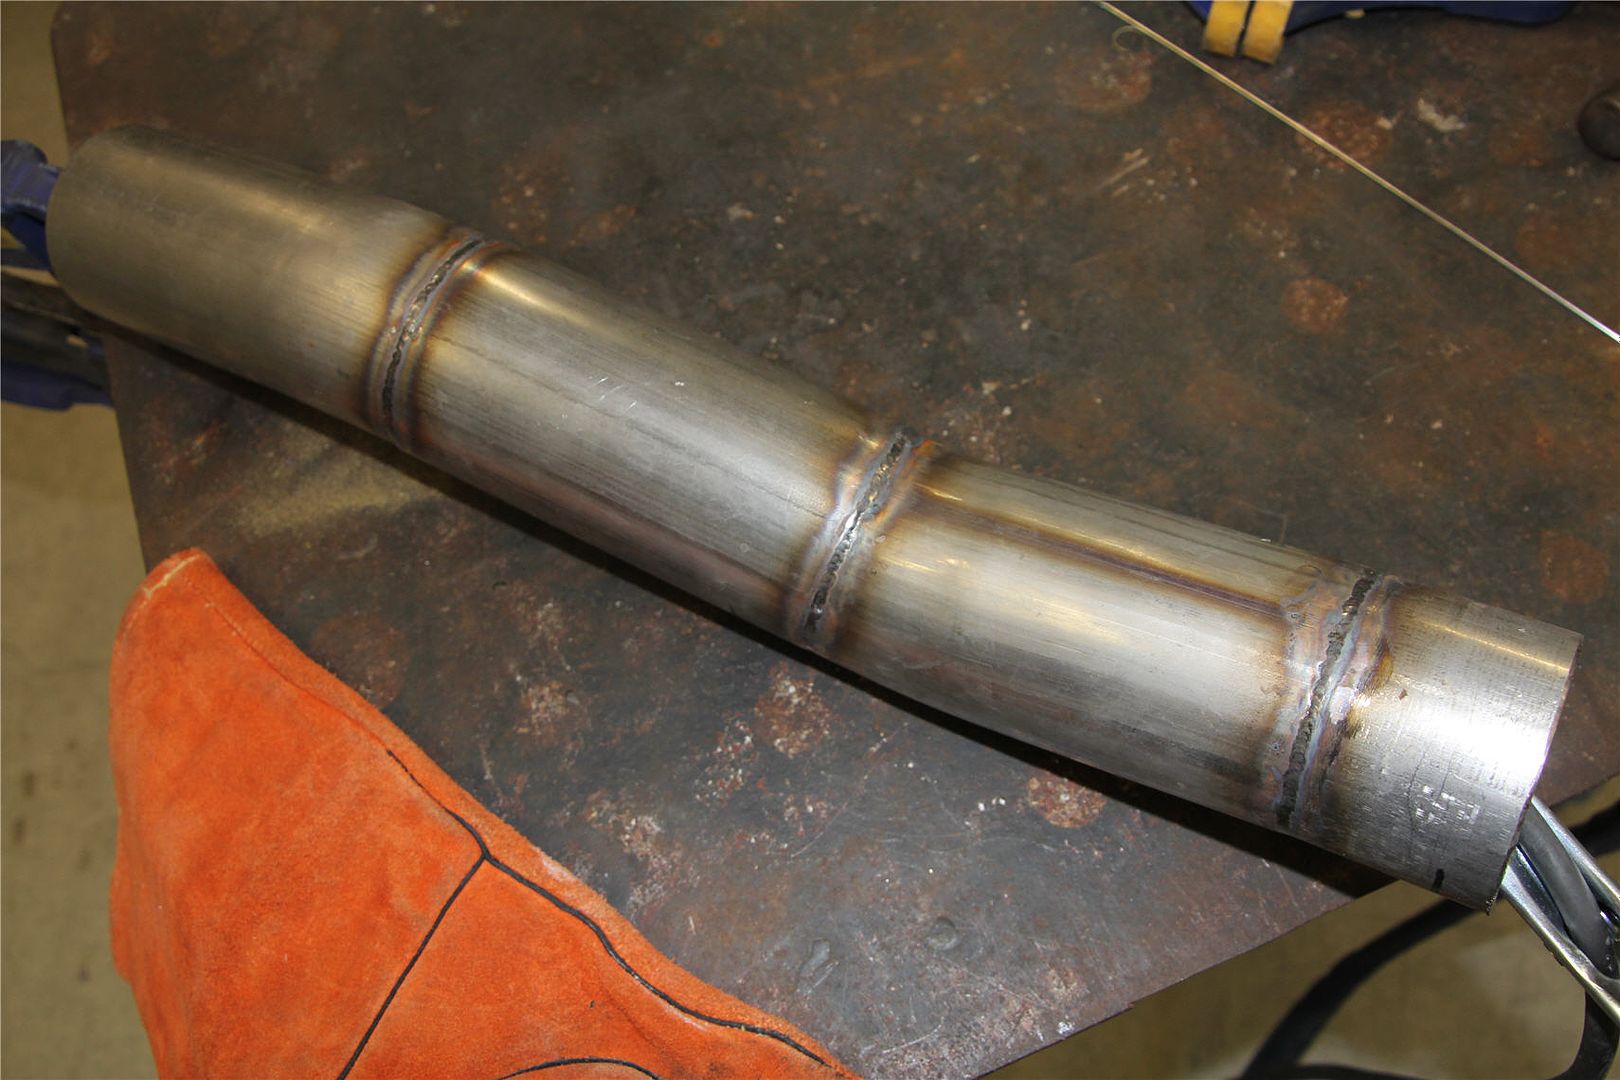
Set it out on the floor, first time building a full exhaust of course but also first time I have seen a twin 3″ system laid out in the flesh, man they are big! Makes a 2 1/2 look like a Pee shooter :) Should look and sound pretty sweet once its done.
So spent yesterday cutting up small rings of tube and playing trying to tig weld them together. First impressions, harder than it looks but I seemed to get better pretty quickly. Actually having no trouble welding, just getting way too much penetration. Hopefully during the week will get the chance to see my mate and get a few pointers. Tacking looks pretty bloody simple, so worse case I will build it all tacked then get him to finish it off, wait and see. This is me playing around.
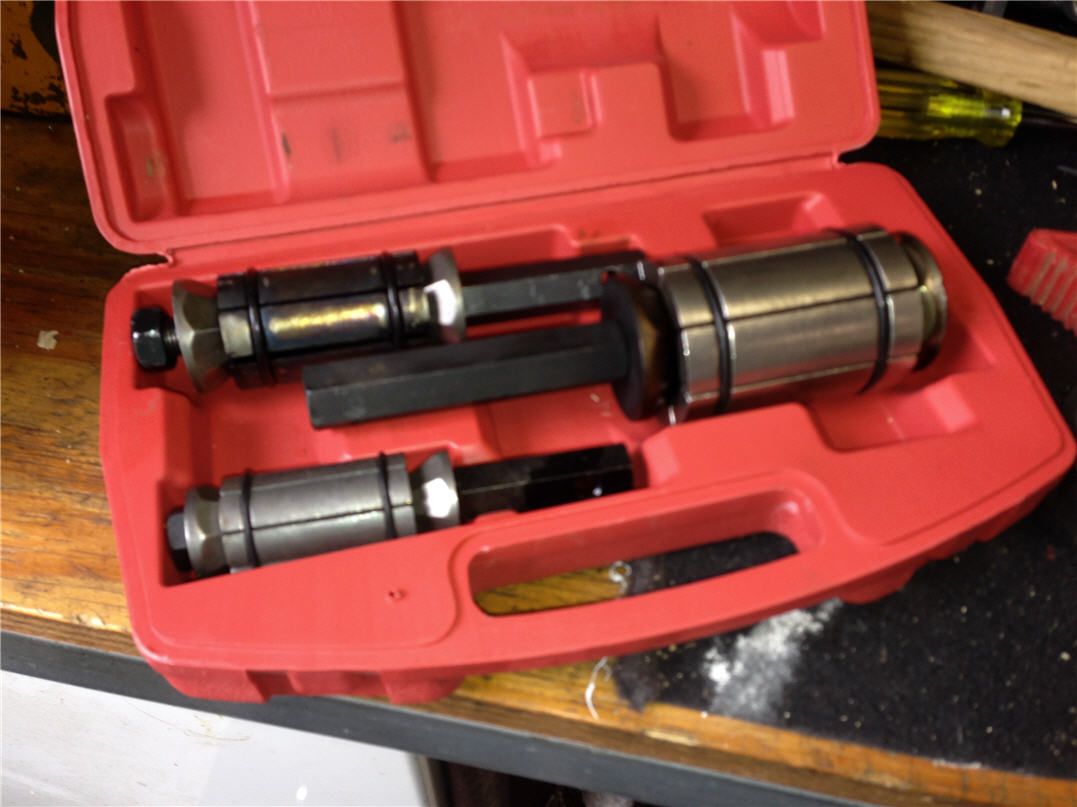
Did get the front passenger side cut off, so I can make up the two 2″ to 3″ collectors. A tip if anyone is tempted to buy one of these expander tools, forget it. They might be alright for fixing an out of round pipe but no way are they good enough to expand even the 2″ mild steel let alone 3″ stainless. Have cut the tubes and reckon I will just go to a muffler place and get them to expand the two ends for me.

This is what not to buy.
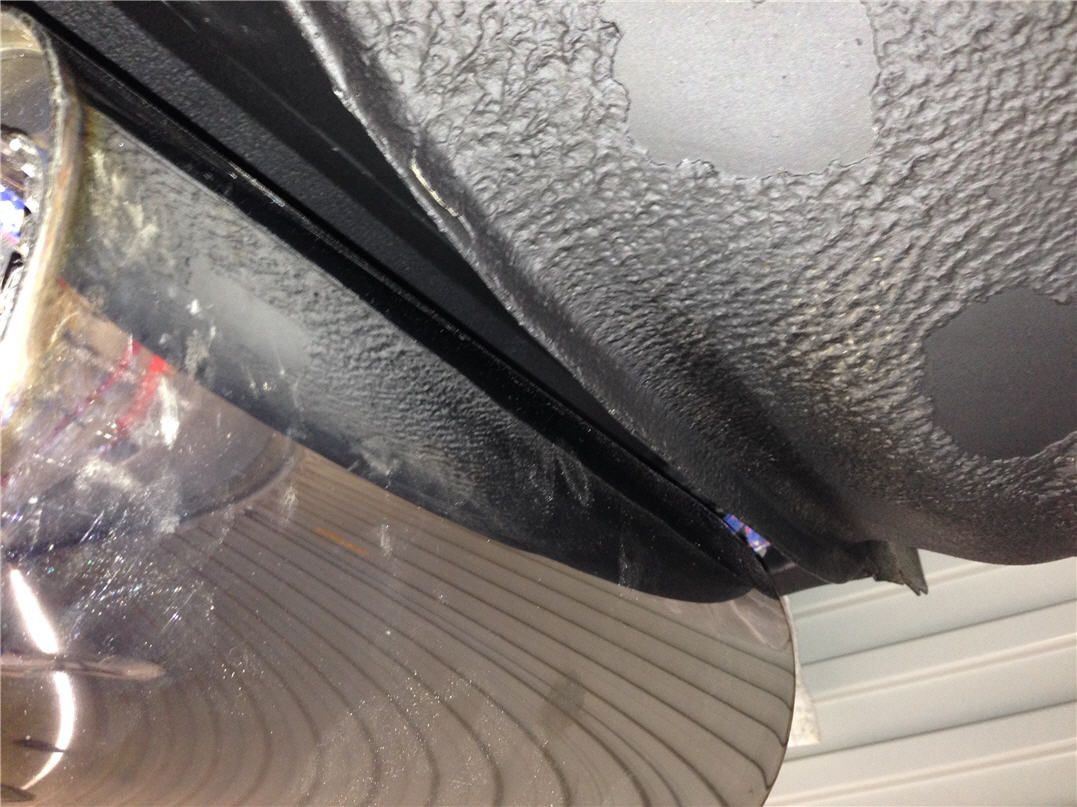
Also had a look at the rear twin 3″. It is reasonably tight, but I think if I just massage the vertical steel edge of the spare well it will give it enough clearance. Might see about finding some stick on heat stuff just for the side of the tank.
 February 18, 2015 at 1:58 am #459
VRSenator065Participant- Adelaide SA
- VR Senator LSx454 1960 Kombi (project) 1921 Nash Hot Rod (future project)
View build HERE
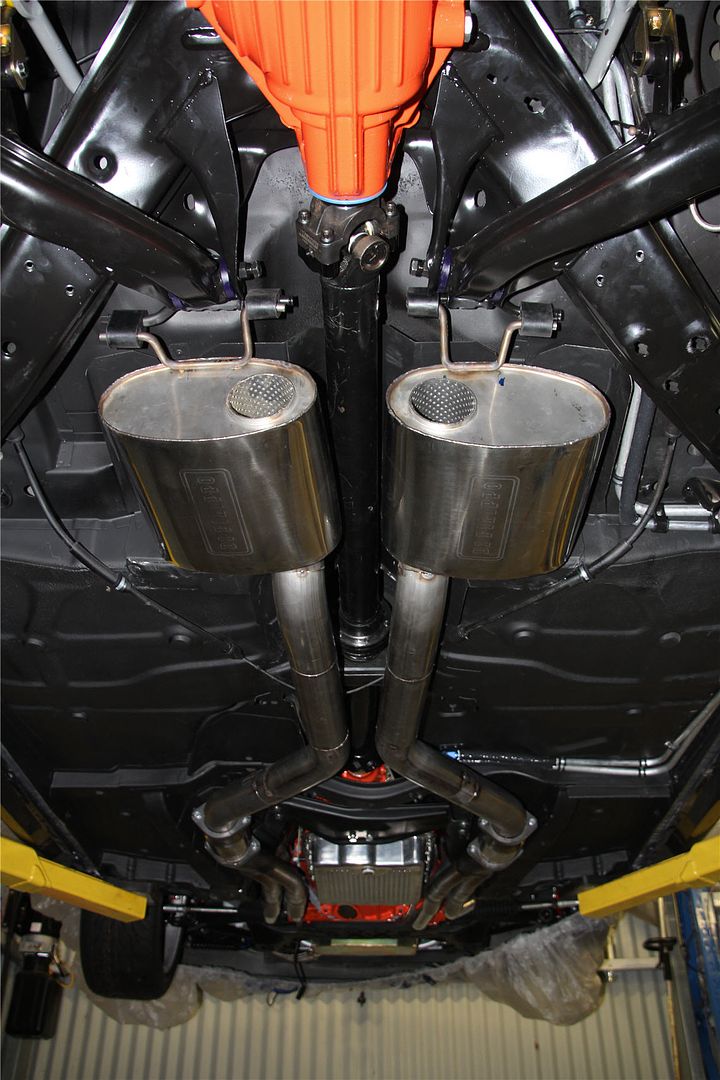
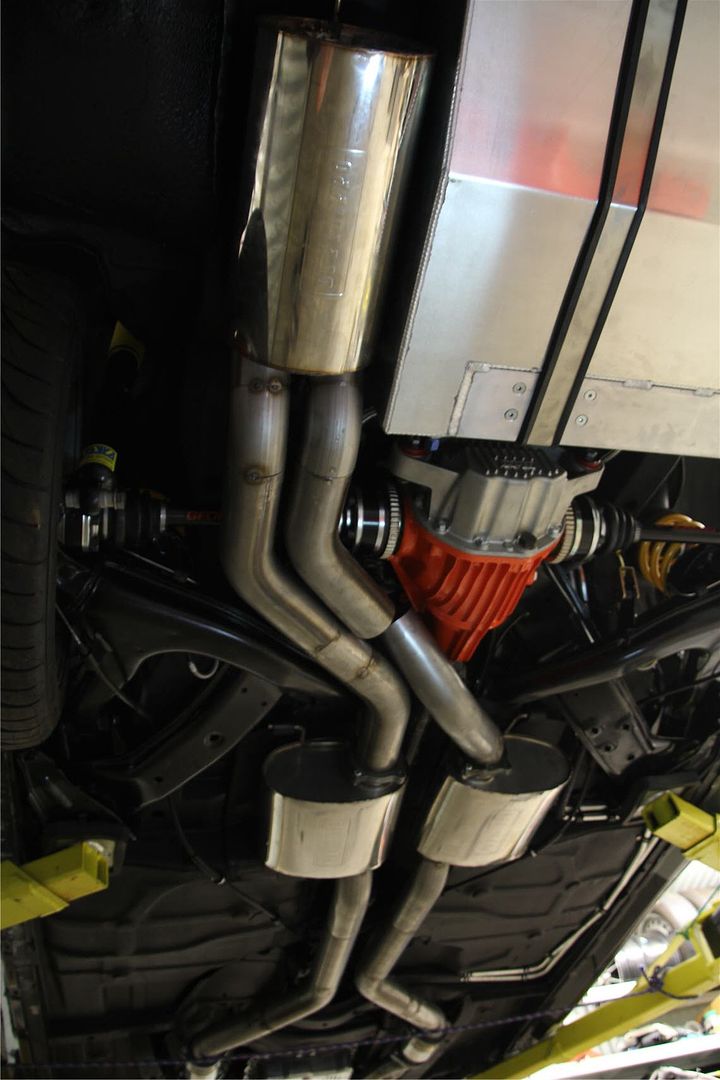
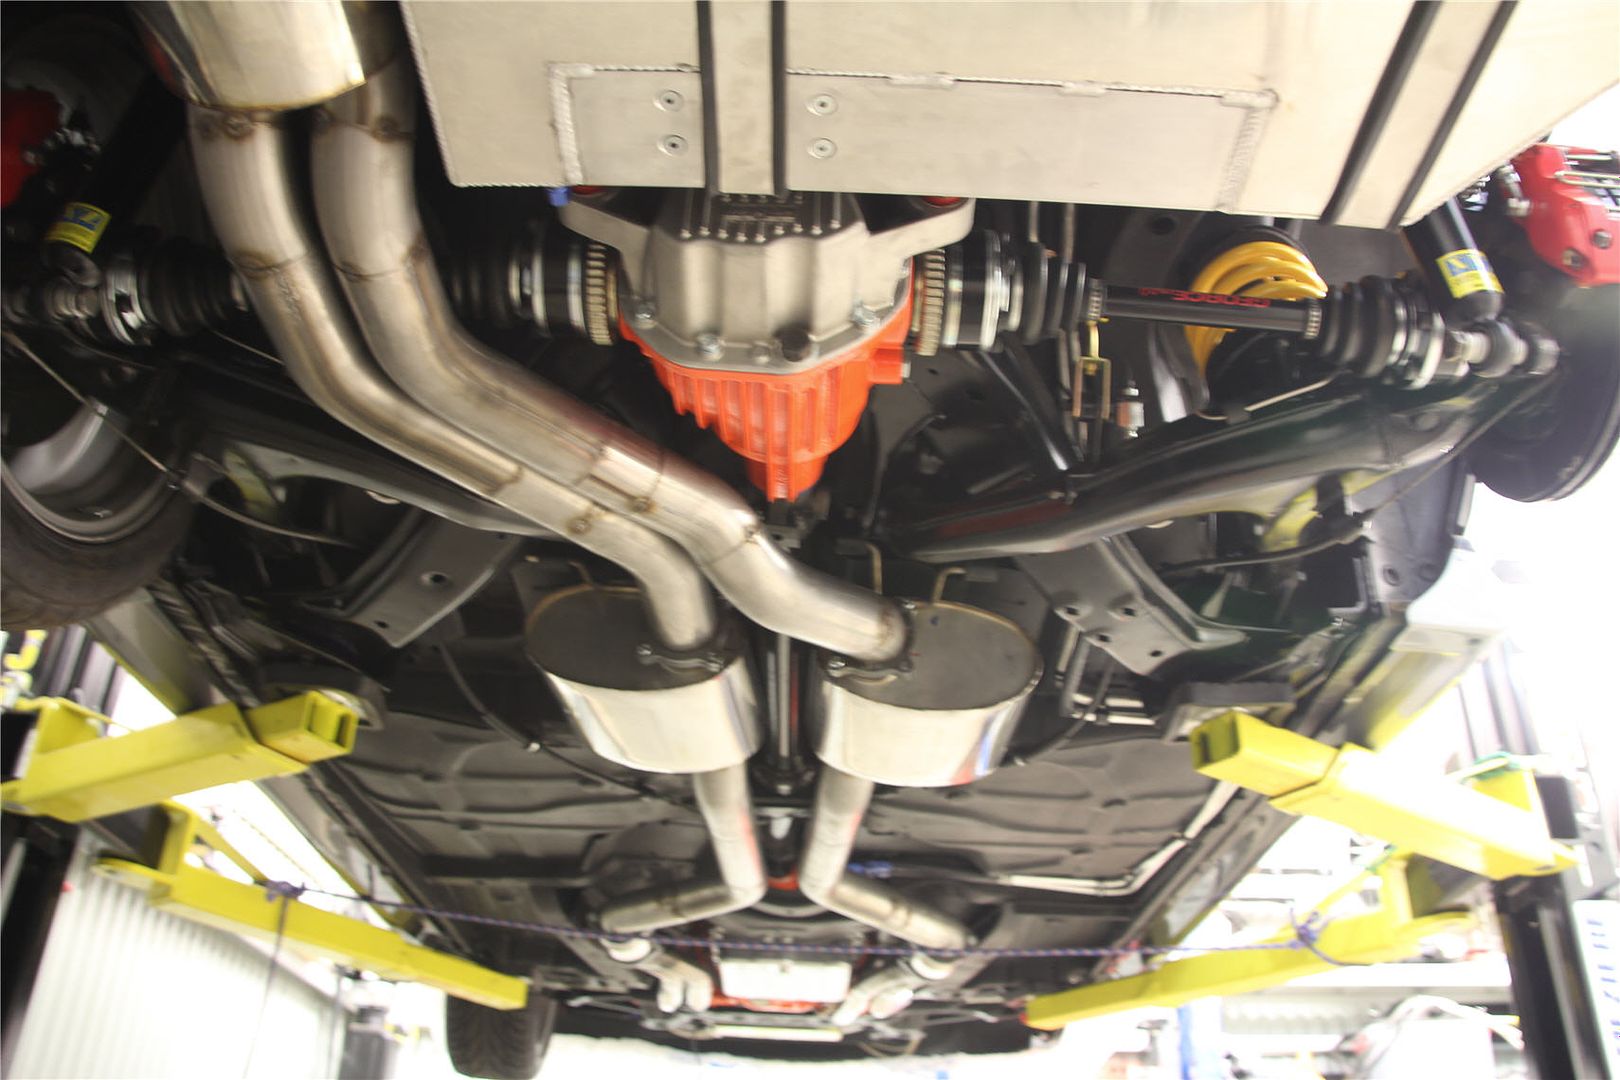
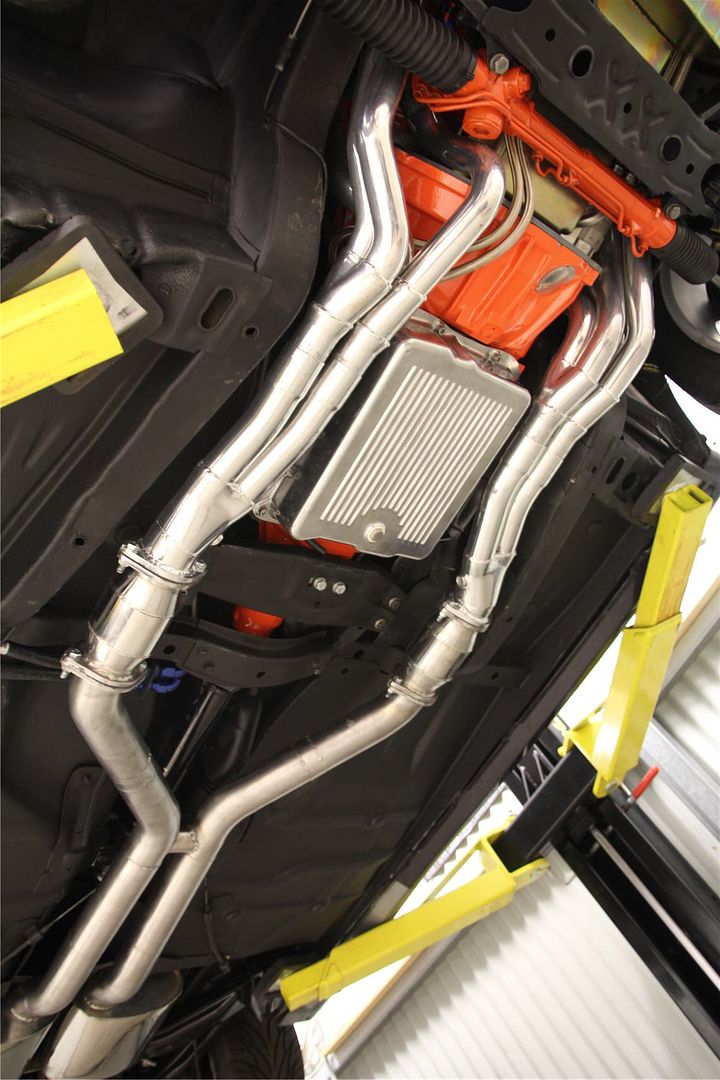
Posts: 5 777Well have to say I am bloody happy with the exhaust so far. Took a while to work out how I wanted it to run, really wanted it tucked up as much as I could. Have got the pipes done from the collectors through to the mid mufflers. Only tacked at this stage and haven’t done the H pipe yet but getting there. May have to get a bit more straight pipe for the rear section but will hopefully start on that maybe during the week. I reckon pretty blood good so far for an amateur
 February 18, 2015 at 1:58 am #460
VRSenator065Participant- Adelaide SA
- VR Senator LSx454 1960 Kombi (project) 1921 Nash Hot Rod (future project)
View build HERE
Posts: 5 777Thought I would throw these up, I am going to Bendigo swap meet tomorrow morning, so I wont get anything done on the week end. My wife has gone to her Spanish class so I thought I would just have a quick play. Never ceases to amaze me how much you get done when your on a roll. Have got the passenger side rear pipe done, worked nice, was going to stop at that but came up with an idea how to go across the diff. Have used a bend, and got it curved down around the nose of the housing, hard to tell from the photos but came up sweet. The bottom of the bend is only as low as the bottom of the mufflers so it should work well.
 February 18, 2015 at 2:31 am #471
VRSenator065Participant- Adelaide SA
- VR Senator LSx454 1960 Kombi (project) 1921 Nash Hot Rod (future project)
View build HERE
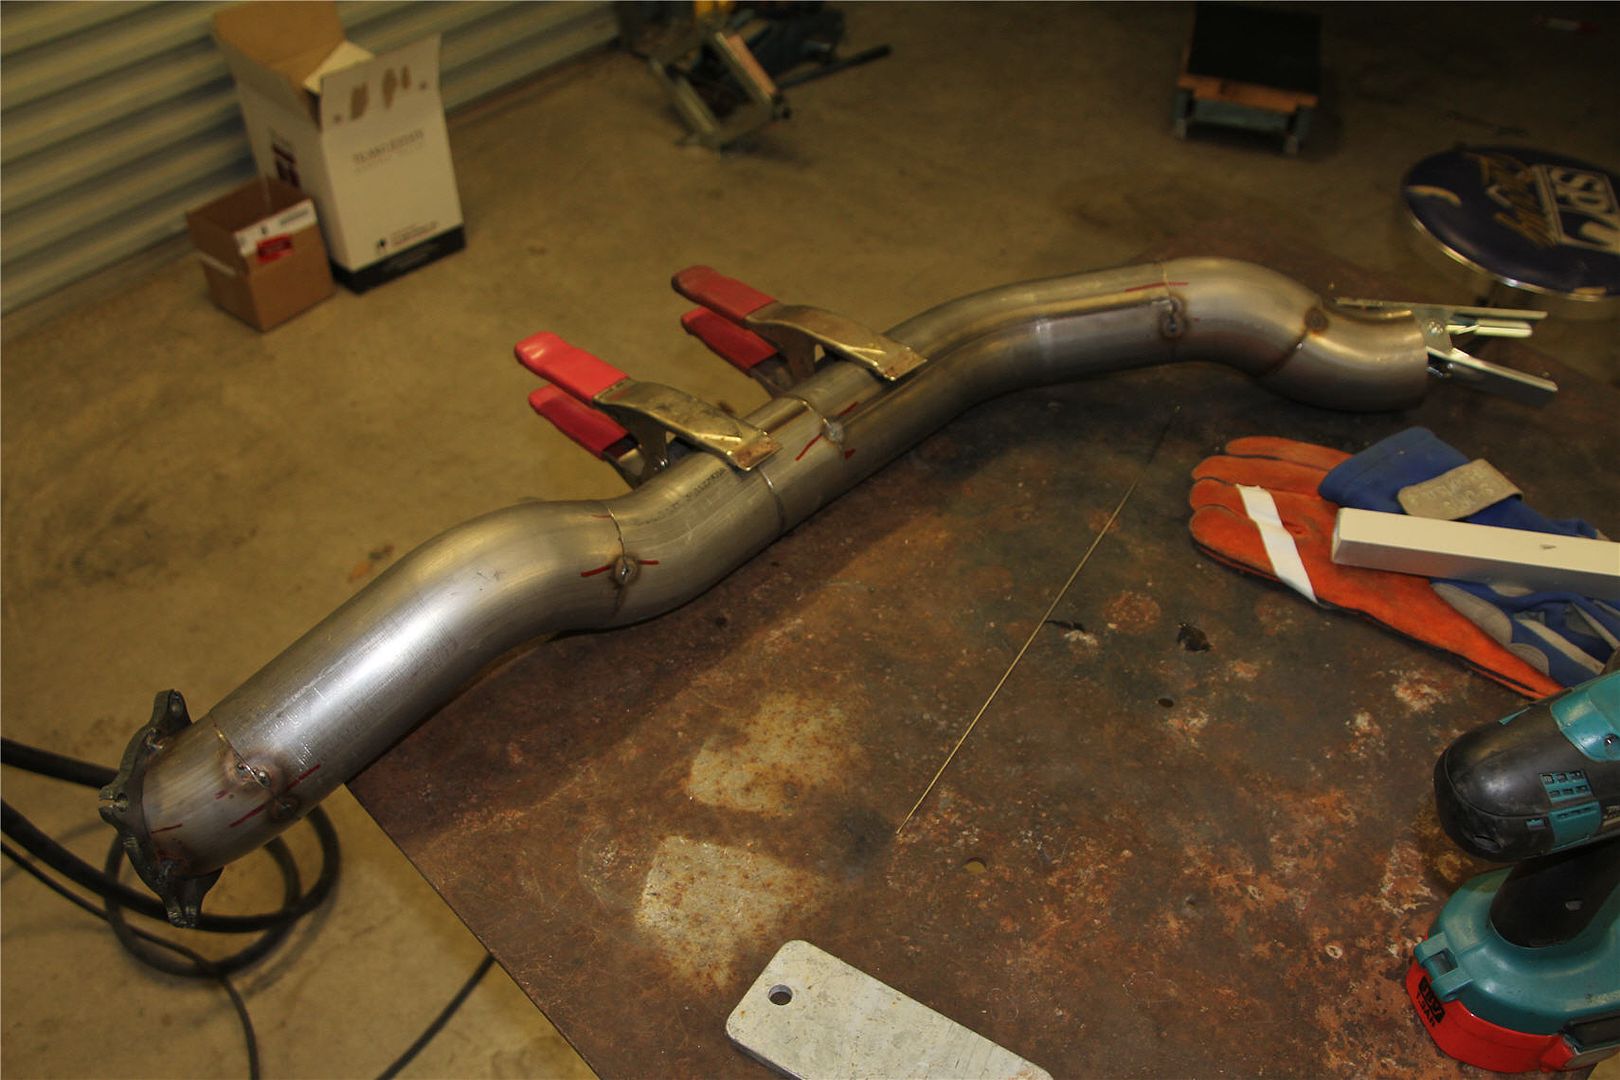
Posts: 5 777Have had an annual leave day today as I wasn’t sure what time we would make it back from Bendigo, as it turns out got back reasonable time. Got pretty much finished and tacked. Have run out of a couple of bends for the very last section out, but have an idea how I want that, will be pretty simple. Have to say the exhaust has been a really enjoyable job. Once i got over the “shit what have I done” actually its not easy but not hard, just a case of thinking it through, tacking it, and changing it if it needs. Happy with the clearance all round, can easily get my hand everywhere, if I shake the crap out of it it’s nowhere near hitting, time of course will tell. Will get a couple of elbows and finish the rear, also the H pipe, then sit down and start to fully weld it, will be interesting.

 February 18, 2015 at 2:32 am #472
VRSenator065Participant- Adelaide SA
- VR Senator LSx454 1960 Kombi (project) 1921 Nash Hot Rod (future project)
View build HERE
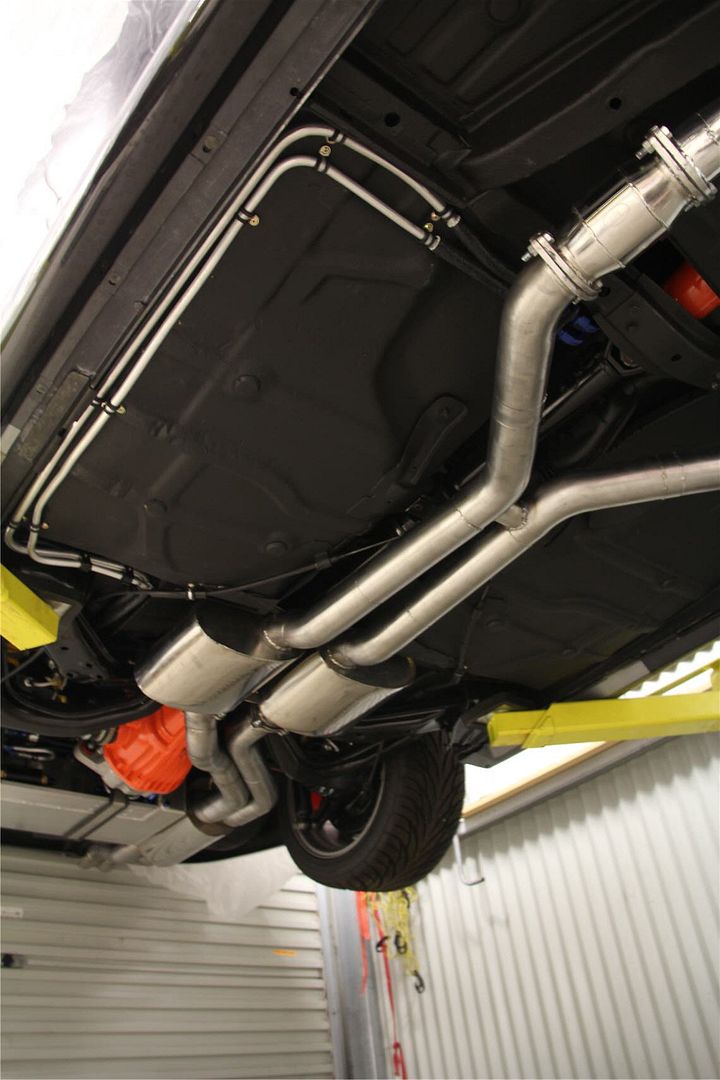
Posts: 5 777Wasn’t going to post as was going to wait until it was all done but got so much done over the last few days wanted to post at least a bit of progress. Finished off the collectors during the week, some of the welds on them tested me, should get them back from ceramic coating this Wednesday. On Thursday Suesy and the kids were out so got a night to my own. Went out at 5:30, came in after 9 no tea and no break, just getting into and having fun, tig welding I have to say I am finding is a little addictive. Got 90% of the pipes welded, I feel as though I am really starting to get the hang of it. Yesterday and today got all the flanges welded up to the cats, also the rear mufflers flanges etc Polished it all up, then really like the brushed look for my car so as a last go over went over it with a scotch brite rotary pad, gave a great even finish. Tacked up the dual rear pipes, they are not fully welded or polished yet, also still also have to do the H pipe. I reckon by the end of next week end hopefully the exhaust is all done and dusted.
 February 18, 2015 at 2:36 am #475
VRSenator065Participant- Adelaide SA
- VR Senator LSx454 1960 Kombi (project) 1921 Nash Hot Rod (future project)
View build HERE
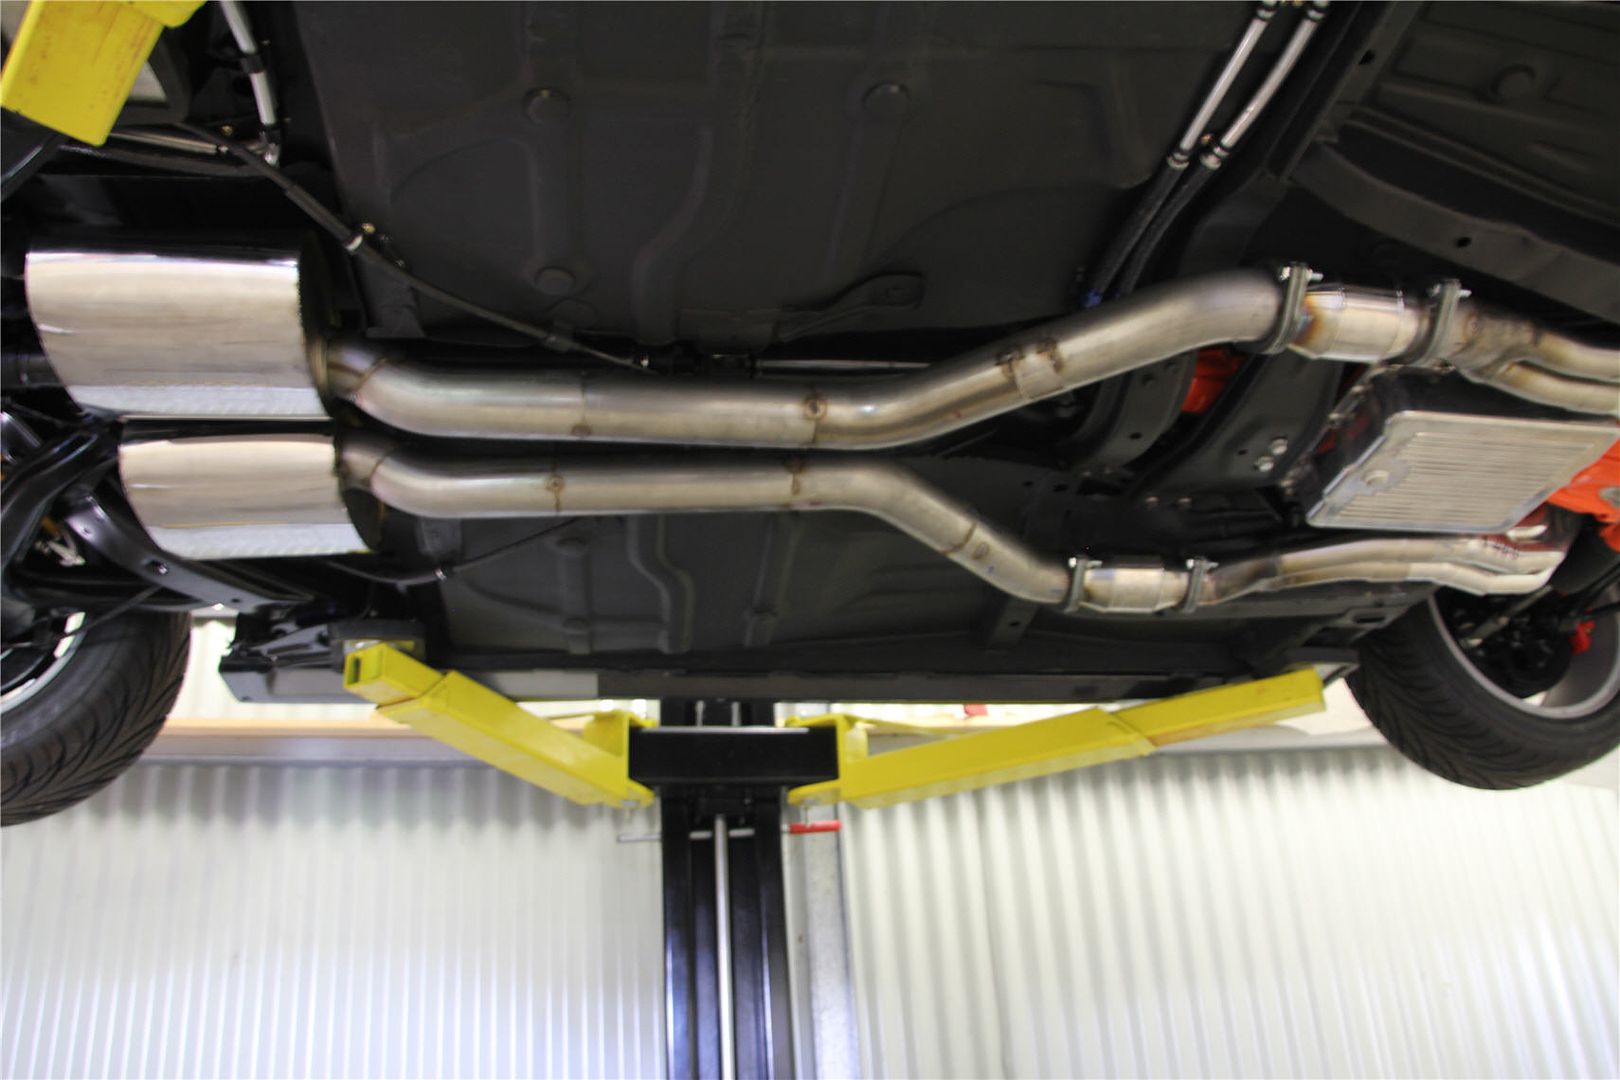
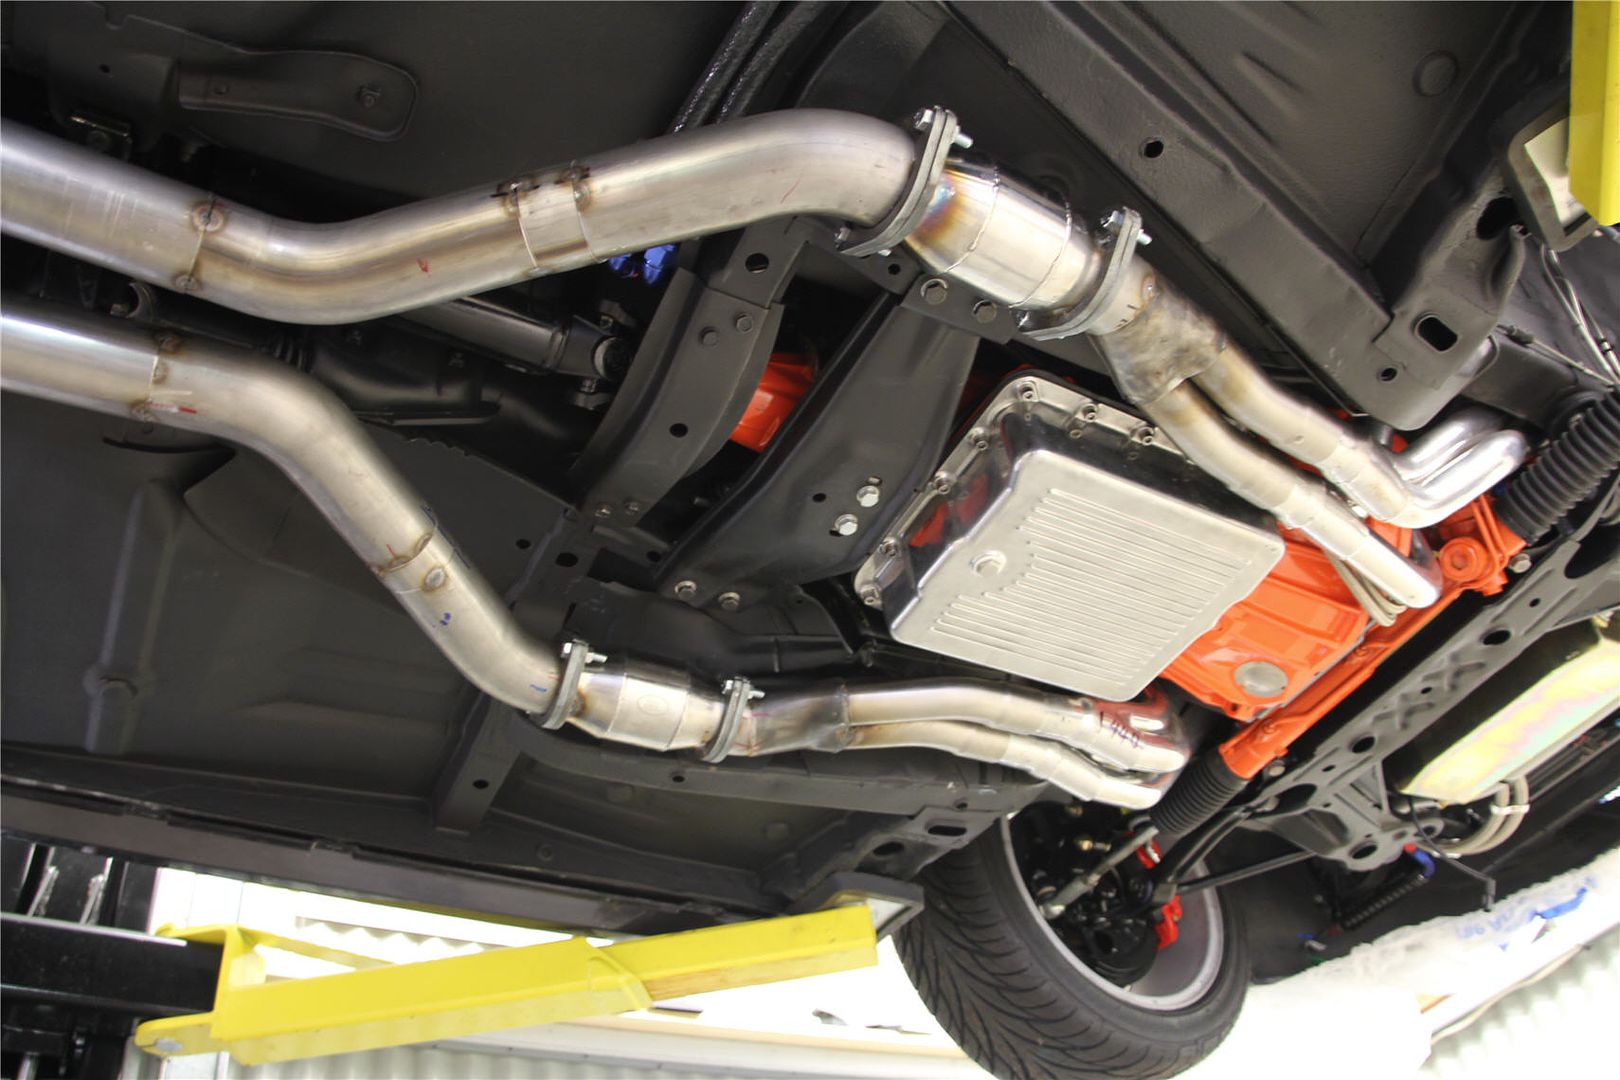
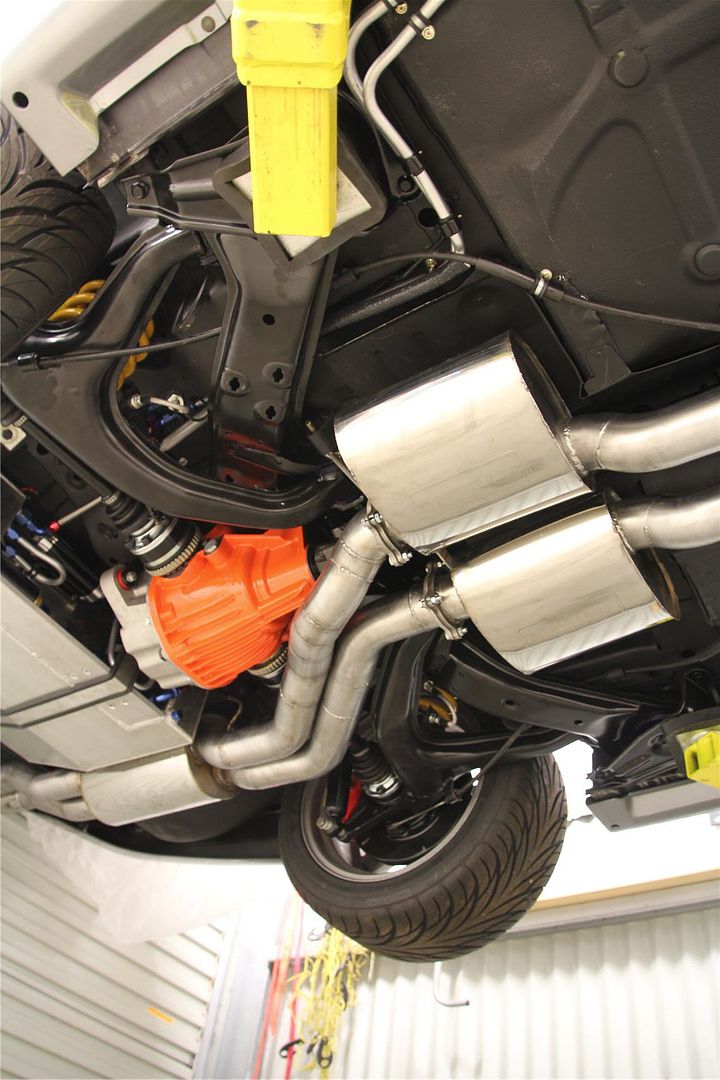
Posts: 5 777Well exhaust done and dusted. Been a bit of an epic, but really happy with how it has turned out. Thought I would do a bit of a more detailed write up in case it’s of any use to anyone else doing their own. It certainly is a big job, it actually reminds me of doing the auto transmission. It’s not that it’s particularly difficult or hard, but it’s not that easy either, and it is quite time, consuming. It’s a lot of head scratching, cutting the pipe, cleaning the cut, tacking it, getting under the car for a trial fit, then moving onto the next piece. Occasionally you finish one of the pipes and realise it would be better maybe rotated or angled a degree or so, so it’s a case of cutting off the tacks and changing it. Getting under the car to check, then back out again to fully weld etc. I am sure anyone reading this who has done is nodding in agreement right now. I reckon I have spent maybe 40-50 hours on it, but that does include teaching myself to tig weld. If I did another I would definitely be much quicker.
Material
I decided to buy the mufflers, cats, pipes and tube off DiPhillipo. I really liked the look of their centre mufflers in particular. The gear they supplied is 409 series stainless steel. One of the benefits of this grade is its magnetic, which is very useful when clamping it etc while you are fabbing it up. The downside is when polished it doesn’t achieve the mirror finish of 300 series. For me that’s not an issue. My car is not going to be trailer queen, so first time I run it will discolour anyway, but it is something to consider. If I did it again, I maybe would have bought pre-polished bends and tube, just to save some time and effort, and that way I would have only had to clean the weld zone.DiPhillipo
I was really happy with the quality of the DiPhillipo mufflers cats, and the mandrel bends (as they should be) were spot on. I do have to say I wasn’t overly impressed with their after sales service. I tried to contact them a couple of times with questions with various degrees of success. I also think given they knew I was making my own exhaust, they could have suggested/included some stainless bar to hang the mufflers, also their flanges are basically rough profile cut. I needed to hit them with a flap disc to get them to look schmick. I am not rubbishing DiPhillipo, but on the other hand it wasn’t terrible but I did want to mention it, $1,800 id not a small amount of money.Finish
I played around a lot to work out the way I wanted to finish the polishing. I tried quite a few things, but in the end settled on a brushed stainless kind of look. Bunning’s sell a 3M rotary scotch bright style of pad, it was excellent for cleaning it up, and overall gave it a nice uniform look which is what I was looking for. So with some fine flap discs in the grinder your away.Cost
The quotes I got were around the $4,500 mark. Now I am sure for that sort of money it would have been better than I have achieved, not sure how much though. I bought all the bends, mufflers, tube and cats delivered to my door for $1,800. I reckon add in about an extra $200 for consumables like welding rods, gas etc, so it cost $2,000. I bought the TIG for $800, it’s a middle of the road, TIG/STICK inverter welder, you can pay less, and considerable more, but it easily handled the job. So I reckon I am still way out in front even factoring in the purchase of the welder. Of course the flipside is the time I spent. I can see where the cost is to have it done. But in my opinion you can save a chunk of cash doing it yourself.TIG Welding
Anybody out there considering buying a tig, I would highly recommend it. You just have so much control over the heat, once you get the hang of it, I really wouldn’t do it any other way. My welds at the end were of course way way better than when I started. I made the decision not to grind them at all, so what you see is what you get. I am really pretty chuffed to be truthful, particularly some of the tougher welds say where the pipes met the flanges. Its very relaxing tig welding, as someone has said, just a good skill to have.Things Specific to the VR
Where my exhaust ran, one of the pipes pretty much is directly under the hand brake mechanism. I used an air saw to trim off the underside seam of it to clear, then texture coated it so it looks neat.
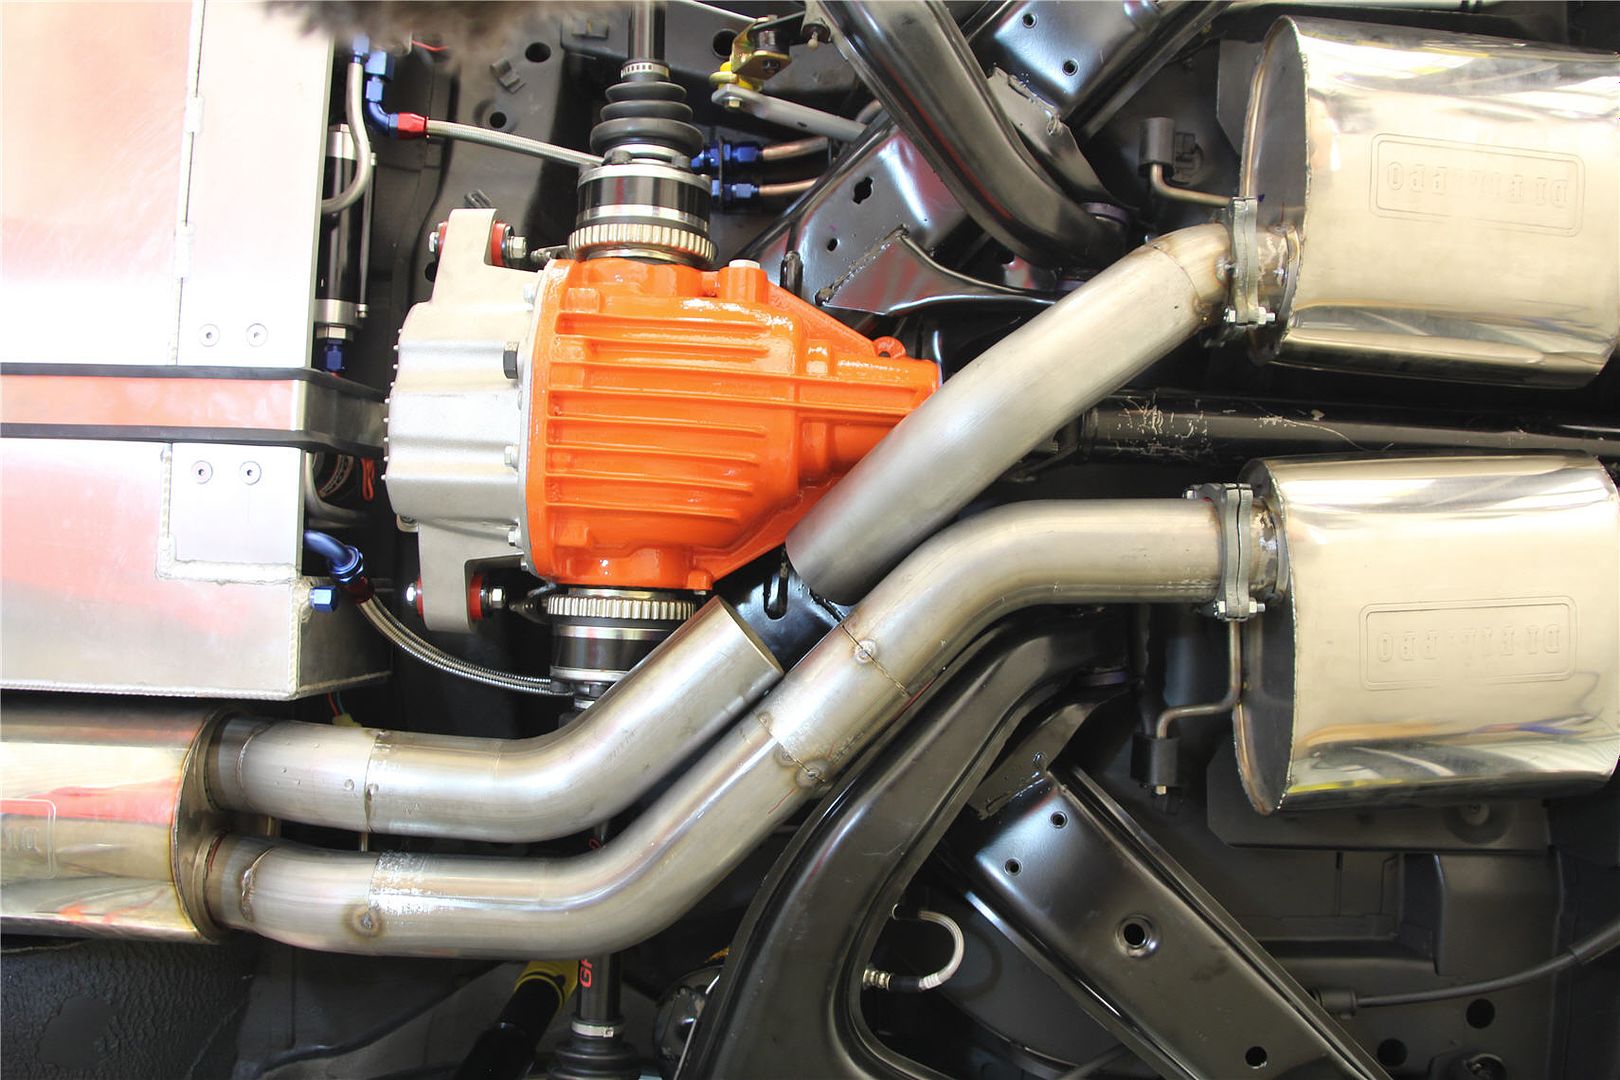
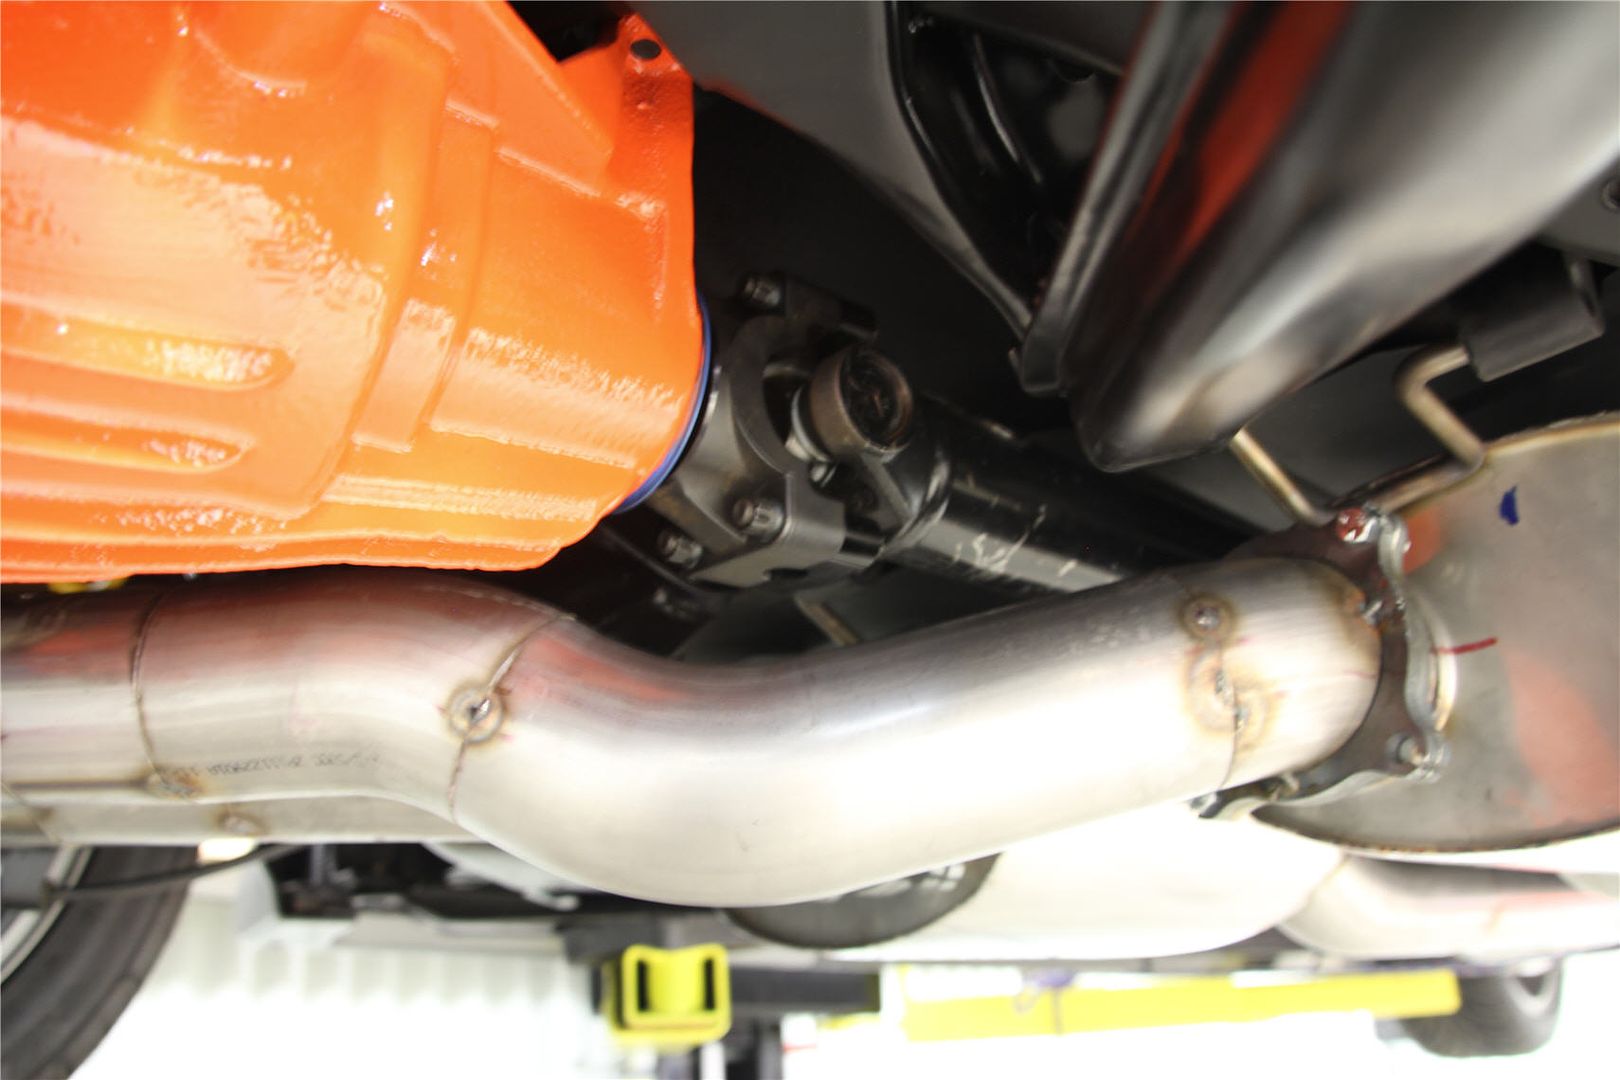
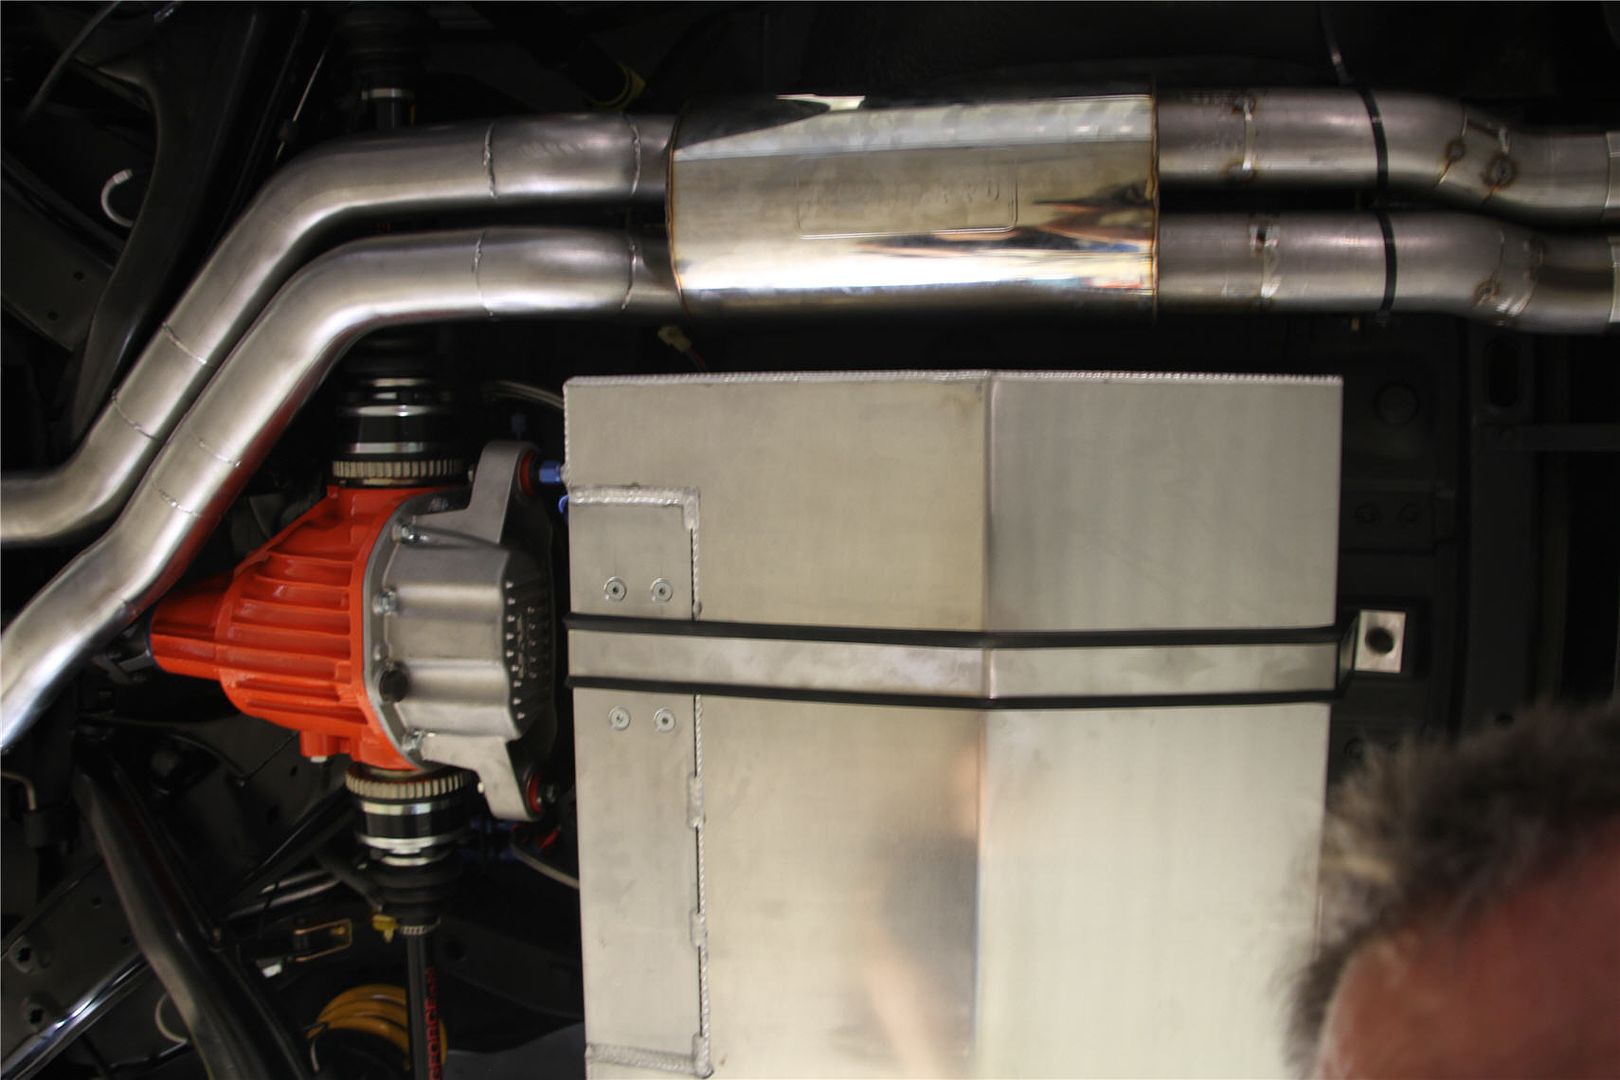
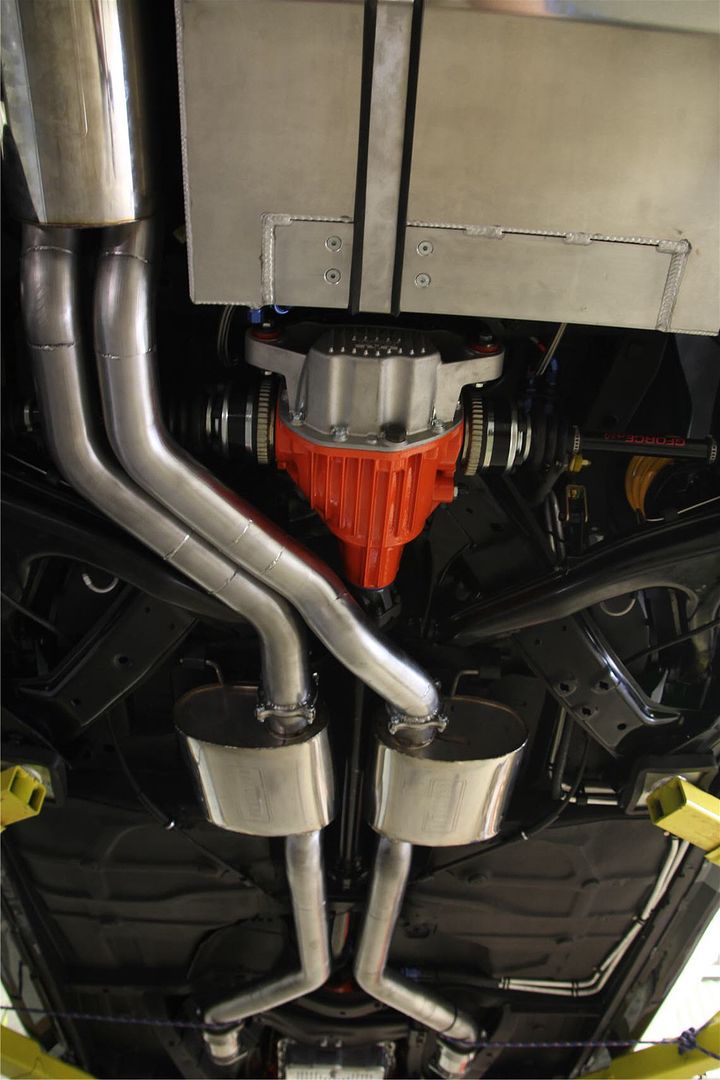
Also it’s a reasonably tight fit for the rear barrel muffler with my drop tank. I dressed the spare wheel carrier side over with a hammer then also texture coated it so it looks neat.The big issue for my car was the size of the 12 bolt diff. Not only is it bigger in diameter, but it is also much longer and with bigger strengthening ribs. It makes the driver’s side pipe a tight fit, but it does fit.
I positioned my middle mufflers first. I set them so there is about a hand depths gap between the floor and top of the muffler. I then used the bottom of the muffler as the lowest height. None of the other pipe is lower than that, I figured if the bottom of the mufflers is that low, it won’t hurt if nothing is lower.
My car has a very heavy duty tail haft centre bearing and custom mount plate. I ended up countersinking the mounting plate and used counter sunk socket head cap screws to make sure there was no chance of them rubbing on the pipe work.
I decide to use all the standard OE mounting blocks, that includes the rear figure 8 hangers. I just didn’t want to change the car, I will keep an eye on them, if needed I will change the later although it seems pretty solid.
What I Used
· A mixture of 45 and 90 degree bends, actually I never used the 90’s, I cut them up as 45s
· About 2m of straight pipe
· DiPhillipo side in/side out middle mufflers, and duel in/out rear barrel muffler
· 200 cpi DiPhillipo cats
· 3M scotch bright style rotary clean up disc
· 4″ thin angle grinder cut off discs, for cutting through tacks when changing it.
· Set of magnetic welding clamps.
· 4″ fine flap disc for cleaning up the flanges etc.
· I ended up using a 50mm round sanding barrel attachment for my air die grinder to remove the burr of the internal side of the pipe after cutting.
· I used my 300mm Makita cut off saw, I bought an iron free new blade before I started.Here’s a few photos of the finished article.
 February 18, 2015 at 2:36 am #476
VRSenator065Participant- Adelaide SA
- VR Senator LSx454 1960 Kombi (project) 1921 Nash Hot Rod (future project)
View build HERE
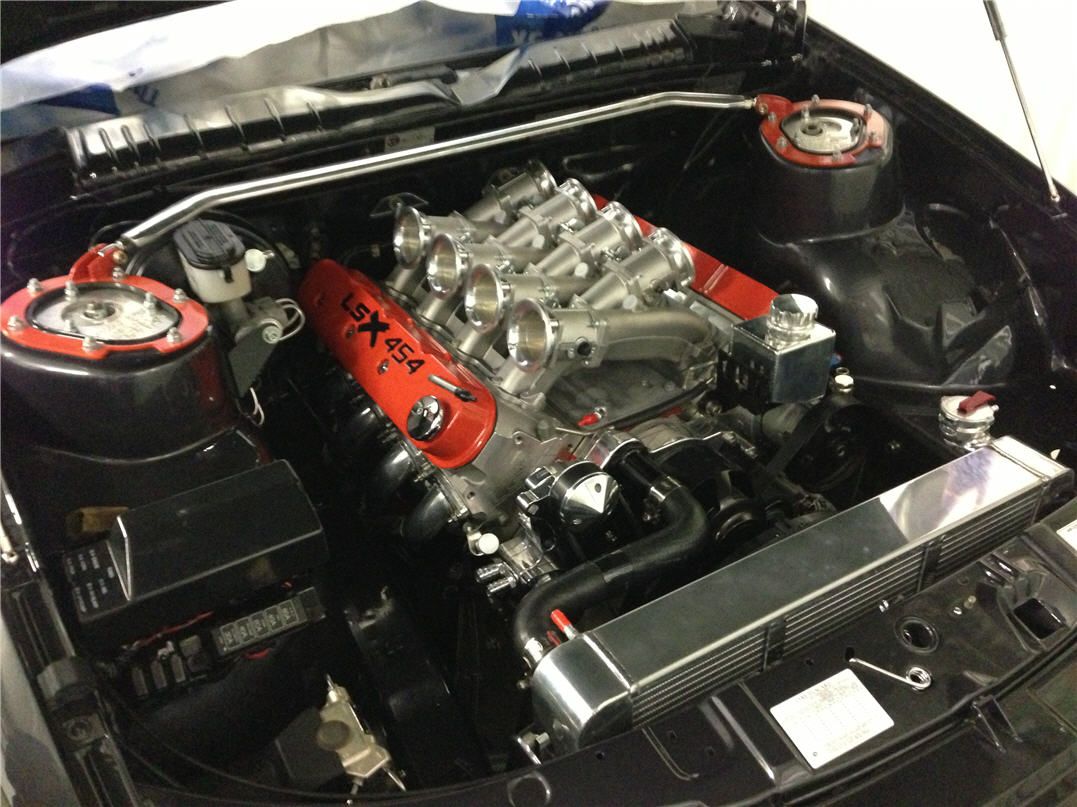
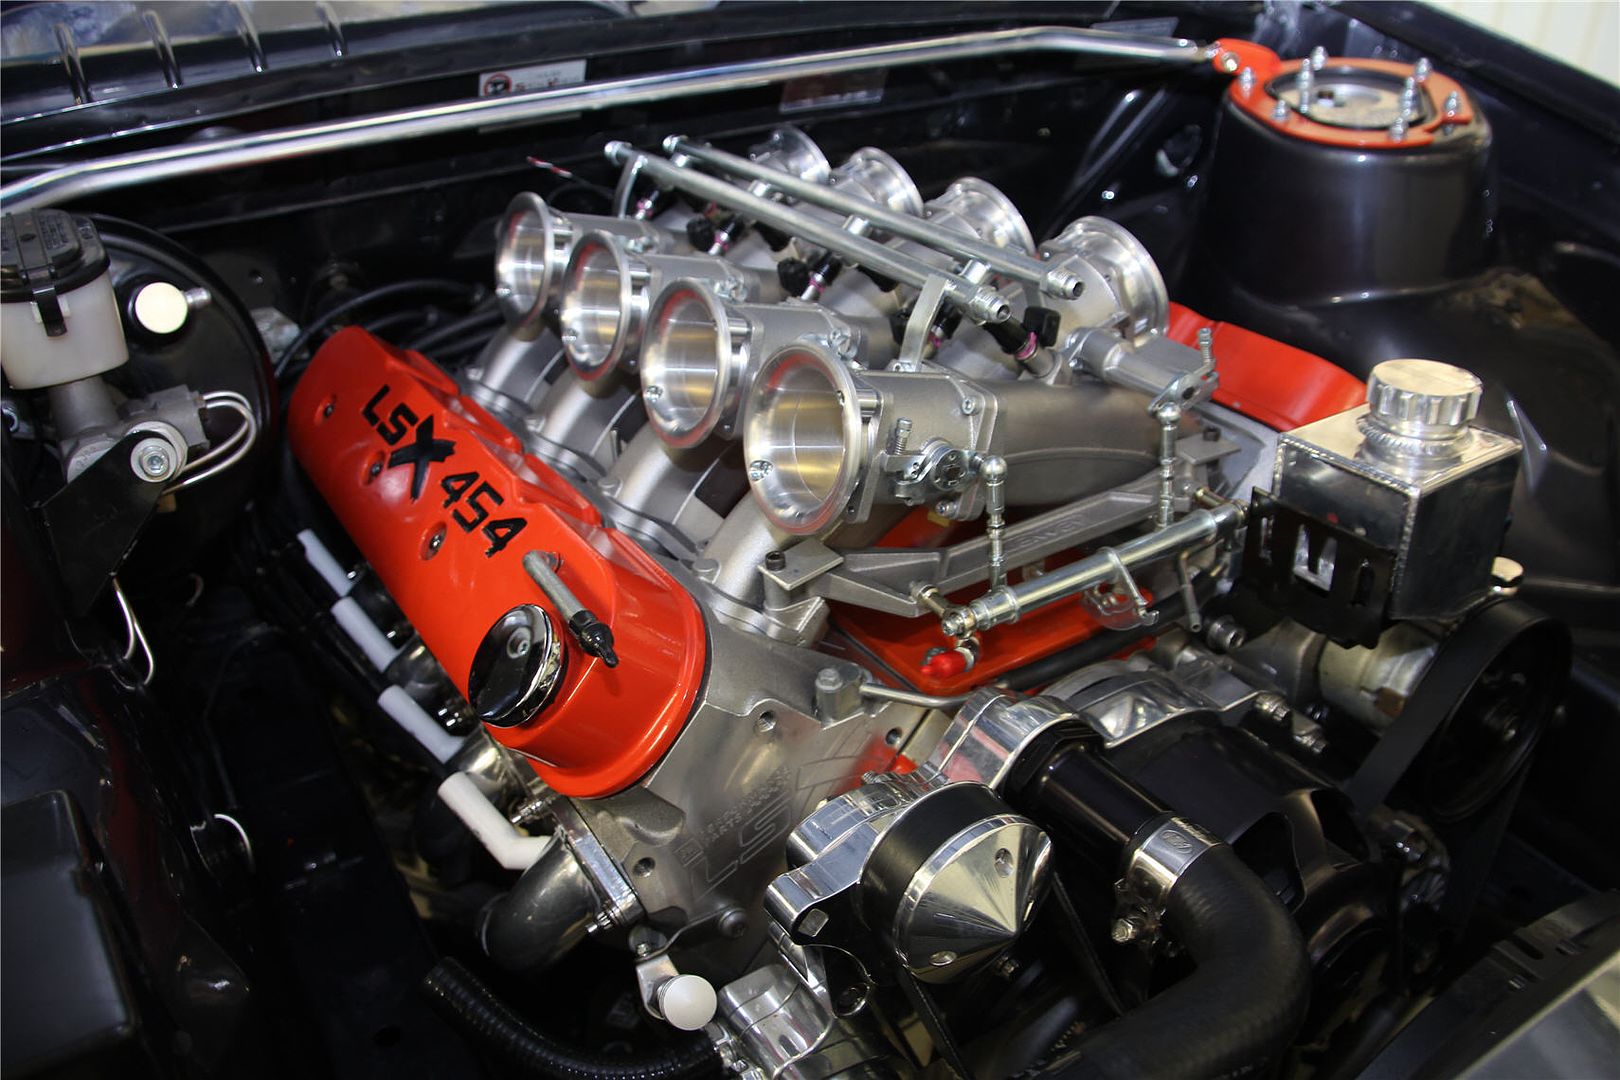
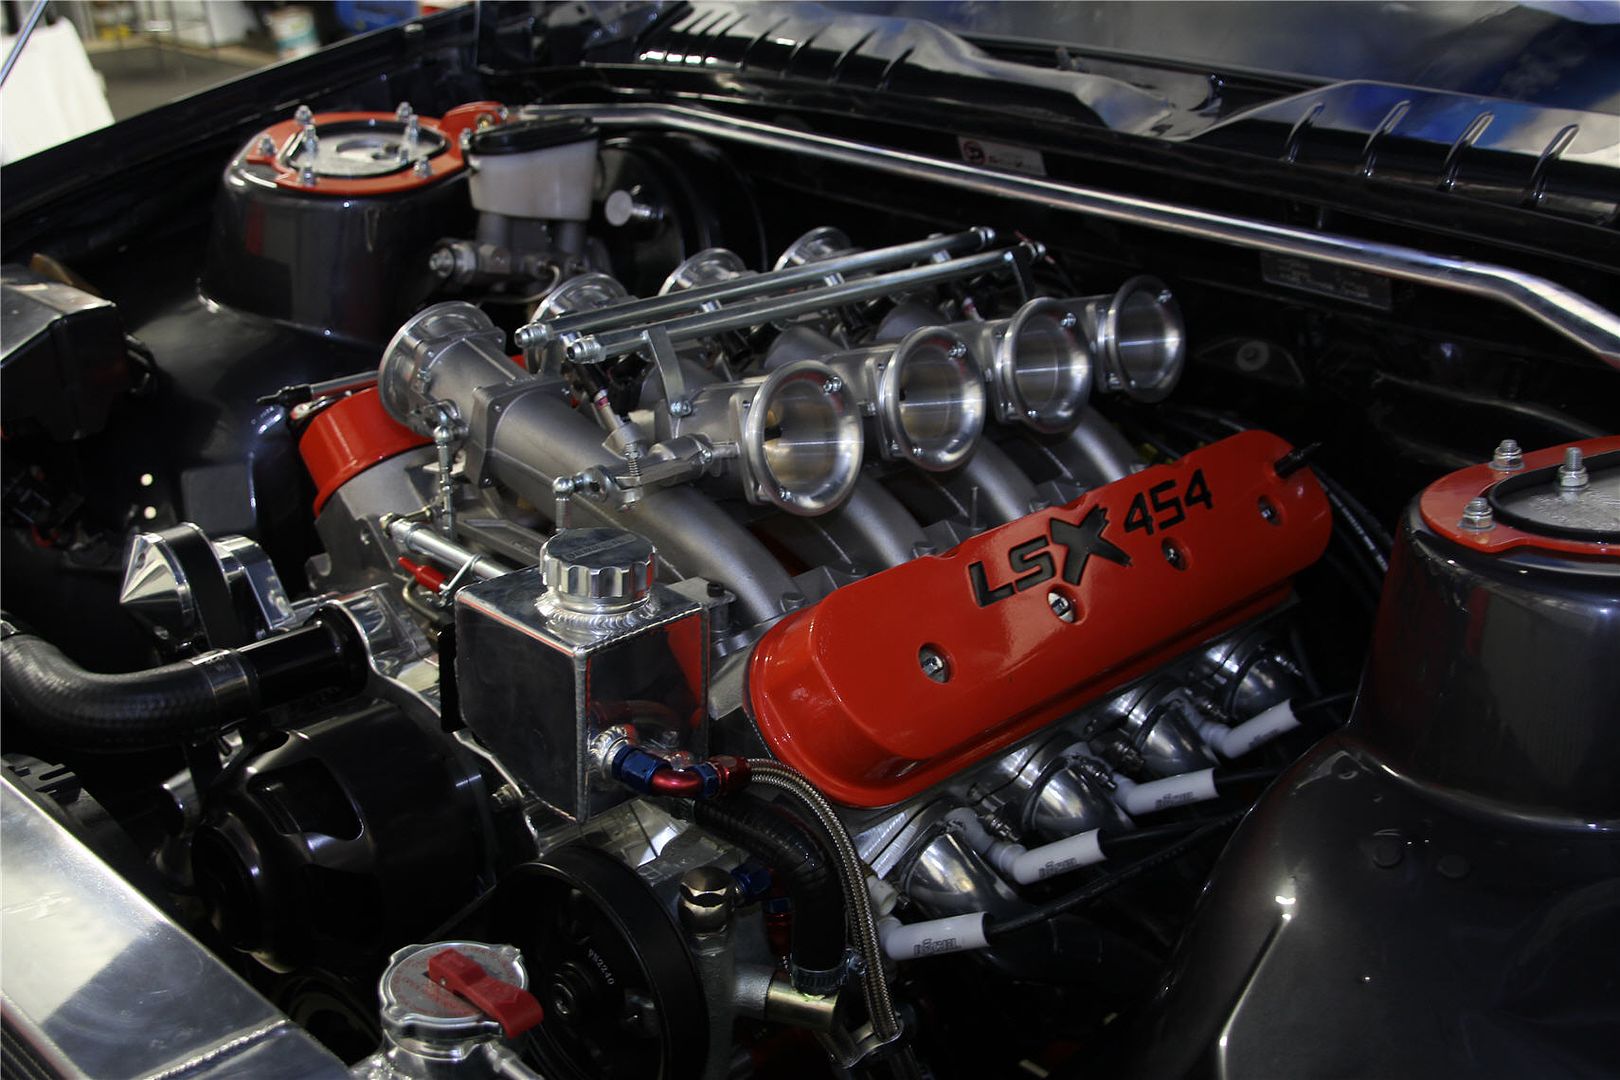
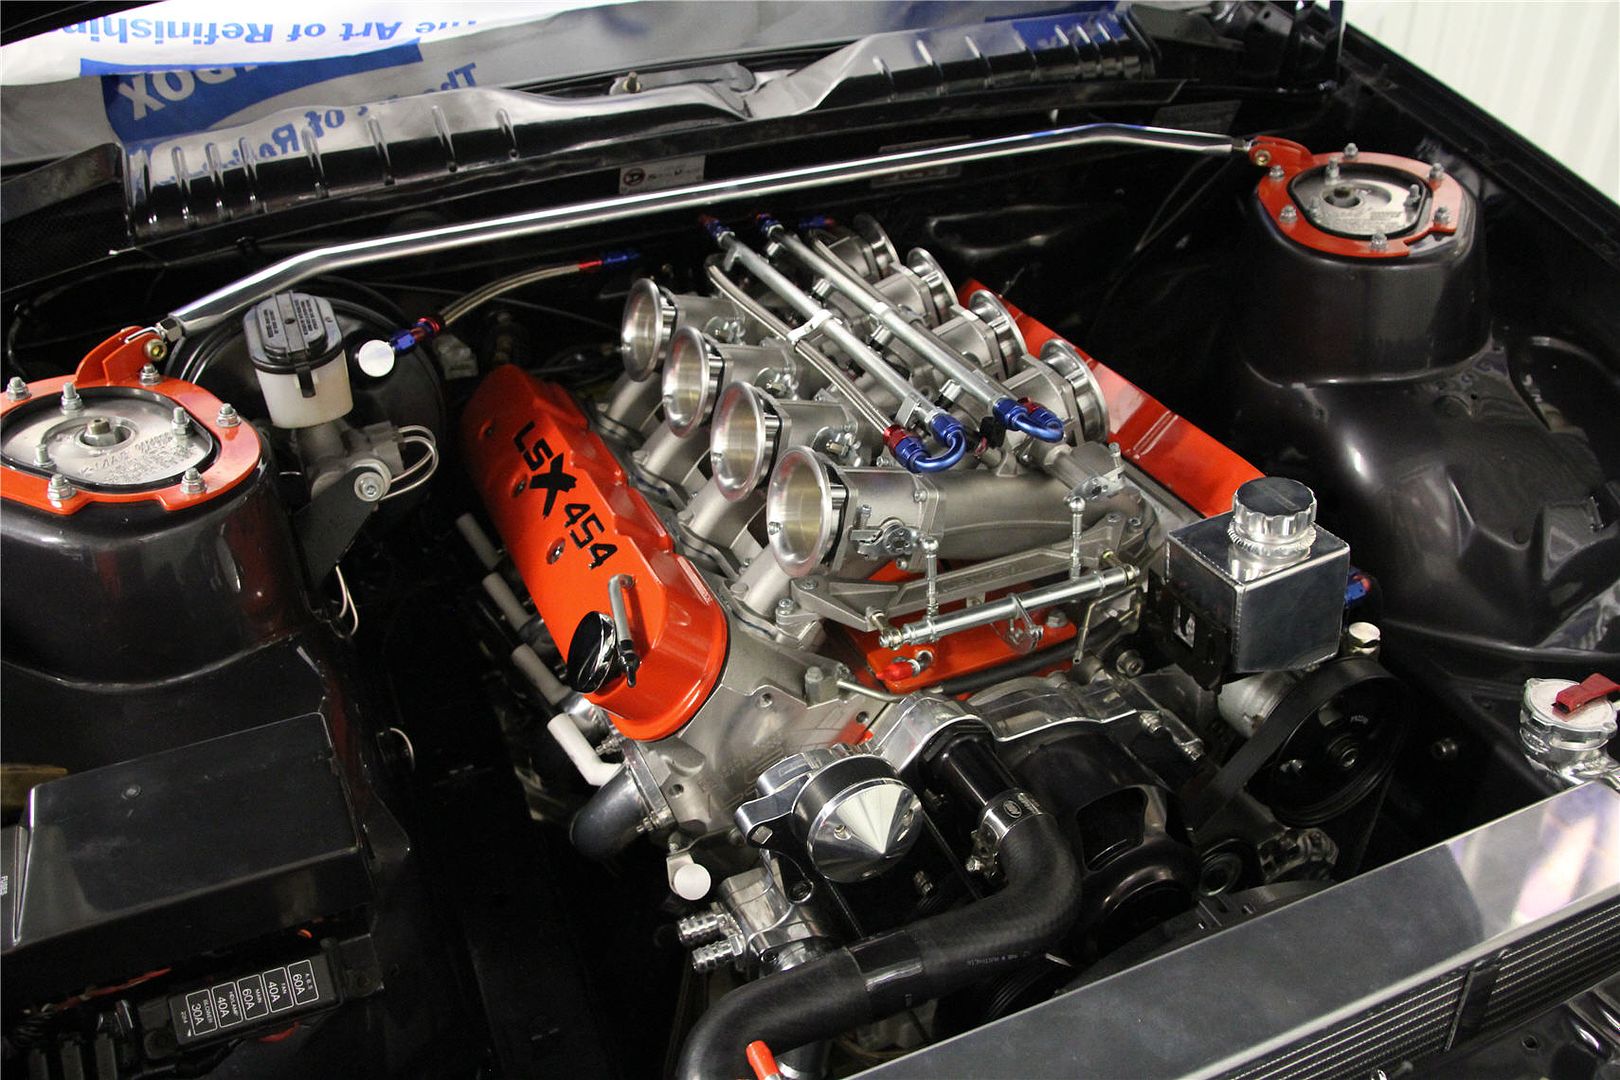
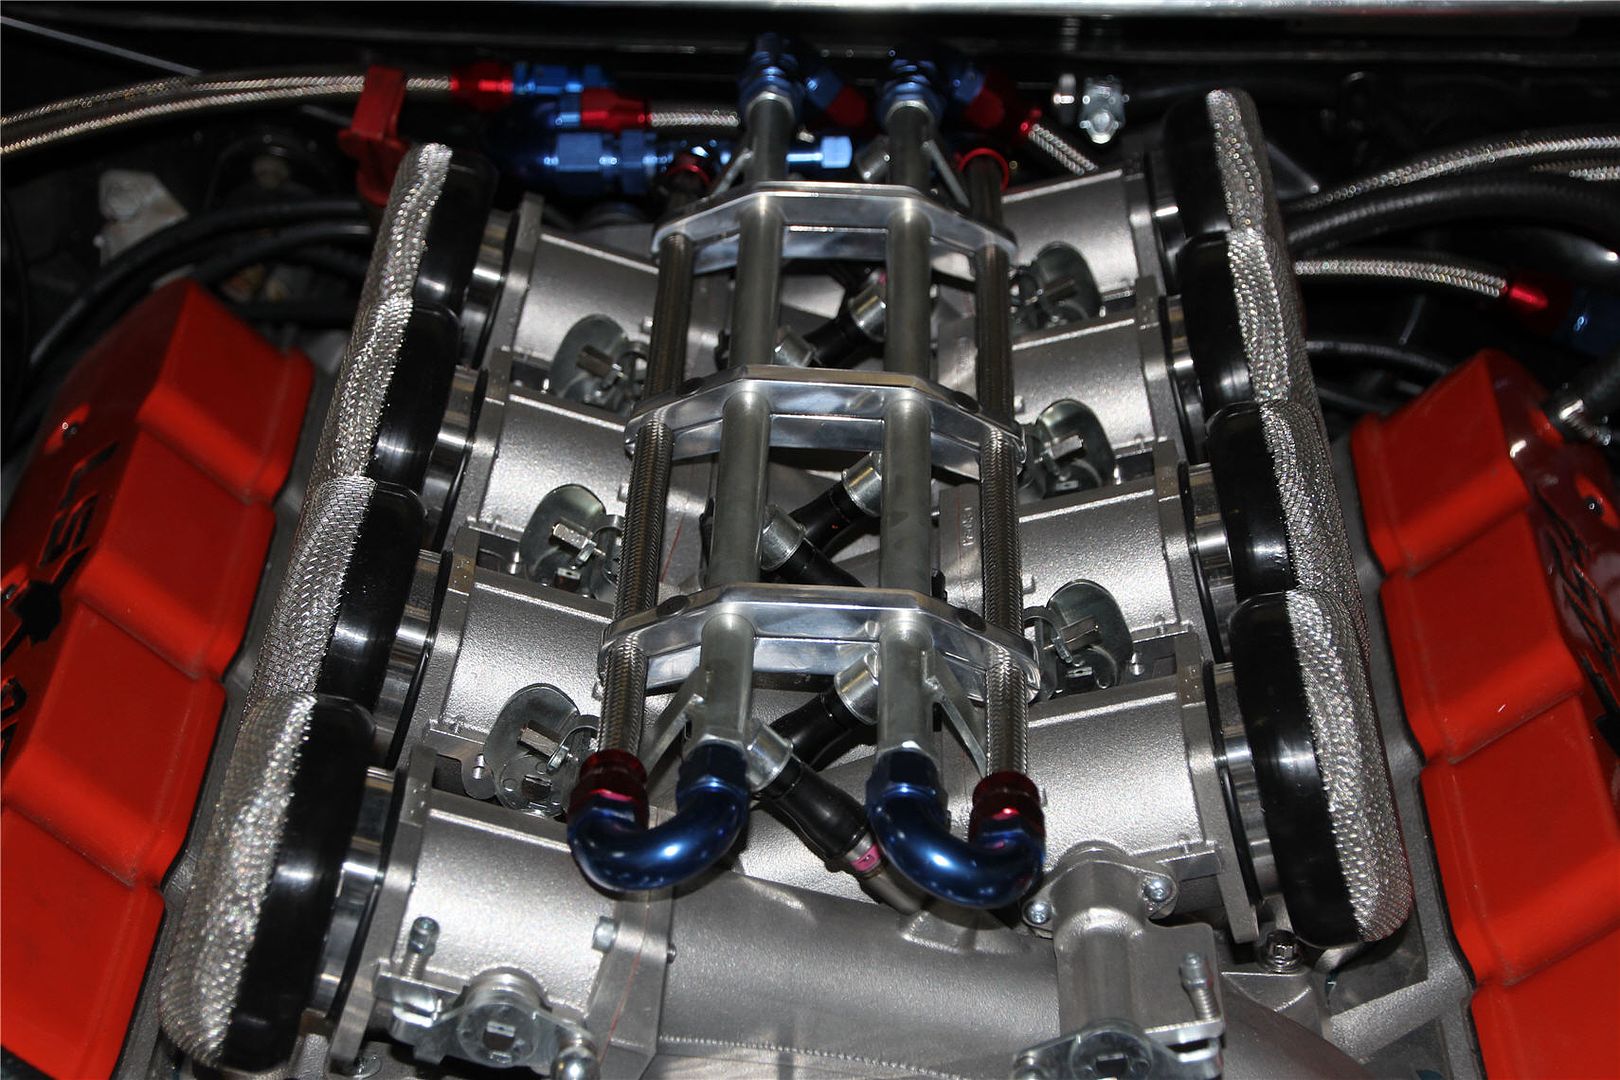
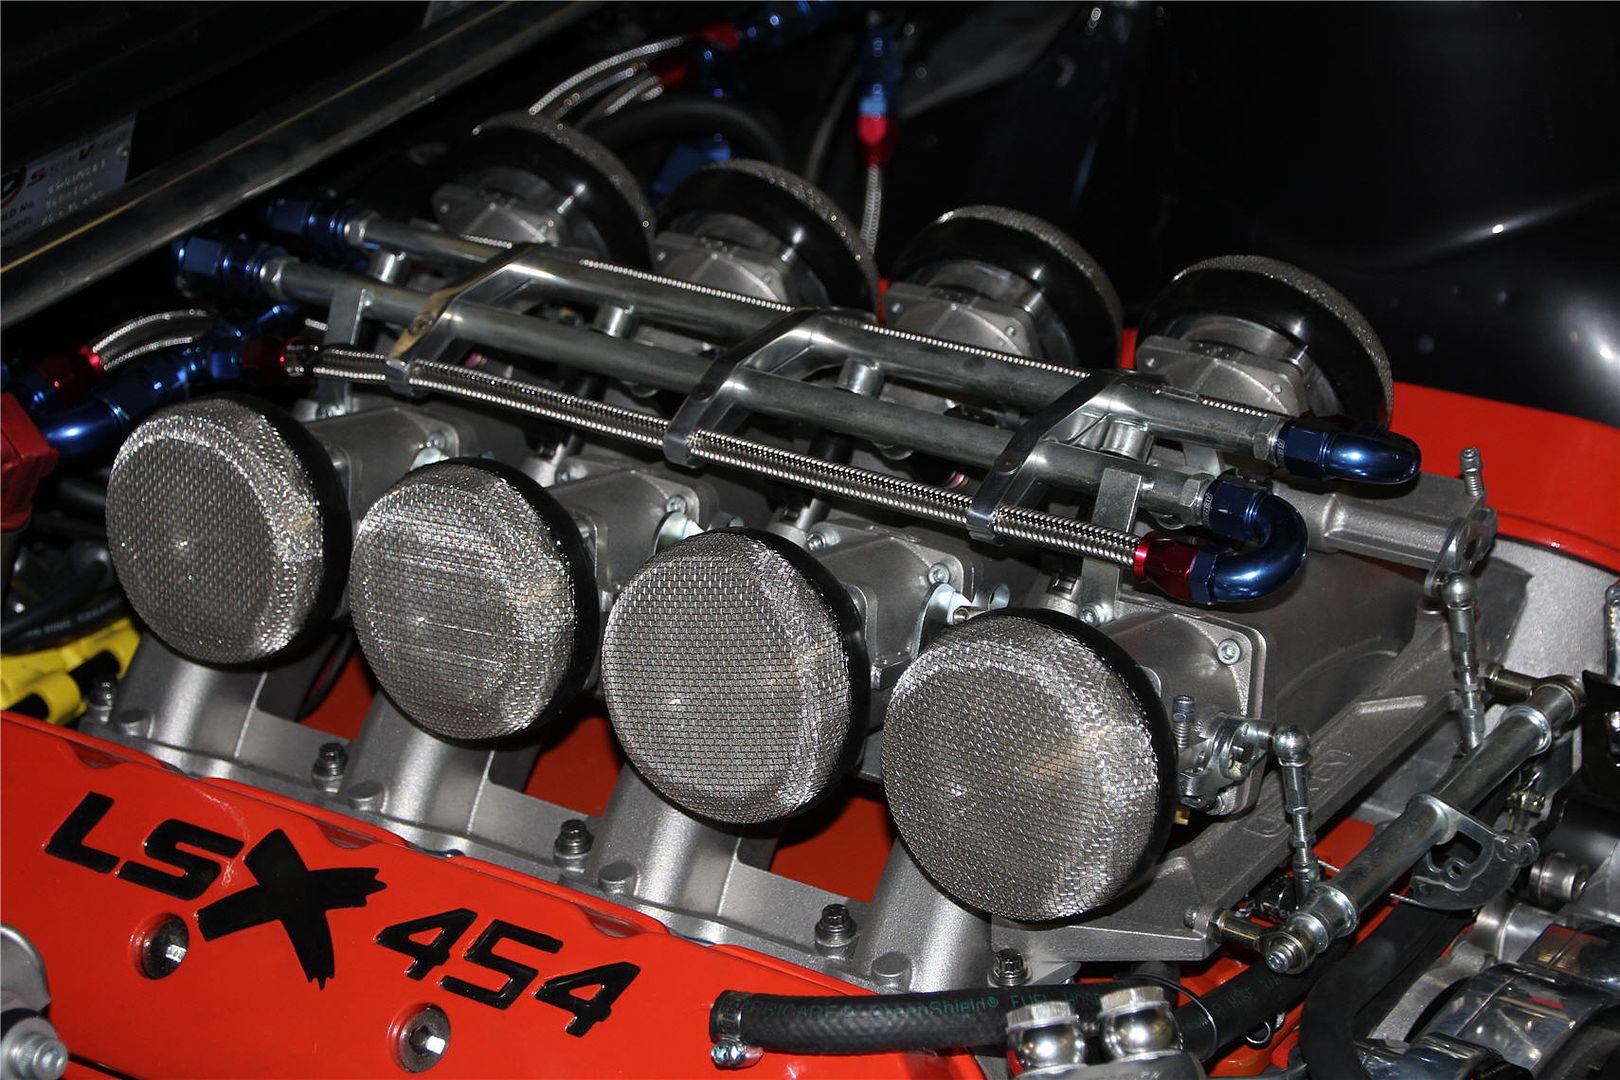
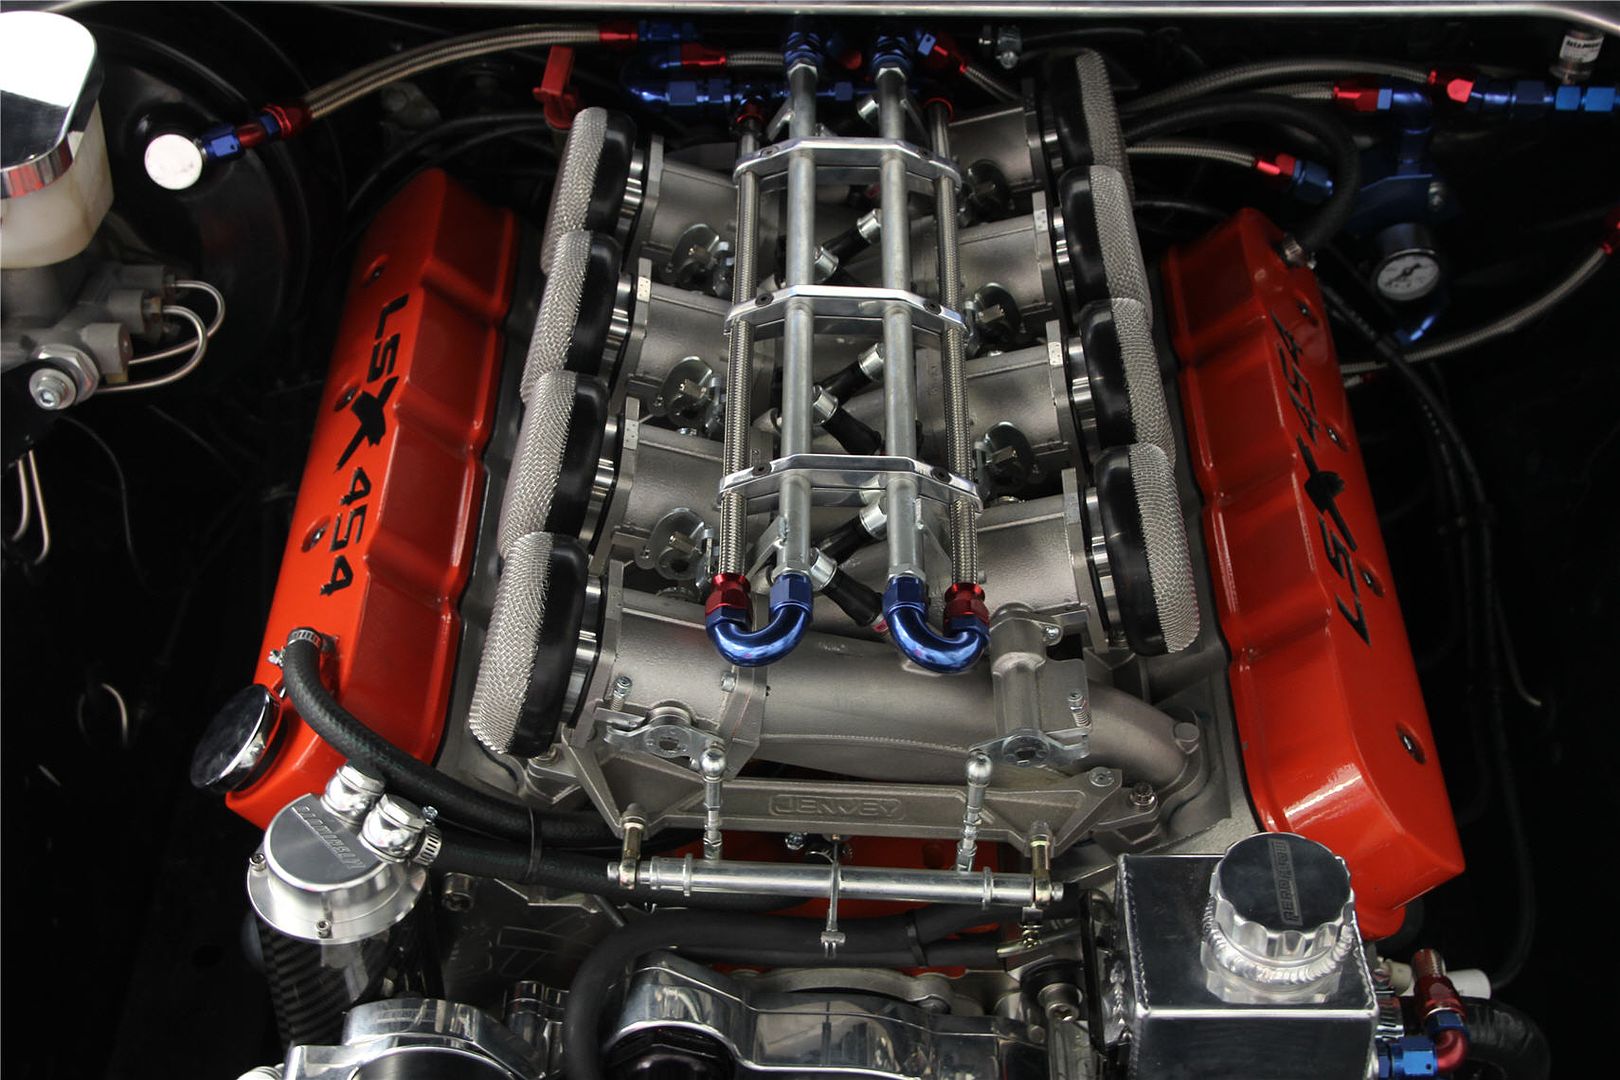
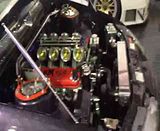
Posts: 5 777Really feel like I am powering along now, maybe its the sight of the finish line not too far away :) Using my new found tig welding skills made up a nice bracket to hold the radiator overflow. Also Agentcrm did an awesome job of the fuel rail brackets I designed up, all I had to do was polish them up on the buff, just waiting to get the proper stainless screws but I think it looks schmick. Still finishing off the breather hoses and catch tank, but also plumbed the head pressure bleed line. Also managed to find some push on trumpet screens, i like them, they will at least do for now to stop small children being sucked into the intake. Still cant really seem to get a good pic, it just doesn’t look as busy in real life as it does in the photos. Here’s a few I took anyhow for posterity.
 February 18, 2015 at 2:37 am #477
VRSenator065Participant- Adelaide SA
- VR Senator LSx454 1960 Kombi (project) 1921 Nash Hot Rod (future project)
View build HERE
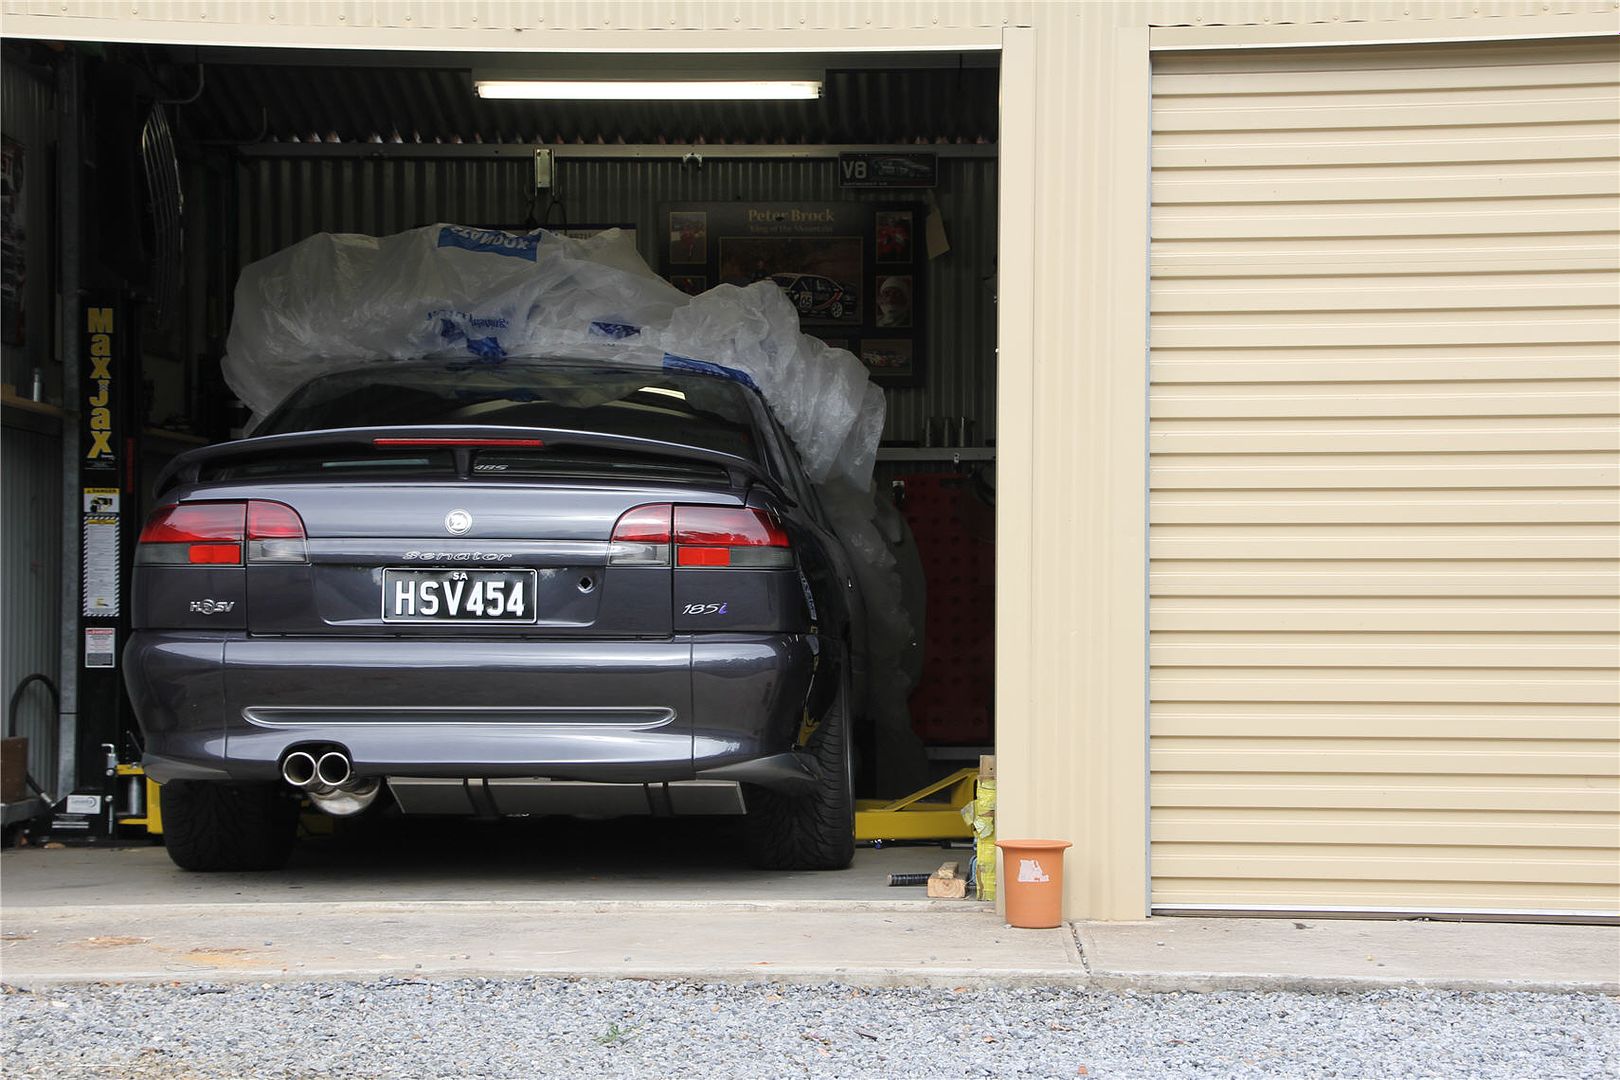
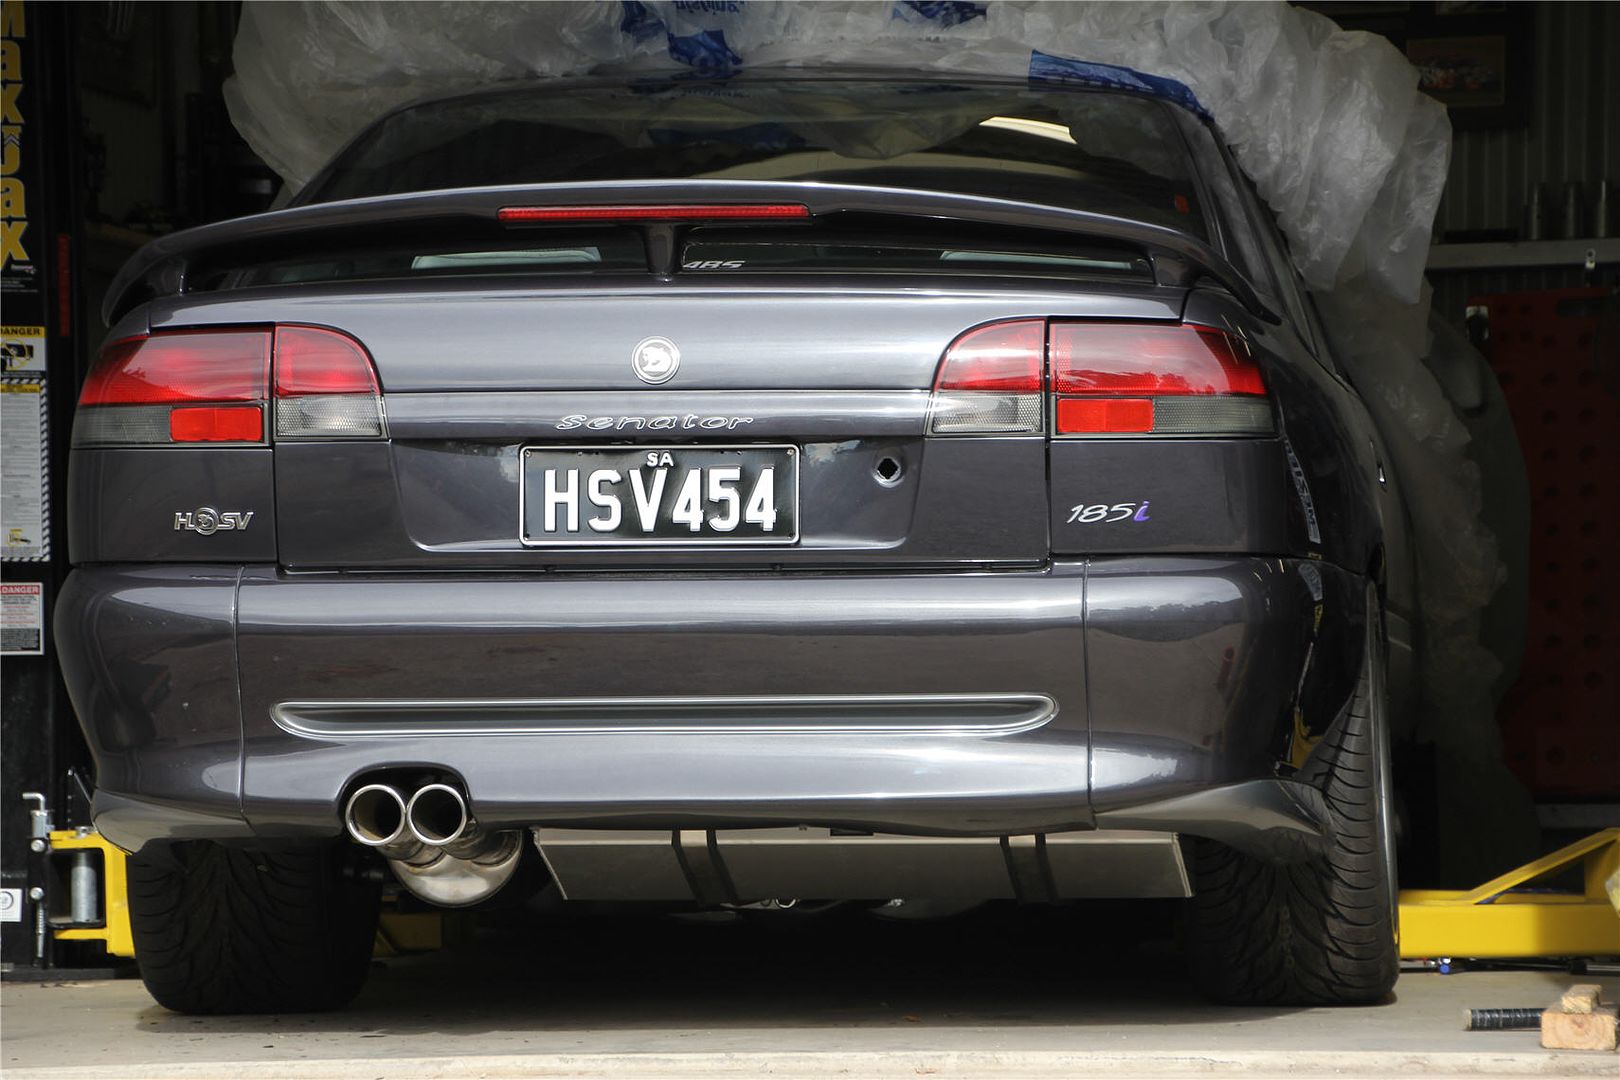
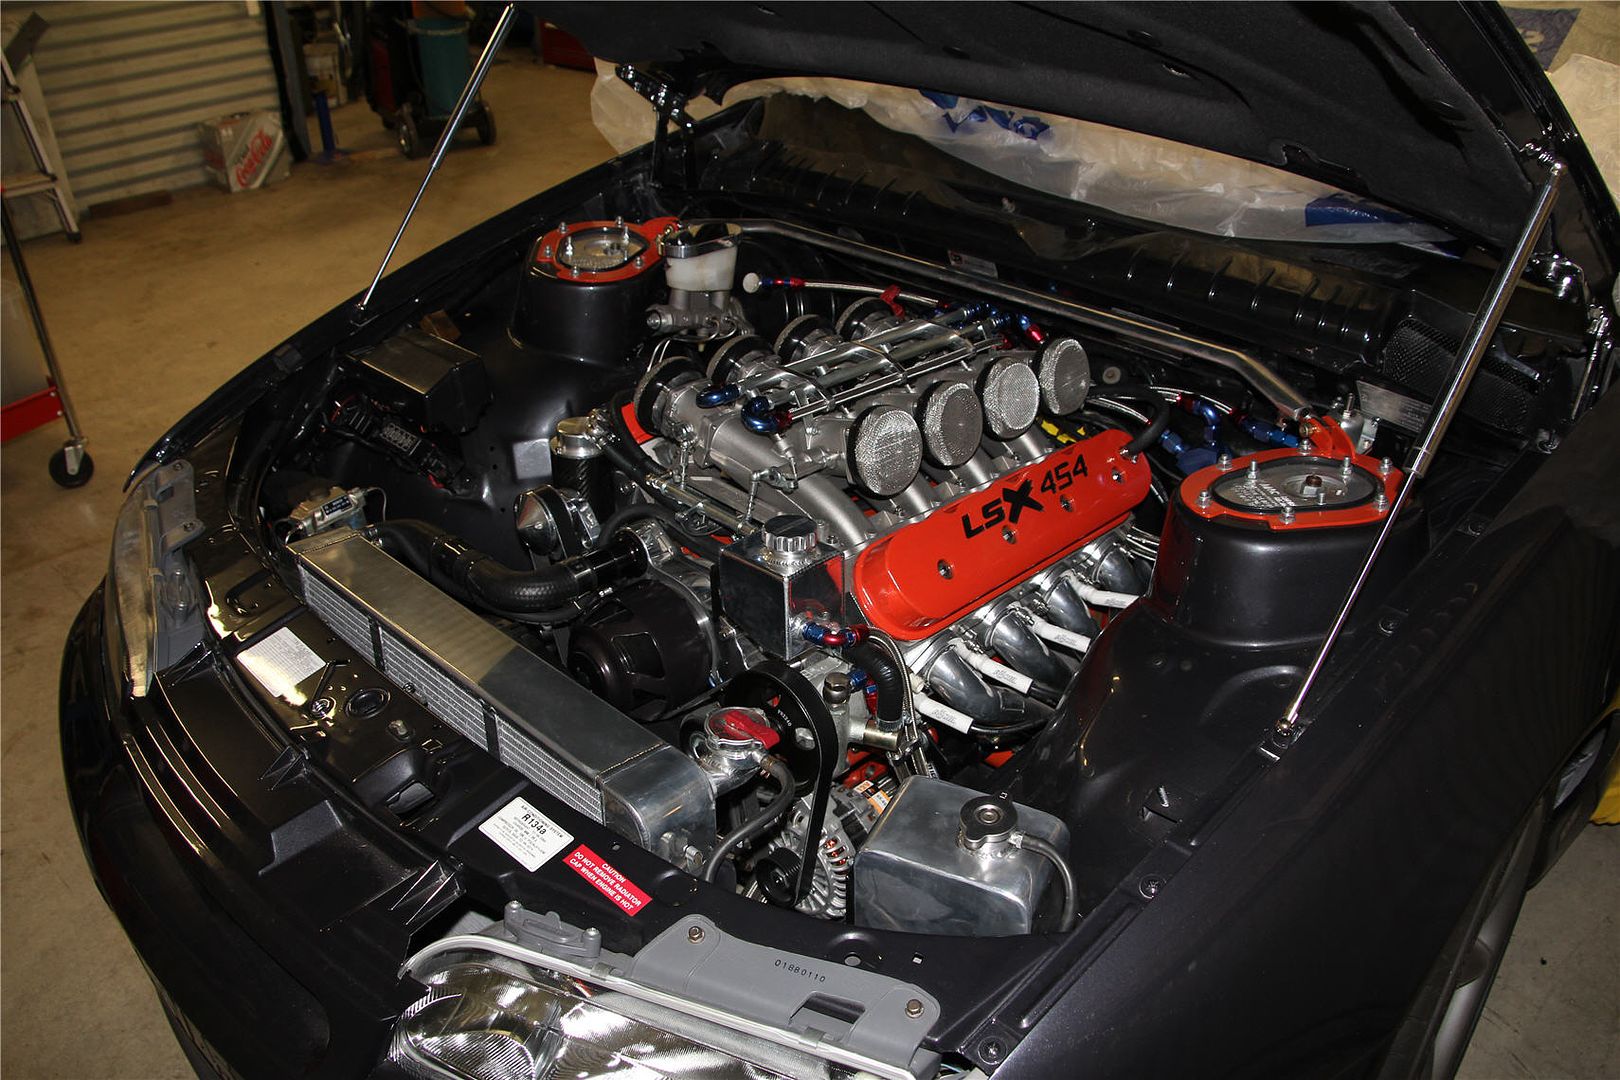
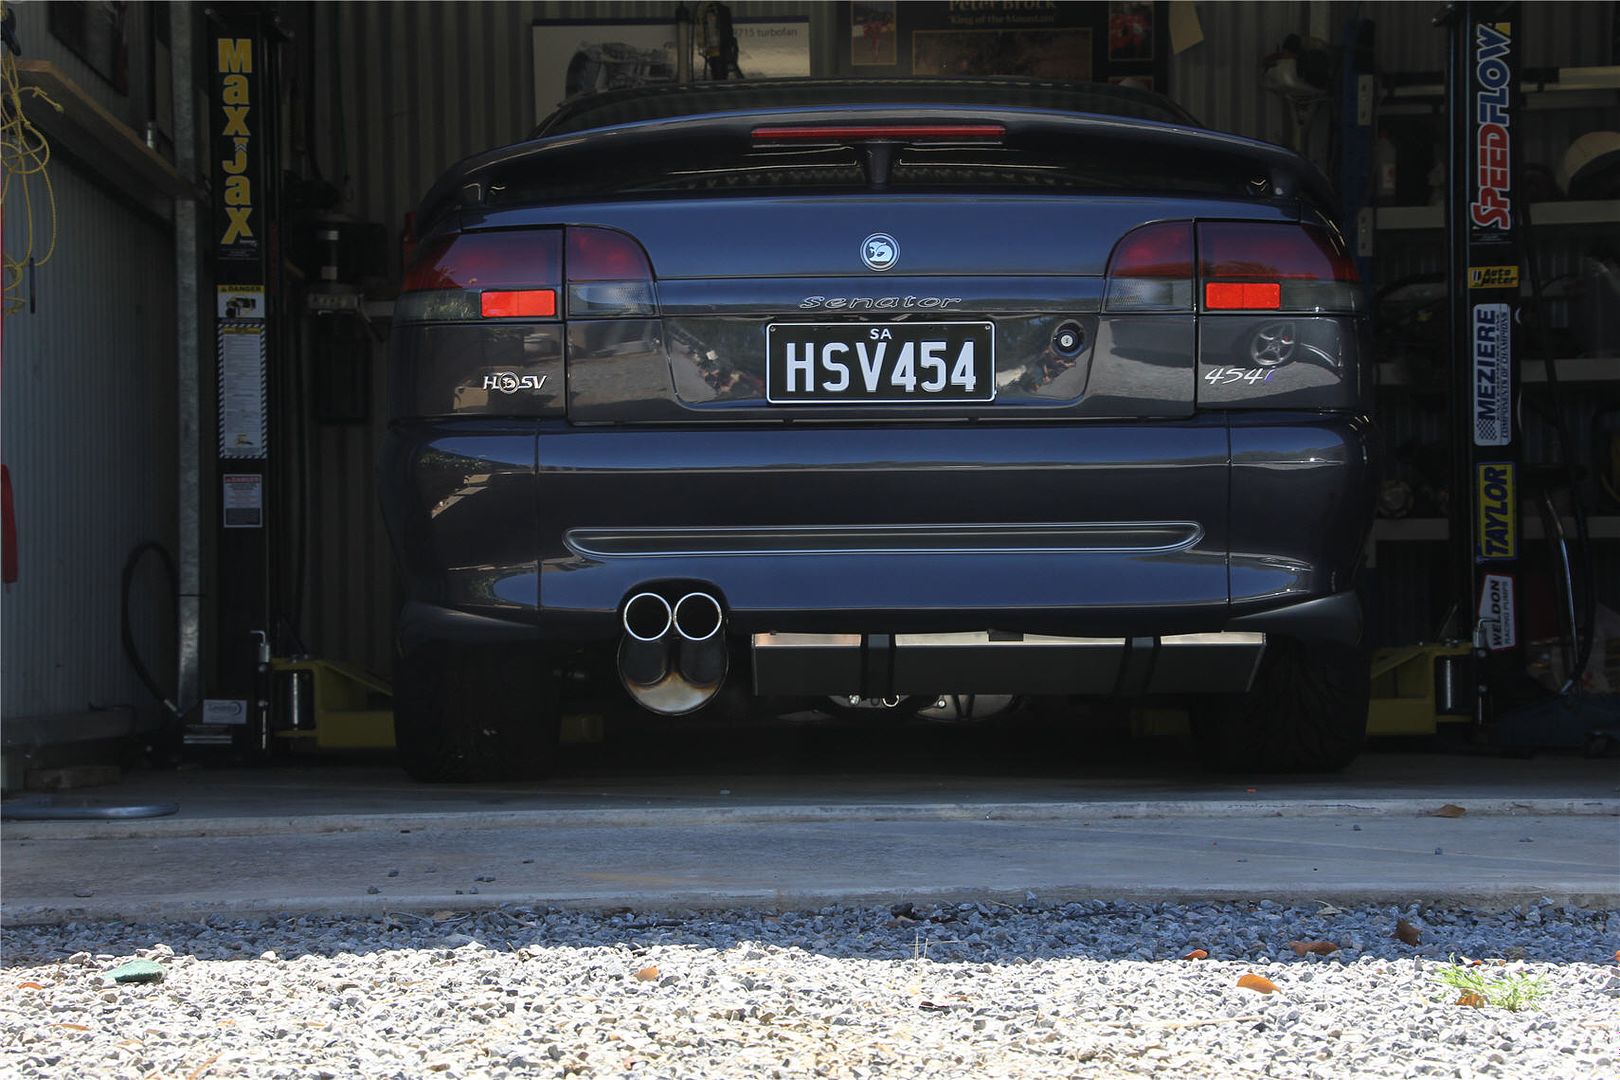
Posts: 5 777Looks like Adam has come through with the loom, its on its way over, hopefully with the correct plugs. Nailed a heap of stuff today. Started off with swapping all the boot latch and wiring to the new boot from my old one. With the help of the diagram posted by VSClubby355 was actually a lot easier than I imagined. Couldn’t for the life of me find the small cable that goes from the main loom to the boot solenoid but a quick trip to UPI sorted that. So the rear is all finished (yay). Also filled the engine with oil and calibrated my custom dipstick as per Cantons recommendations. That involved filling with 5.2l of oil, letting it settle, adjusting the length of the dipstick to read full, then adding another litre of oil. After the initial start up once the oil has filled and the filter, cooler etc is full, it just needs to be topped back to the full level. Also got is down off the hoist, fitted my new bonnet release cable, got a little ocd and modified one of my nice chrome brake line clamps that were left over to suit and used it instead of the OE clamp. Looks neat but truthfully no one will ever see it. Went to Repco, and bought a pair of heater hoses with the right angle bend, they fit really well, I wanted to not go braided as I want then to not be noticed, really happy with how they worked out as I was a bit worried they would look crappy but they look like they are meant to be there. And lastly made another trip to UPI (car heaven??), trying to find nice condition washer nozzles for the bonnet. I couldn’t they are all grey and crappy looking, and they aren’t available from GM. Rang Frank, and he said to give them a light “dusting” of satin black, “less is more” he said, gotta say they turned out perfect (he is a bloody wizz) Also have painted the wiper arms, so should get them on tomorrow. Also fitted my one little personalised touch to the back. Seriously is starting to look like a car. I think it will settle another 1/2 inch or so once its driven so will sit ever so slightly lower. And to all those dipshits who have said to me over the last couple of years “why do this to a bloody Commodore” or variations on that theme, why don’t you take a long hard look at the rear shot below and tell me it doesn’t look tuff as ****. I am so looking forward to driving it.

 February 18, 2015 at 2:37 am #478
VRSenator065Participant- Adelaide SA
- VR Senator LSx454 1960 Kombi (project) 1921 Nash Hot Rod (future project)
View build HERE
Posts: 5 777Apologies for all the posts, should have made a reality TV show ha ha. Got the console out, and modified to mount the three Auto Meter gauges Santa brought me. I actually took a long time to decide on what ones to ask him for. I cut and pasted images of all the different types to see how they would look. Initially I though black would look best, but I just kept coming back to the simple clean purposeful look of these. I ended up going for a staggered plate, just orientates them a little nicer to the driver. Had to make up a horizontal plate above them and painted it satin black so it looks nice and neat. Put my trade wiring and soldering skills to use, the looms are out of the back of the console labelled so the auto elect can finish them. Also got the sender unit for the oil pressure mounted in the filter mount.


 February 18, 2015 at 2:38 am #479
VRSenator065Participant- Adelaide SA
- VR Senator LSx454 1960 Kombi (project) 1921 Nash Hot Rod (future project)
View build HERE
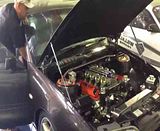
Posts: 5 777Ran it myself this morning, sounds bloody epic, then got Phil to quickly fire it while I took a crappy phone vid. Off to Willall tomorrow morning after Phil gets a chance to just tidy up couple of things, then a full tune and hopefully some longer better vids. Got goose bumps starting it though, she is rather loud and cranky, sounds tuff as fark
 February 18, 2015 at 2:39 am #480
VRSenator065Participant- Adelaide SA
- VR Senator LSx454 1960 Kombi (project) 1921 Nash Hot Rod (future project)
View build HERE
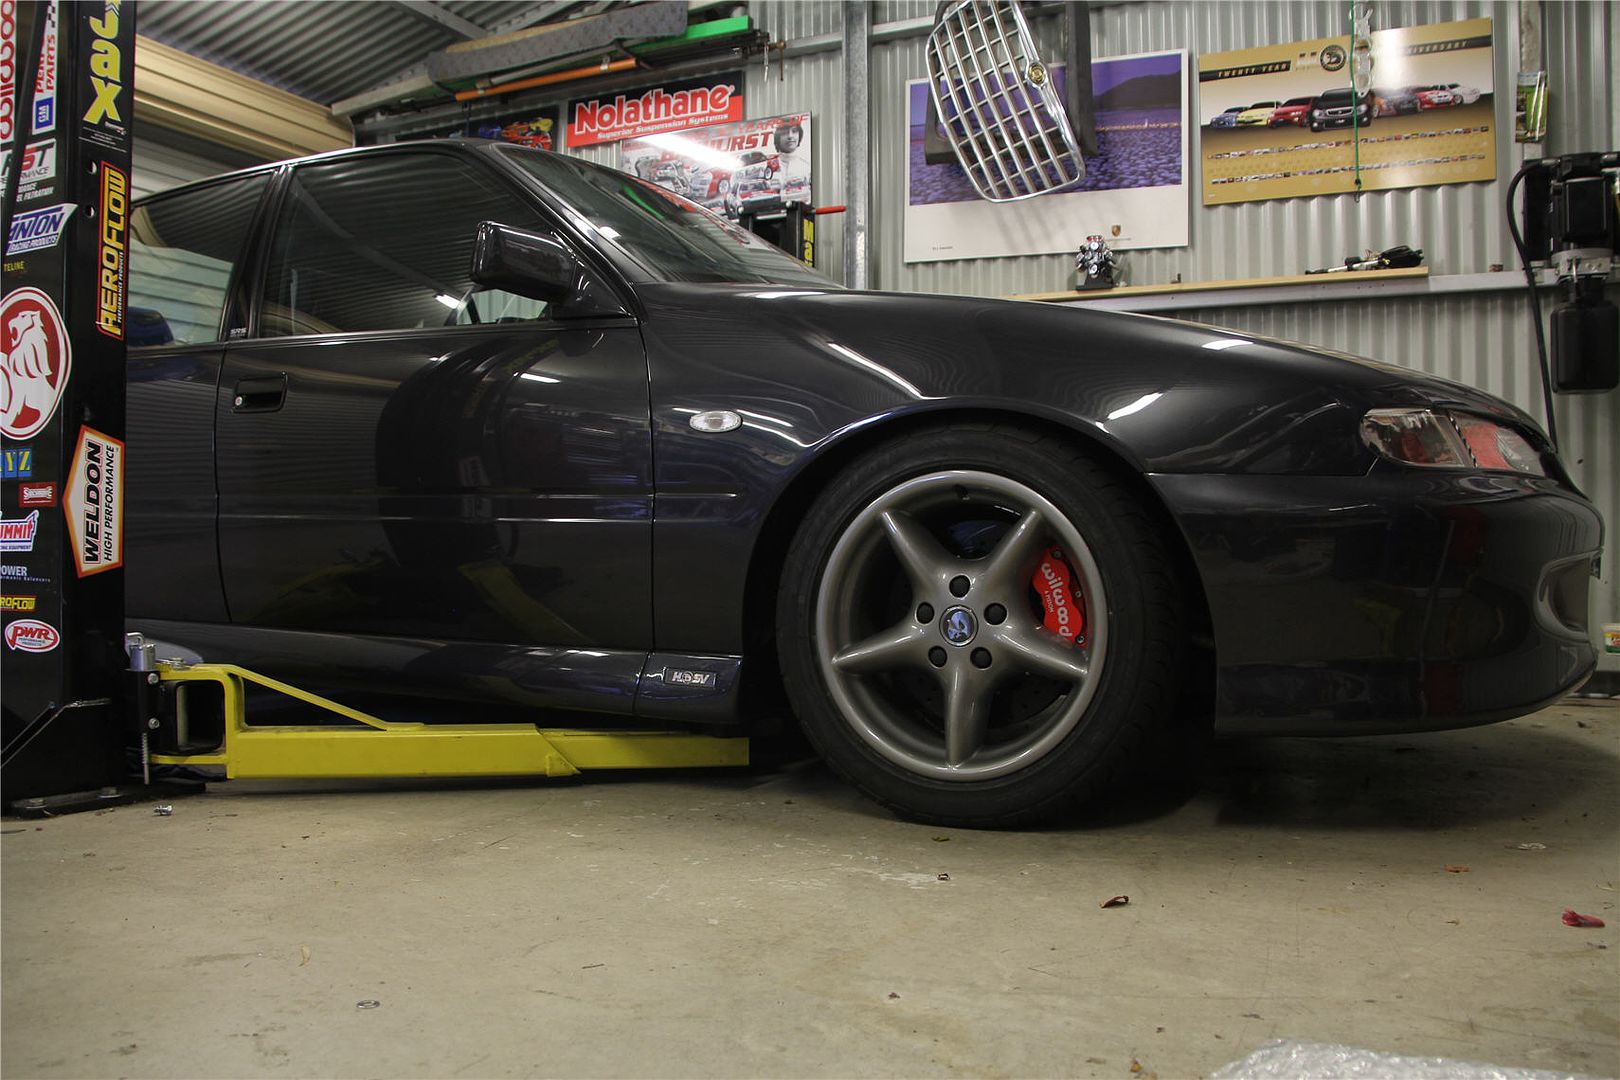
Posts: 5 777Well, just been for my first gentle drive up and back outside the tuners. The brakes still have all the paint on the discs etc so it all needs to be bedded in, plus the wheel alignment etc isn’t sorted. Gave it a couple of half squirts though, its bloody insane. I think I have won over some cred with the tuner, he made a point of telling me there were no leaks from anything at all. Its off to the wheel aligner on a flat bed tomorrow, then I am driving it home. The tuner wants me to drive it a bit, get it all loosened up, then once I have just tidied up a couple of small things take it back to him for a full dyno pull, so sorry you guys are going to have to wait a little more. Here’s a couple of vids I took though, still on a crappy iPhone though. When I walk down the back of the car you can hear how nice it sounds I think.

 February 18, 2015 at 2:40 am #482
VRSenator065Participant- Adelaide SA
- VR Senator LSx454 1960 Kombi (project) 1921 Nash Hot Rod (future project)
View build HERE
Posts: 5 777Well drove it home. Fark it’s awesome. Bear in mind it was over 40 degrees and I live 40km out of the city. Stopped at the first set of traffic lights after leaving Phil’s. A guy stops alongside me, winds down the window and says, “mate is that your fuel pump”. I smiled and said yea, she makes about 650hp, he just said ****, smiled and drove off.
It’s just epic, effortless torque. Drove her home, it’s about an hour, temp gauge rose maybe a couple of mm at traffic lights. Not one issue, brakes are awesome, trans feels great. Got almost home, maybe a km to go and the fuel pressure dropped, pulled over and she stalled. Bit of a head scratch, opened the bonnet felt the fuel rails and they were very hot. Rang Phil, vapour lock he said instantly, let it cool down it will start.
So cut a long story short, walked the 5 mins home, disappointed she didn’t make it, chatted to Suesy and Matt then he drove me to the car, hit the key, started immediately, ran perfect. So it was I think the heat, but also that we at the moment have the pump running at max. Maybe over an hours driving at 40 was taking the piss.
Anyway it’s home, took my son for a drive, he couldn’t stop laughing, I just have it maybe 1/3 throttle from walking speed and it laid two black lines in an instant. I think at just about any speed in any gear it will spin the rears. Two 10″ strips looked pretty cool. Surpringly excluding the fuel pump whine it’s relatively docile, stomp the loud pedal though and it gets busy very quickly. Disappointed with the vapour lock, but stoked it drives so nice.
-
AuthorPosts


 [/url]
 [/url]
 [/url]
 [/url]


You must be logged in to reply to this topic.
