
Home›Forums›Technical – General›Exhaust›Home Built SS Exhaust Summary
This topic contains 16 replies, has 7 voices, and was last updated by ![]() VRSenator065 7 years, 3 months ago.
VRSenator065 7 years, 3 months ago.
-
AuthorPosts
-
March 3, 2015 at 11:47 am #1656

VRSenator065Participant- Adelaide SA
- VR Senator LSx454 1960 Kombi (project) 1921 Nash Hot Rod (future project)
View build HERE
Posts: 5 777
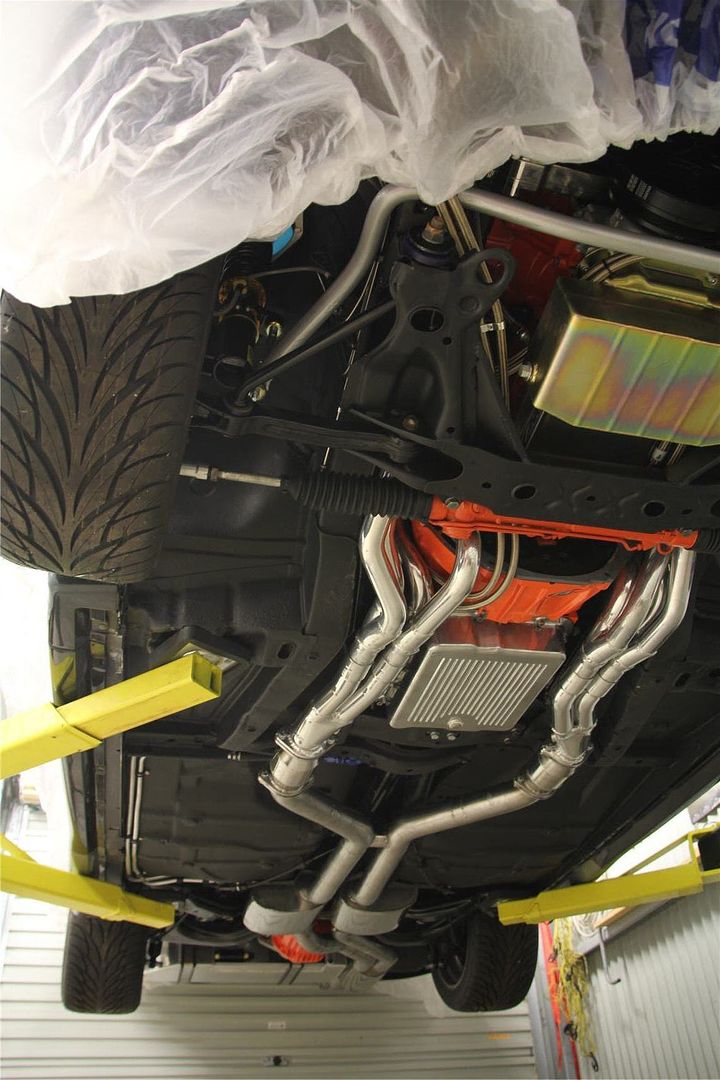
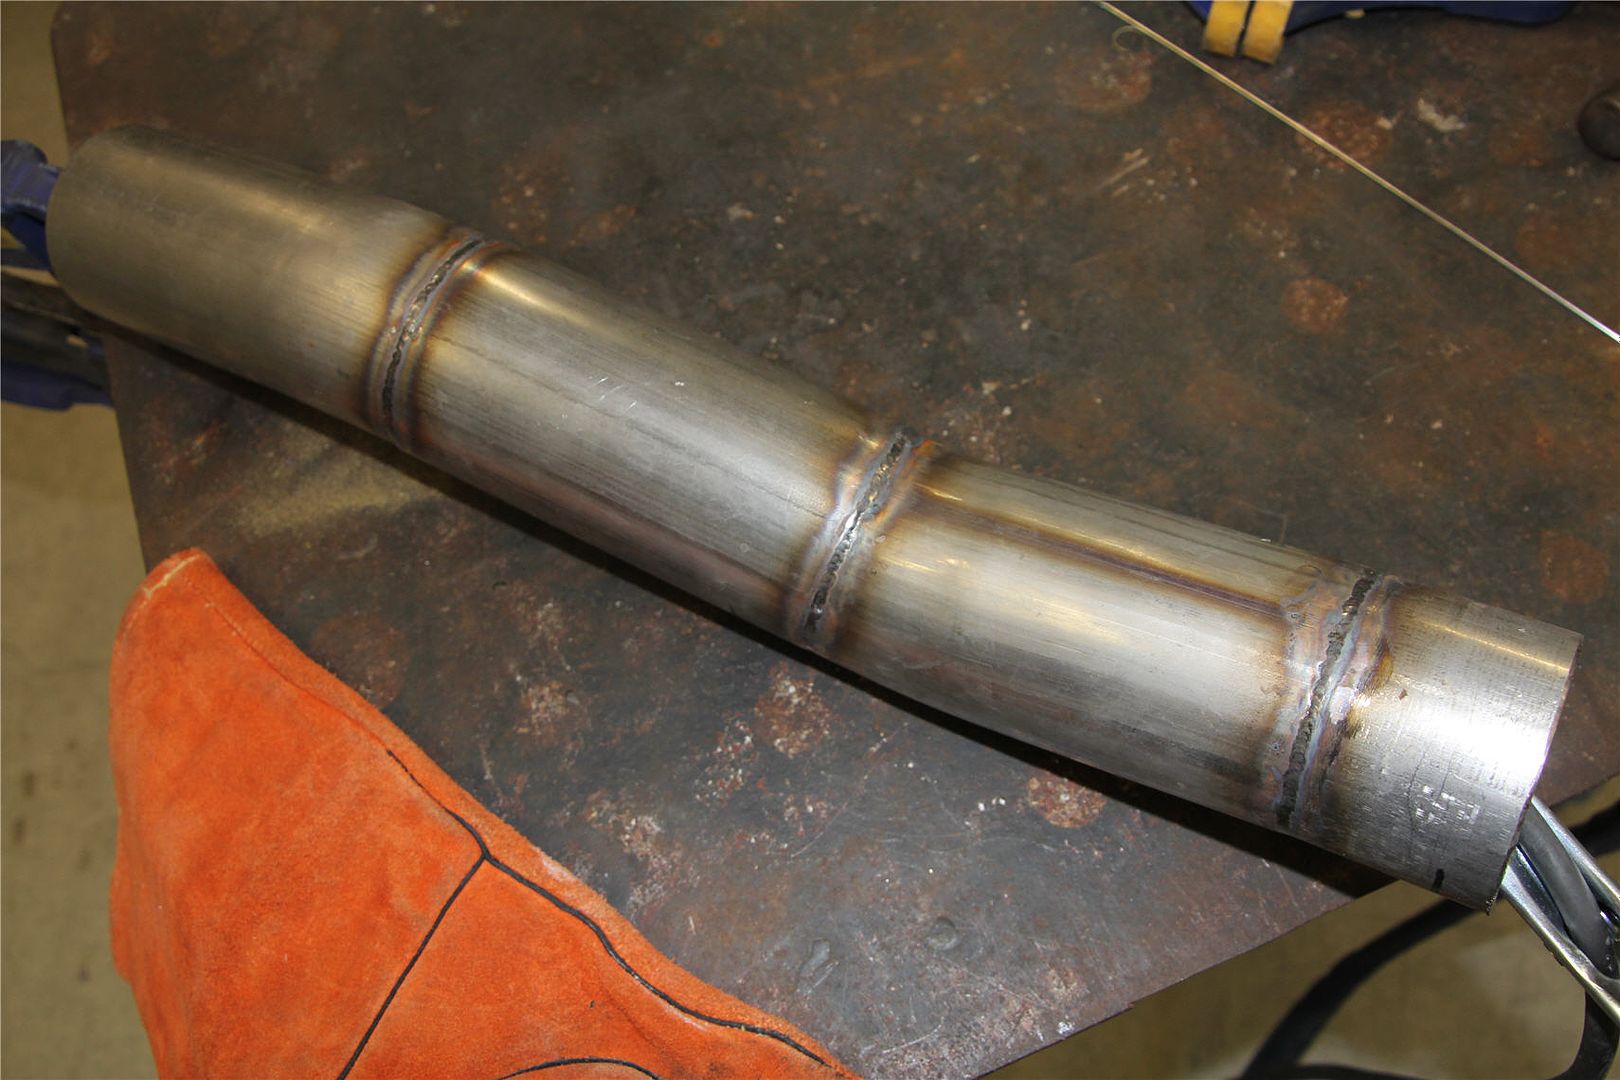
I made my own custom 3″ stainless steel exhaust system and thought I would do a detailed write up in case it’s of any use to anyone else doing their own. It certainly is a big job. It’s not that it’s particularly difficult or hard, but it’s not that easy either, and it is quite time, consuming. It’s a lot of head scratching, cutting the pipe, cleaning the cut, tacking it, getting under the car for a trial fit, then moving onto the next piece. Occasionally you finish one of the pipes and realise it would be better maybe rotated or angled a degree or so, so it’s a case of cutting off the tacks and changing it. Getting under the car to check, then back out again to fully weld etc. I am sure anyone reading this who has done is nodding in agreement right now. I reckon I have spent maybe 40-50 hours on it, but that does include teaching myself to tig weld. If I did another I would definitely be much quicker.
Material
I decided to buy the mufflers, cats, pipes and tube off DiPhillipo. I really liked the look of their centre mufflers in particular. The gear they supplied is 409 series stainless steel. One of the benefits of this grade is its magnetic, which is very useful when clamping it etc while you are fabbing it up. The downside is when polished it doesn’t achieve the mirror finish of 300 series. For me that’s not an issue. My car is not going to be trailer queen, so first time I run it will discolour anyway, but it is something to consider. If I did it again, I maybe would have bought pre-polished bends and tube, just to save some time and effort, and that way I would have only had to clean the weld zone.DiPhillipo
I was really happy with the quality of the DiPhillipo mufflers cats, and the mandrel bends (as they should be) were spot on. I do have to say I wasn’t overly impressed with their after sales service. I tried to contact them a couple of times with questions with various degrees of success. I also think given they knew I was making my own exhaust, they could have suggested/included some stainless bar to hang the mufflers, also their flanges are basically rough profile cut. I needed to hit them with a flap disc to get them to look schmick. I am not rubbishing DiPhillipo, but on the other hand it wasn’t terrible but I did want to mention it, $1,800 id not a small amount of money.Finish
I played around a lot to work out the way I wanted to finish the polishing. I tried quite a few things, but in the end settled on a brushed stainless kind of look. Bunning’s sell a 3M rotary scotch bright style of pad, it was excellent for cleaning it up, and overall gave it a nice uniform look which is what I was looking for. So with some fine flap discs in the grinder your away.Cost
The quotes I got were around the $4,500 mark. Now I am sure for that sort of money it would have been better than I have achieved, not sure how much though. I bought all the bends, mufflers, tube and cats delivered to my door for $1,800. I reckon add in about an extra $200 for consumables like welding rods, gas etc, so it cost $2,000. I bought the TIG for $800, it’s a middle of the road, TIG/STICK inverter welder, you can pay less, and considerable more, but it easily handled the job. So I reckon I am still way out in front even factoring in the purchase of the welder. Of course the flipside is the time I spent. I can see where the cost is to have it done. But in my opinion you can save a chunk of cash doing it yourself.TIG Welding
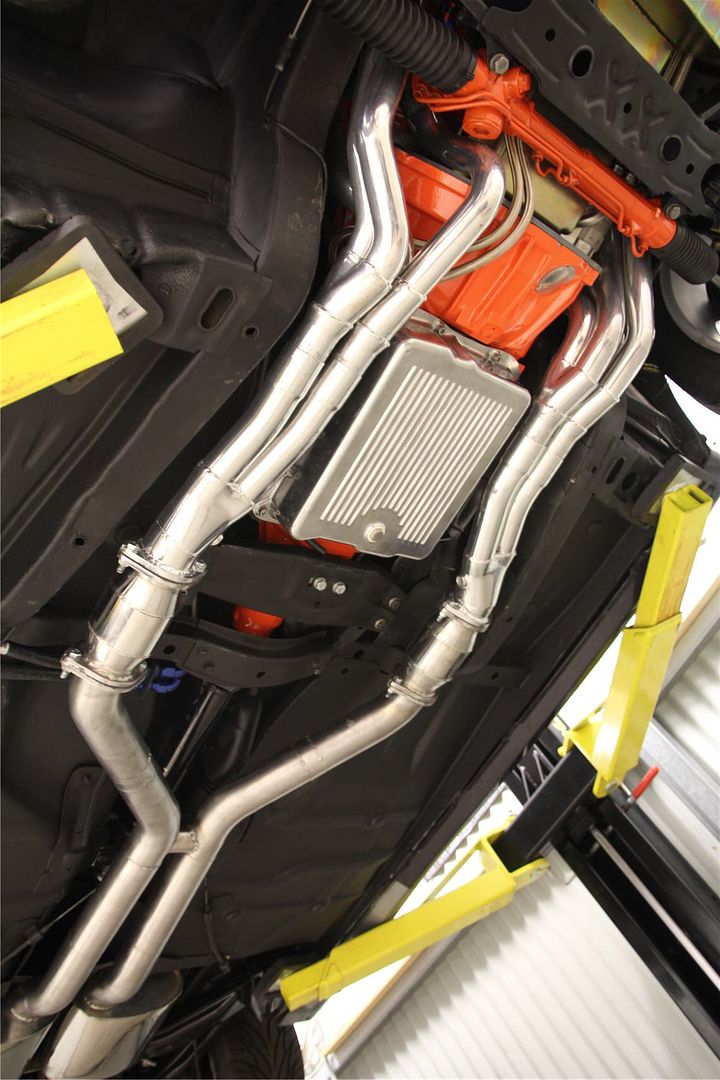
Anybody out there considering buying a tig, I would highly recommend it. You just have so much control over the heat, once you get the hang of it, I really wouldn’t do it any other way. My welds at the end were of course way way better than when I started. I made the decision not to grind them at all, so what you see is what you get. I am really pretty chuffed to be truthful, particularly some of the tougher welds say where the pipes met the flanges. Its very relaxing tig welding, as someone has said, just a good skill to have.Things Specific to the VR
Where my exhaust ran, one of the pipes pretty much is directly under the hand brake mechanism. I used an air saw to trim off the underside seam of it to clear, then texture coated it so it looks neat.
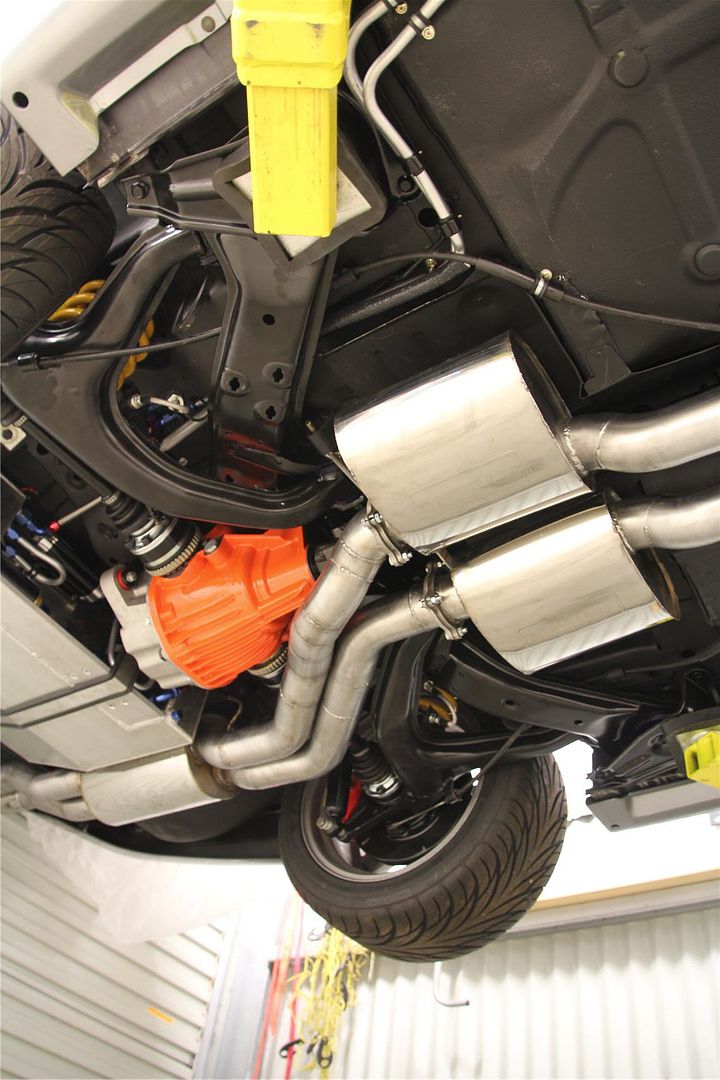
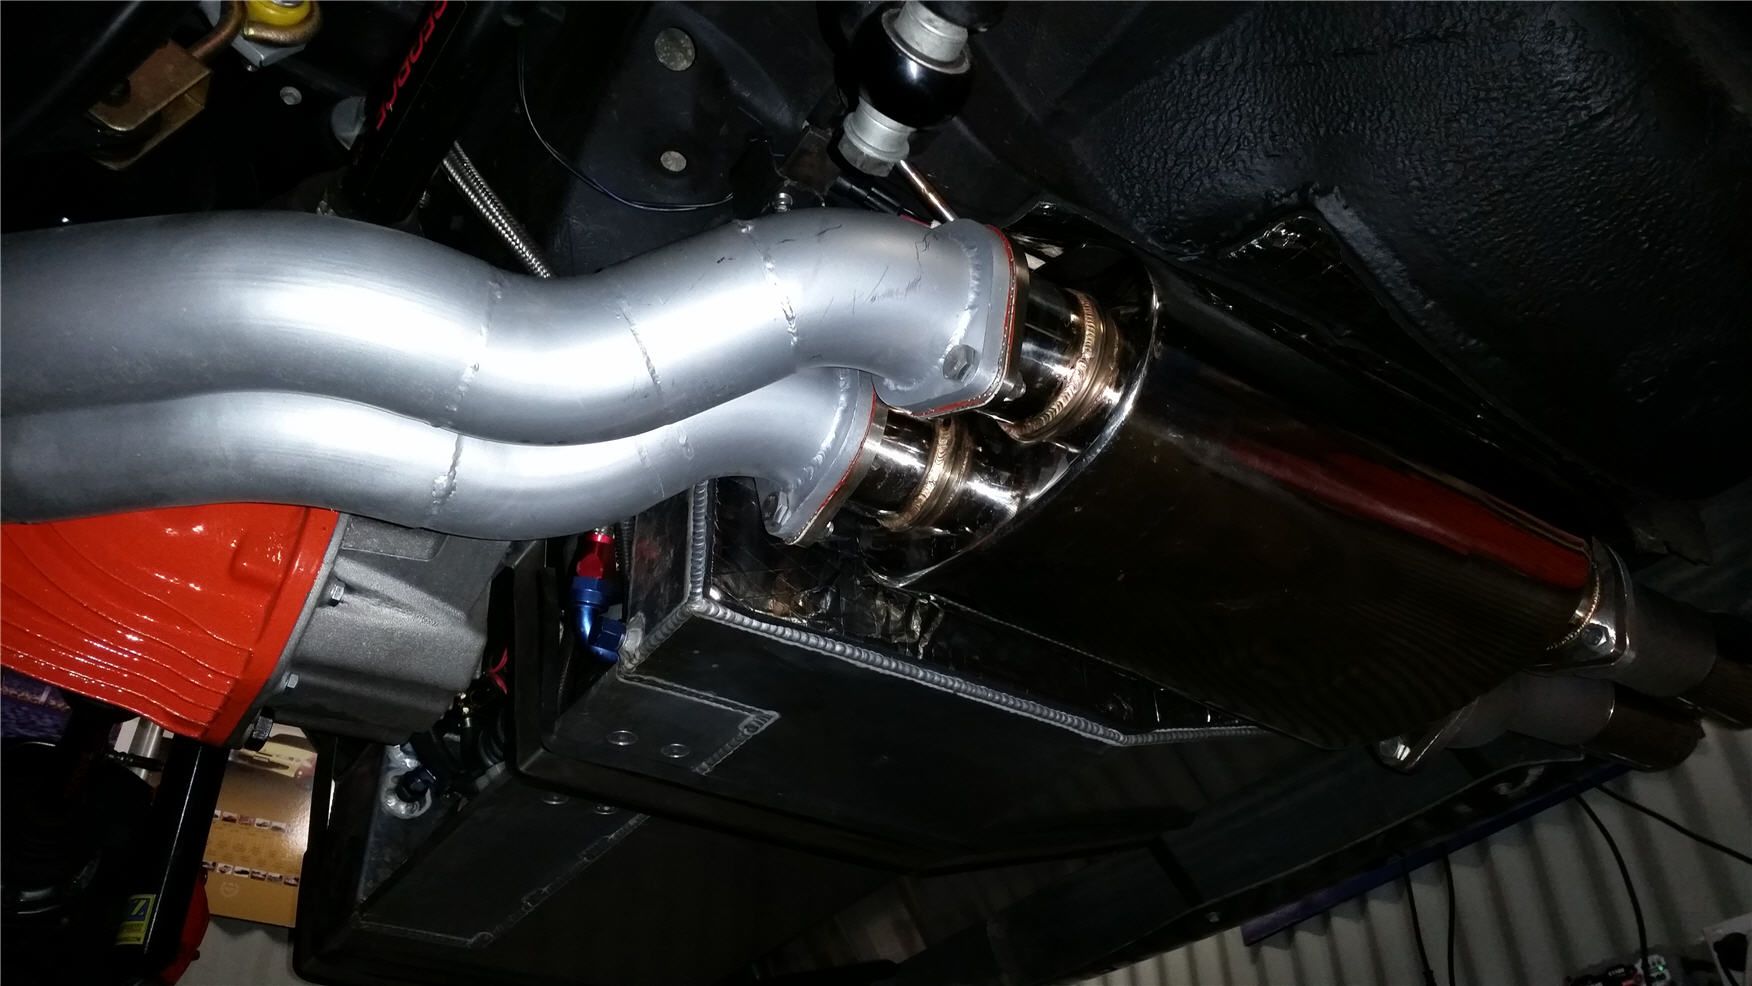
Also it’s a reasonably tight fit for the rear barrel muffler with my drop tank. I dressed the spare wheel carrier side over with a hammer then also texture coated it so it looks neat.The big issue for my car was the size of the 12 bolt diff. Not only is it bigger in diameter, but it is also much longer and with bigger strengthening ribs. It makes the driver’s side pipe a tight fit, but it does fit.
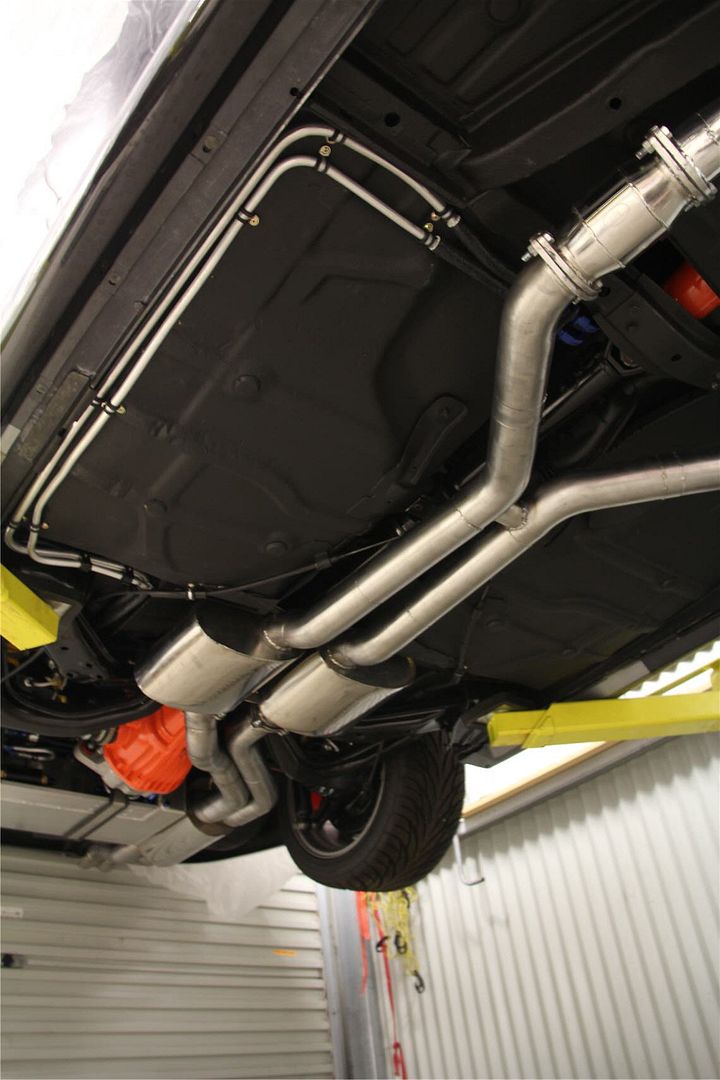
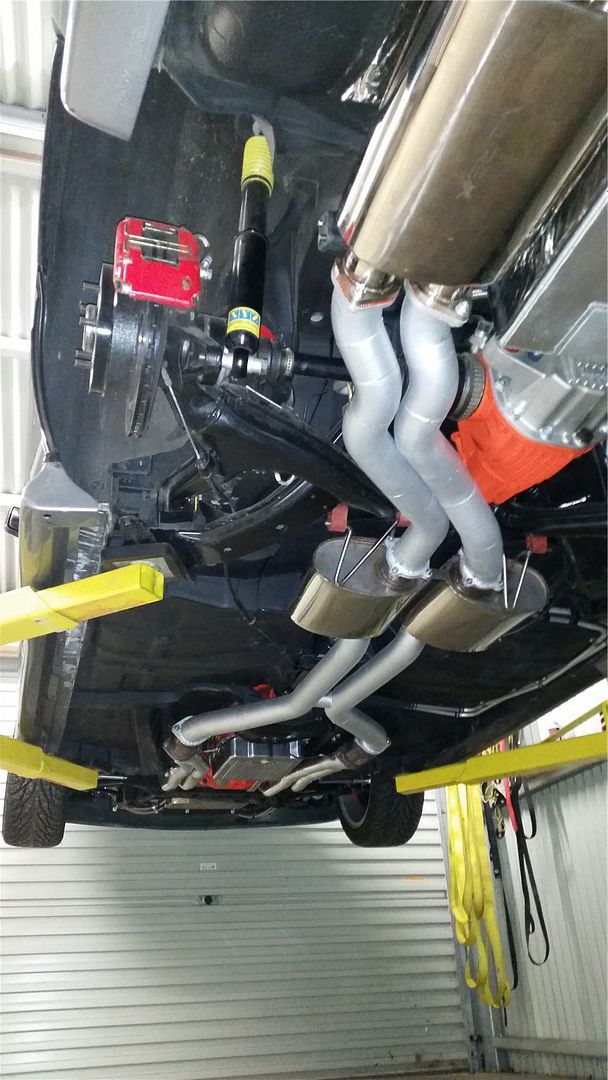
I positioned my middle mufflers first. I set them so there is about a hand depths gap between the floor and top of the muffler. I then used the bottom of the muffler as the lowest height. None of the other pipe is lower than that, I figured if the bottom of the mufflers is that low, it won’t hurt if nothing is lower.
My car has a very heavy duty tail haft centre bearing and custom mount plate. I ended up countersinking the mounting plate and used counter sunk socket head cap screws to make sure there was no chance of them rubbing on the pipe work.
I decide to use all the standard OE mounting blocks, that includes the rear figure 8 hangers. I just didn’t want to change the car, I will keep an eye on them, if needed I will change the later although it seems pretty solid.
What I Used
· A mixture of 45 and 90 degree bends, actually I never used the 90’s, I cut them up as 45s
· About 2m of straight pipe
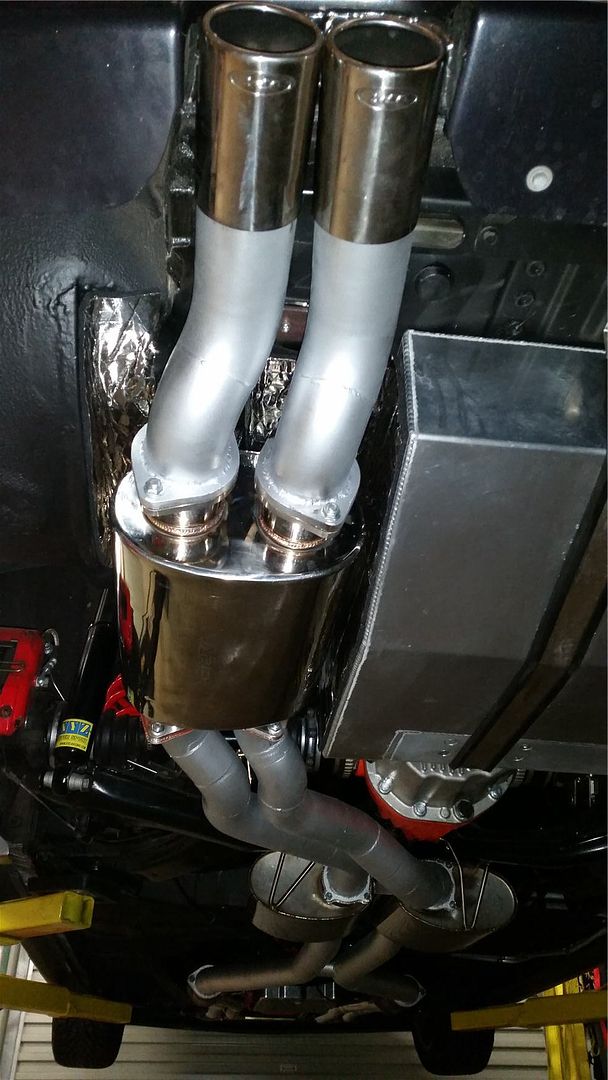
· DiPhillipo side in/side out middle mufflers, and duel in/out rear barrel muffler
· 200 cpi DiPhillipo cats
· 3M scotch bright style rotary clean up disc
· 4″ thin angle grinder cut off discs, for cutting through tacks when changing it.
· Set of magnetic welding clamps.
· 4″ fine flap disc for cleaning up the flanges etc.
· I ended up using a 50mm round sanding barrel attachment for my air die grinder to remove the burr of the internal side of the pipe after cutting.
· I used my 300mm Makita cut off saw, I bought an iron free new blade before I started.Here’s a few photos of the finished article.
-
This topic was modified 9 years, 2 months ago by
 VRSenator065.
-
This topic was modified 9 years, 2 months ago by VRSenator065.
-
This topic was modified 9 years, 2 months ago by VRSenator065.
March 3, 2015 at 12:40 pm #1662
pir4teParticipant- Mallala
- 640 HP hyper-cruising SS-V Flagonwagon
View build HERE
Posts: 154Maybe something to consider given your constraints is to crossover 6+8 and 3+7 (merge prior so 2 x 2″ over and under) after bell before trans pan
Ive done initial calcs and not only would segment lengths suit your engine spec better, but also reduce noise, and allow space for a decent expansion chamber before cats.
Also perhaps the 3″ axle back is taxing your escape velocity, given primary pipe cross section at port?
Either that or replace H with X at the calculated position (second harmonic wave length) to smash the split plane double pulse for sonic scavenging and reduce db.
Ca’an mate, mock it up in solid works!
Naturally as-pirated, all-motor.
March 3, 2015 at 2:15 pm #1678
VRSenator065Participant- Adelaide SA
- VR Senator LSx454 1960 Kombi (project) 1921 Nash Hot Rod (future project)
View build HERE
Posts: 5 777Thanks buddy, very interesting. I actually since I did the system above did a lot of work, and cut down the spare wheel well and fitted a Varex rear muffler. I got it close but not close enough. But I also think now that the tune wasn’t helping. Might see if I can post the mods i did.
March 3, 2015 at 2:17 pm #1679
VRSenator065Participant- Adelaide SA
- VR Senator LSx454 1960 Kombi (project) 1921 Nash Hot Rod (future project)
View build HERE
Posts: 5 777So spare wheel well reduced to make space for the Varex. Actually I think turned out pretty neat. So the million dollar question is, is it quiter? answer heaps,. But I don’t have any rear wheels at the moment as I am getting them re powder coated (thanks Bob Jane for chipping them) So its stuck in the shed hard against the wall. Anyhow, hopefully next week end with my mate will take it to a park or something with a db meter he has loaned me and see how much its attenuated it. For now I have wired it with the switch in a little box so the idea is I will for now just bring it through the rear seats up so can operate it whilst driving it to test it all out. Then once its all sorted will permanently mount the switch in the boot.
Few random pics for posterity….
 March 3, 2015 at 11:08 pm #1805
Building my exhaust at the moment and most of this rings very familiar for me. Some solid advice in the write up. If I was to add one thing, it would be that from what I can definitely say on VB-VK (and probably onwards), offset in and centre/offset out mufflers are a must. Just a simple thing that’s easy to overlook but the offset in makes life just that little bit easier.
March 3, 2015 at 11:18 pm #1818
VRSenator065Participant- Adelaide SA
- VR Senator LSx454 1960 Kombi (project) 1921 Nash Hot Rod (future project)
View build HERE
Posts: 5 777Yea agree re the offset, I actually would have preferred them, but with me the 12 bolt and iRS is so bloody big, getting back across under it and still maintaining 100mm clearance was the issue.
Great job though, I think most satisfying part of the buld for me
 March 4, 2015 at 10:07 pm #1958
I built this twin 3 inch exhaust just before Gary built his
Did have different rear mufflers before but have since fitted this varex mufflers now
-
This reply was modified 9 years, 2 months ago by
 vs manta 218.
-
This reply was modified 9 years, 2 months ago by vs manta 218.
March 4, 2015 at 10:11 pm #1963If this doesn’t work then I give up

puu.sh/5e0O9.jpg[\
puu.sh/5e0P1.jpg[\IMG]
-
This reply was modified 9 years, 2 months ago by vs manta 218.
-
This reply was modified 9 years, 2 months ago by vs manta 218.
-
This reply was modified 9 years, 2 months ago by vs manta 218.
-
This reply was modified 9 years, 2 months ago by vs manta 218.
March 5, 2015 at 6:07 pm #2020
NickVRParticipant- Adelaide
- VR V8 Exec, VR SS, VF Redline Reserve
View build HERE
Posts: 264March 7, 2015 at 3:33 pm #2171
St3r3otyp3Participant- WA
- VXII Clubsport R8 (PB,12.8@113MPH) VXII SS (PB 13.35 @104MPH)
View build HERE
Posts: 4What brand tig did you buy?
March 7, 2015 at 3:42 pm #2173
VRSenator065Participant- Adelaide SA
- VR Senator LSx454 1960 Kombi (project) 1921 Nash Hot Rod (future project)
View build HERE
Posts: 5 777A CIG 170HF, very nice to use
January 17, 2017 at 6:58 pm #21460
Judge1 FrazerParticipant- new zealand
- 1983 VB LSA MG9 6060 6 speed
View build HERE
Posts: 775Hey Gary just read you exhaust thread I was nodding my head as I read it but I did mine on the floor
 did you think about a x pipe instead or was it more for room using the H, also the varex would you recommend them I seen the one with remotes, FrazerJanuary 23, 2017 at 12:24 pm #21520
VRSenator065Participant- Adelaide SA
- VR Senator LSx454 1960 Kombi (project) 1921 Nash Hot Rod (future project)
View build HERE
Posts: 5 777Hi mate, sorry been away on holidays. The research i did on an X ipe vs H were that on a road car it doesn’t really make any difference. So for me working the H pip is was easier. The varex is ok, they are quite bulky and heavy though, and sound pretty average closed.
January 23, 2017 at 9:36 pm #21532Yeah Iv got twin 3 inch varex mufflers on Myn
no doubt the Magna flow twin rear mufflers I use to have sounded better
on on a hydrolic cammed mild car Iv got no idea what they would sound like but on my solid cammed cranky engine closing the mufflers takes the crackle out of it and very noticeable when out side the car
if your not worried about noise defects use good mufflers, if your car is very noise and want to be able to maybe get away with it then the varex is ok
January 25, 2017 at 10:12 am #21549
VRSenator065Participant- Adelaide SA
- VR Senator LSx454 1960 Kombi (project) 1921 Nash Hot Rod (future project)
View build HERE
Posts: 5 777Yif your not worried about noise defects use good mufflers, if your car is very noise and want to be able to maybe get away with it then the varex is ok
Well said, pretty much spot on.
January 25, 2017 at 8:17 pm #21556
Judge1 FrazerParticipant- new zealand
- 1983 VB LSA MG9 6060 6 speed
View build HERE
Posts: 775Cheers guys I would like a good sounding exhaust but sometimes you just want it quiet I suppose it’s a balance with hp you need to get the gasses out ,with the vk it had twin 2 1/2 two mufflers then 3″ over diff into another muffler sounded nice but tuner did say it was restricted but then the super charger was louder too
February 1, 2017 at 3:34 pm #21619
VRSenator065Participant- Adelaide SA
- VR Senator LSx454 1960 Kombi (project) 1921 Nash Hot Rod (future project)
View build HERE
Posts: 5 777^sounds like a 747 taking off
-
AuthorPosts


You must be logged in to reply to this topic.
