
Home›Forums›Members’ Builds and Rides›VN – VP – VR – VS›VR V8 Calais HSV Mock Up
This topic contains 15 replies, has 5 voices, and was last updated by ![]() VRSenator065 5 years, 5 months ago.
VRSenator065 5 years, 5 months ago.
-
AuthorPosts
-
May 12, 2017 at 8:24 pm #22818

Khaos IncParticipant- South Brisbane
- VR V8 Calais Manual
View build HERE
Posts: 10
Hi all,
I was a member of justcommodores for a long time but not very active while I had a v6 berlina I had done little to but changed it to manual. I’ve been a member here for around a year and though it was time to post up my commodore and start a build thread on it after checking out all the ones on here.
I bought this car as a few years ago, didn’t do much to it just fixed a few things and drove it as it was in fair condition. Funnily enough I don’t have any decent pics of it from the outside, but it is blue over silver. The below picture was from when I was fixing the wiper motor. (Damage was from a driving home after a 15 hour shift on a Saturday at my weekend/after main job job, don’t ask there was a lot of crazy in my life but the job was good for seeing lots of very nice cars. I don’t do 2 jobs now so I have a lot of time to work on my car)

It was a stock V8 Calais that was a stock until the guy I bought it of did a little bit to it and it came with the following extras;
- Pacemakers not for a Calais that were bashed and bent to clear the variable power steering
- Engine rebuilt 40 thou over and apparently stock spec crow cam (it only has 695 on it other than CROW)
- Stock Fog lights added
- shit ebay memcal ‘stage 4 shit fuel consumption’ I would get 300kms to the tank with a lot of highway driving
- GT Gas and pedders ultra springs with nothing to fix rear camber so getting 10,000kms out of a set of tyres was great!!
It sounded nice but was slow as shit, but it was comfortable with full leather seats.
I was driving it till the rear seals of the auto failed almost instantly and it was losing transmission fluid that bad that if you drove it for 10 minutes it would start to slip and overheat. So I decided I was just going to fix it but then thought I was sick of an auto car so I was going to change it to manual and then back on the road.
While I was changing it to manual, it ended up turning into change to manual, strip the interior and freshen it up, rebuild the engine so I know what’s inside it, fix the few dints in it, freshen the paint and put a body kit on it.
I had alot going on in my life just after deciding to do this and not have proper workspace to work on my car it took a while to get to where I am today.
Now I have a good lock up shed so I can work day or night and when its raining.
My plans are the following-
- Rebuild engine with 10-10.5 comp (maybe stroke it) and clean up block and heads and new cam
- Fabricate new intake
- Fix all the body damage, new panels and doors and paint it white
- Re-trim interior and paint dash and console (Thinking Blue and grey) upgrade stereo
- Upgrade brakes to VE or Skyline, front and back
- Hide all wiring in engine bay and give it a nice coat of paint
- Move battery to the boot (I have a yellow top ultima battery for this)
- Relocate ABS to where the battery was and do new brake lines
- Replace power steering hoses with mostly solid line to avoid touching the exhaust
- Convert clutch to hydraulic
- Replace all suspension
Some background from the start to where I have gotten to today and what I have changed on it so far……
One of the first things I go was a full exhaust (pacemaker extractors and twin 2.5” with x pipe) that was second hand, it had bashed out cats so I have gotten 2 x 3” body 200 cell cats to replace this. I also replaced the steering rack with a non-variable one to make it easier to fit
A guy at my work bought a VS Ute and I swapped him my Calais bumper and fog lights for the “dodgy” copy front bumper his car had. Turned out it was a genuine hsv front bar so I hunted around for real side skirts and rear bar. All up I paid $600 for a genuine kit so it was a little cheaper than a fibreglass copy kit.
After this the manual kit I had gotten had a VN ECU but I was told it was a HSV ecu with knock, (I ended up getting some interior parts off the guy and he chucked in some free wiring harnesses that were hard to get to compensate) I looked for a fair price ‘3082 ecu and was able to get a NOS hsv memcal. I do have a pcm hacking NV Ram to out in it as well.
For the interior I ended up completely stripping it as per the photo below, HVAC and all. I then put down some sound deadening and on top of that I put down some form-shield from clark rubber to help with heat. Got new carpet. While the HVAC was out I opened it up and have replaced the air con core and heater core.
Sound deadening all in

I was able to get a Caprice interior which included electric front seats, rear seat and door cards from the same guy that I got the manual off and a complete wiring harness for them, they are only missing the side covers and I’ve learnt they are very brittle these days so they are very rare and not many people will post them, so I will be making covers out of aluminium that wont break as easy.
After all this was when I moved and have a good shed to work in so I’ve removed the engine and stripped it down to start rebuilding and started to remove everything from the engine bay and start hiding it all.
Engine out and stripped down

The below pic doesn’t show it well but the crank bearings are all gouged and so is the crank…

Engine bay clean up begins

I will post stuff up as I go and will definitely be looking for advice and ideas from the great community this forum has.
May 12, 2017 at 8:29 pm #22819
Khaos IncParticipant- South Brisbane
- VR V8 Calais Manual
View build HERE
Posts: 10This is the exterior look I am going for

And this is the kind of design (Aluminium not carbon) I am thinking for the intake, I want to make it a 2 piece design with a base with the water part then intake part on top of it with something between it to stop heat transfer to the runners.
 May 12, 2017 at 9:27 pm #22821
exec24Participant- 2004 VY S2 Berlina 1996 VS 5L Sedan
View build HERE
Posts: 435I was able to get a Caprice interior which included electric front seats, rear seat and door cards from the same guy that I got the manual off and a complete wiring harness for them, they are only missing the side covers and I’ve learnt they are very brittle these days so they are very rare and not many people will post them, so I will be making covers out of aluminium that wont break as easy.
If you ever find a set of the plastic surrounds for the caprice seats, let me know, ive been looking since i put electric seats in my VS, which was about 5-6 years ago
id even settle for a set of fibreglass ones
May 12, 2017 at 9:33 pm #22822
Judge1 FrazerParticipant- new zealand
- 1983 VB LSA MG9 6060 6 speed
View build HERE
Posts: 775just an idea could Gary print some or would he need to copy one first
May 12, 2017 at 9:45 pm #22823
Khaos IncParticipant- South Brisbane
- VR V8 Calais Manual
View build HERE
Posts: 10If you ever find a set of the plastic surrounds for the caprice seats, let me know, ive been looking since i put electric seats in my VS, which was about 5-6 years ago id even settle for a set of fibreglass ones
I’ve had no luck, the ones I find people won’t post as they think they will end up in pieces by the time they get delivered. The only way will be to have them 3D printed or a fiberglass copy. Since I can get aluminium bent up and powdercoated cheap I was going to go that way.
May 13, 2017 at 4:35 pm #22824
VRSenator065Participant- Adelaide SA
- VR Senator LSx454 1960 Kombi (project) 1921 Nash Hot Rod (future project)
View build HERE
Posts: 5 777Hey guys just seen this, been on shed cleaning detail today :). Any chance of posting up some pics of the seat surrounds so i can have a look at whats involved? Nice build btw, I love second gens, just beautiful
 May 13, 2017 at 5:23 pm #22826
Khaos IncParticipant- South Brisbane
- VR V8 Calais Manual
View build HERE
Posts: 10Hey guys just seen this, been on shed cleaning detail today :). Any chance of posting up some pics of the seat surrounds so i can have a look at whats involved? Nice build btw, I love second gens, just beautiful

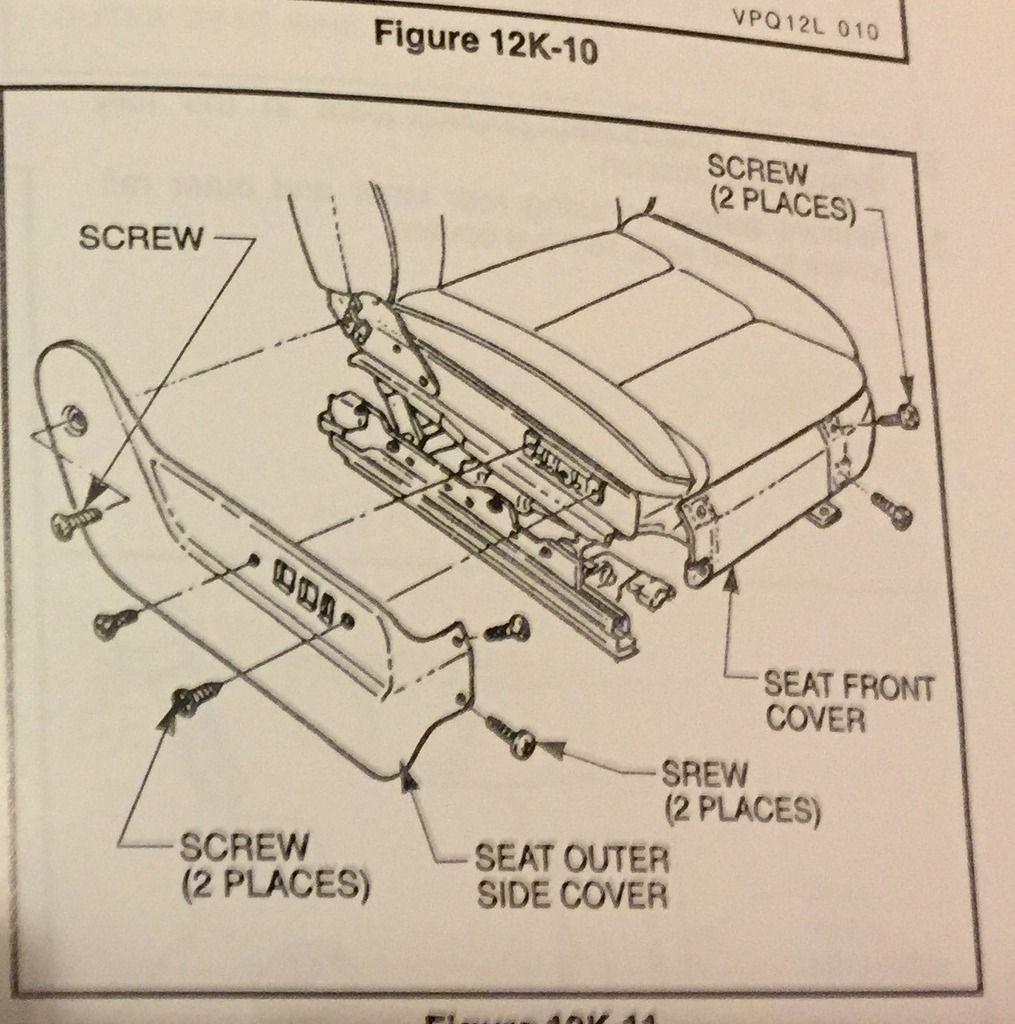
That’s the only good picture I can get, there is the control side cover and the front cover plus some rail covers. I’m not after them but others were. It is very hard to find any that aren’t broken these days or that will break just by looking at them. If anyone is ever after the wiring diagram for the seats let me know, I have volumes 1 to 8 of the holden service manuals for the VR.
This just shows the covers too.
-
This reply was modified 6 years, 11 months ago by
 Khaos Inc.
May 13, 2017 at 6:16 pm #22828
VRSenator065Participant- Adelaide SA
- VR Senator LSx454 1960 Kombi (project) 1921 Nash Hot Rod (future project)
View build HERE
Posts: 5 777Not sure, fibreglass might be better.
May 13, 2017 at 6:28 pm #22829
exec24Participant- 2004 VY S2 Berlina 1996 VS 5L Sedan
View build HERE
Posts: 435cant be scanned?
-
This reply was modified 6 years, 11 months ago by
 exec24.
May 13, 2017 at 7:53 pm #22832
VRSenator065Participant- Adelaide SA
- VR Senator LSx454 1960 Kombi (project) 1921 Nash Hot Rod (future project)
View build HERE
Posts: 5 777Def can be scanned, thats the easy bit.
May 14, 2017 at 9:29 am #22833
exec24Participant- 2004 VY S2 Berlina 1996 VS 5L Sedan
View build HERE
Posts: 435well there’s a guy selling a complete set (with seats) locally, he’s getting me photos today
if you can scan them and the price is ok, maybe worth me buying, i’ll see when i get the photos from him
-
This reply was modified 6 years, 11 months ago by exec24.
November 11, 2018 at 11:40 pm #27475
Khaos IncParticipant- South Brisbane
- VR V8 Calais Manual
View build HERE
Posts: 10It had been a year since I had done anything with this but now have more focus and really want to get it finished (but its still a long way away).
In the last 6 months I’ve slowly done the following
- stripped the engine bay completely getting it ready for smoothing.
- straightened the front top radiator support(?) from an old accident so bonnets actually shut properly now
- removed the rear end completely ready for some strengthening and other mods
Also bought a VT rear end to finally get all the info on if you can use VT-VZ arms in VR/VS IRS. Was hoping to measure it outside the car but its hard, open to any suggestions but thinking of putting it all back together with VT arms on the VR cradle and start measuring and trial fitting. From what I have read its around 30mm difference on each side, I have organised some VQ arms so I can get the hubs that are 20mm shorter to go into the VT arms. Will be also be doing the box mod like the G-force boxes and strengthening the rear cradle and hopefully have the toe arms to tighten it all up.
VT is top and VR bottom
With the engine bay I want to move the ABS unit so its not in the most annoying spot ever, was thinking of moving it and the fuse/relay box to where the battery was as per below pic (will need to make some brackets to get them to sit at the correct height), moving the battery to the boot.
This is a picture from within the engine bay from when I was fixing it so it was straight and the straight bonnet shut properly
Next up is dropping the K-frame and bodywork

Hoping to have all the bodywork sorted over the christmas break as it looks like I’m having 3 weeks off of work at this point in time. Gives me time to think as well as I’m tossing up between going black or white for the whole car (leaning more towards black as its more sleek).
-
This reply was modified 5 years, 5 months ago by Khaos Inc. Reason: formatting
November 12, 2018 at 9:23 pm #27478I can’t see your pics, sounds good though.
November 13, 2018 at 12:51 pm #27482
VRSenator065Participant- Adelaide SA
- VR Senator LSx454 1960 Kombi (project) 1921 Nash Hot Rod (future project)
View build HERE
Posts: 5 777I relocated my ABS to where the battery was, its a good spot. It’s in my build thread.
November 13, 2018 at 4:30 pm #27484
Khaos IncParticipant- South Brisbane
- VR V8 Calais Manual
View build HERE
Posts: 10I relocated my ABS to where the battery was, its a good spot. It’s in my build thread.
Yea that’s where I got the idea, did you do all your mods then goto an engineer or you went thru it with the engineer first?
I‘m going to steal your stiffening for the rear cradle too.
November 15, 2018 at 4:14 pm #27489
VRSenator065Participant- Adelaide SA
- VR Senator LSx454 1960 Kombi (project) 1921 Nash Hot Rod (future project)
View build HERE
Posts: 5 777I pretty much spoke to my engineer before I did anything, mind you it was just going to be a little LS3 upgrade back then… Then after that, I would send him pics and info as I did stuff, sometimes ring him and ask if what I wanted to do was OK. The ABS move was a good example, at first I was going to just delete it but he “preferred” I retain it. And if I moved it he wanted me to try and keep it as close as possible to the original height it was mounted, i.e. not down under the front bumper. So I pretty much kept him in the loop the whole build.
-
AuthorPosts


You must be logged in to reply to this topic.
