
Home›Forums›Members’ Builds and Rides›VN – VP – VR – VS›VR Senator with LSx454
This topic has been reported for inappropriate content
This topic contains 2,102 replies, has 82 voices, and was last updated by ![]() VRSenator065 2 years, 11 months ago.
VRSenator065 2 years, 11 months ago.
-
AuthorPosts
-
February 18, 2015 at 1:28 am #407

VRSenator065Participant- Adelaide SA
- VR Senator LSx454 1960 Kombi (project) 1921 Nash Hot Rod (future project)
View build HERE
Posts: 5 777
Well that didn’t take as long as I thought. Was dreading putting the back seats in but once I worked out the trick was to remove the head rest tube, fit the bracket, then seat, then refit the tube was pretty easy. Gotta say I am stoked with how the interior has turned out, I think its the best its ever looked since I have owned it. There’s a couple of small trim bits I will pick up as I come across them, have assembled the shifter mechanism stock until I work out which way I want to go later in the build. Am thinking maybe pro ratchet but mounted a bit stealthy so its all hidden under the stock console, but that can wait for later.
But that’s all for now. Up on the hoist she goes now for the oily bits, happy days

-
This reply was modified 6 years, 7 months ago by
 VRSenator065.
February 18, 2015 at 1:29 am #408
VRSenator065Participant- Adelaide SA
- VR Senator LSx454 1960 Kombi (project) 1921 Nash Hot Rod (future project)
View build HERE
Posts: 5 777Got the rear end out tonight. Fairly straight forward, although one mistake I made was I didn’t have an M15 6 sided socket so I used a std 12 sider with my rattle gun and rounded the head off (my fault for being impatient). Went to total tools today and bought a 6 sided and did it by hand with a long socket bar and got it off, glad, wasn’t looking forward to the alternative…have also contacted a guru I know re the diff ratio and waiting to hear back.
Pics of the rear end, surprisingly given how I used to drive it the sub frame isn’t cracked. My car had self leveling suspension, so I carefully removed the pump assy and will put it aside so I could refit it if I ever wanted.
Years ago when I fitted the lowered springs I think they did some nolathane sub frame to body bushes, tbh has forgotten about that. Time for a big clean up on the week end then start the disassembly.
-
This reply was modified 6 years, 7 months ago by VRSenator065.
February 18, 2015 at 1:30 am #409
VRSenator065Participant- Adelaide SA
- VR Senator LSx454 1960 Kombi (project) 1921 Nash Hot Rod (future project)
View build HERE
Posts: 5 777Well got the hand brake tear down done this week end. Thought I would take some pics and describe the job.
First of all, anyone who says its an easy job has either never actually done it or must have had a lot of luck :). It is a very tedious and awkward job. Bear in mind the removal and disassembly process has to be done 4 times, twice for the VR arms, then twice for the VZ to get the mechanism off them.
I have a a press, but holding the arms in place whilst pressing everything out is quite frankly a pain in the butt, they are quite heavy and awkwardly shaped. Admittedly I am doing all this on my own, someone to hold the arms whilst doing stuff would have made it a lot easier.
Here some pics and description, probably could have taken a couple more but anyhow, hopefully helps someone if they do it themselves.
Step 1
First step is to remove the Trunion Flange Nut. It is VERY tight, I sprayed it with WD40 for a few days morning and night, then used the longest breaker bar I have and had a tube through the wheel studs to stop it turning.Step 2
I then used a puller to remove the Trunion Flange. Interestingly on the late model arms it came off very easily, on the VR it was much tighter on the splines.Step 3
There are two bolts that hold the hand brake mechanism on, remove these and the cast mechanism, I cleaned it up after with a wire wheel and it looks like new now.Step 4
There are also two star bit bolts that hold the brake backing plate to the trailing arm that need to be removed.Step 5
I then set it up in the press and pressed out the Trunion. It was bloody awkward and hard to hold, and my press is 20T and used every bit of it to get them out, got them in the end though. Was too difficult to hold it and take a picture.Step 6
This then exposed a large circlip on the wheel side of the hub that retains the bearing. It’s a big sucker and very difficult to get out. I got one out OK, but the other I bent getting out so will have to pick up a spare. Forgot to take a pic of that bit.Step 7
Once the circlip is removed its back into the press again to press out the bearing, it came out pretty easily.You are then left with the parts, you can see the inner race of the bearing stayed on the shaft. On the right you can see the circlip groove where the big bearing retaining circlip fits.
Step 8
I then used a pullet to remove the inner race.Step 9
Then I removed the backing plate, and used a cut off wheel in my 4″ grinder to cut off the outer lip as it fouls the larger discs i am using.I then clamped it flat and took it down with a grinding wheel .
Lastly I finished it off nice and smooth with a die grinder and hand file and sand paper.
I am going to get it powder coated with all the other suspension bits, that wont be for a while so I thought I would paint it just to stop it all rusting.
This shows the before and after
As I say, bugger of a job really, but at least its done, I will order some new bearings and the circlip, get it all powder coated, reassemble it all and it will be good to go.
-
This reply was modified 6 years, 7 months ago by VRSenator065.
February 18, 2015 at 1:31 am #410
VRSenator065Participant- Adelaide SA
- VR Senator LSx454 1960 Kombi (project) 1921 Nash Hot Rod (future project)
View build HERE
Posts: 5 777This is what I am planning with the strengthening of the sub frame. Interested in peoples thoughts. Thinking of 5 or 6mm plate. The idea is that the welding guys can use the cardboard as templates for the plate.
-
This reply was modified 6 years, 7 months ago by VRSenator065.
February 18, 2015 at 1:31 am #411
VRSenator065Participant- Adelaide SA
- VR Senator LSx454 1960 Kombi (project) 1921 Nash Hot Rod (future project)
View build HERE
Posts: 5 777Had a good look at the sub frame, and really like the suggestion by Marzella (thanks
) to add a member that ties the top and bottom halves together which also is in exactly the right plane to take the torque. Thats why this forum rocks.So this morning got stuck into it. I plan on using a piece of 10mm flat mild steel, welded top and bottom. Had to hunt around for something 10mm to use as a guide, ended up getting a piece of scrap timber planed down. Dont want to bore everyone with a 1001 pictures, but the basic process is below.
All good to go now, going to take to a welder I have used before, don’t trust my own on something like this, bit worried about distorting it too. Will post up once ts all done and all powder coated up.
-
This reply was modified 6 years, 7 months ago by VRSenator065.
February 18, 2015 at 1:32 am #412
VRSenator065Participant- Adelaide SA
- VR Senator LSx454 1960 Kombi (project) 1921 Nash Hot Rod (future project)
View build HERE
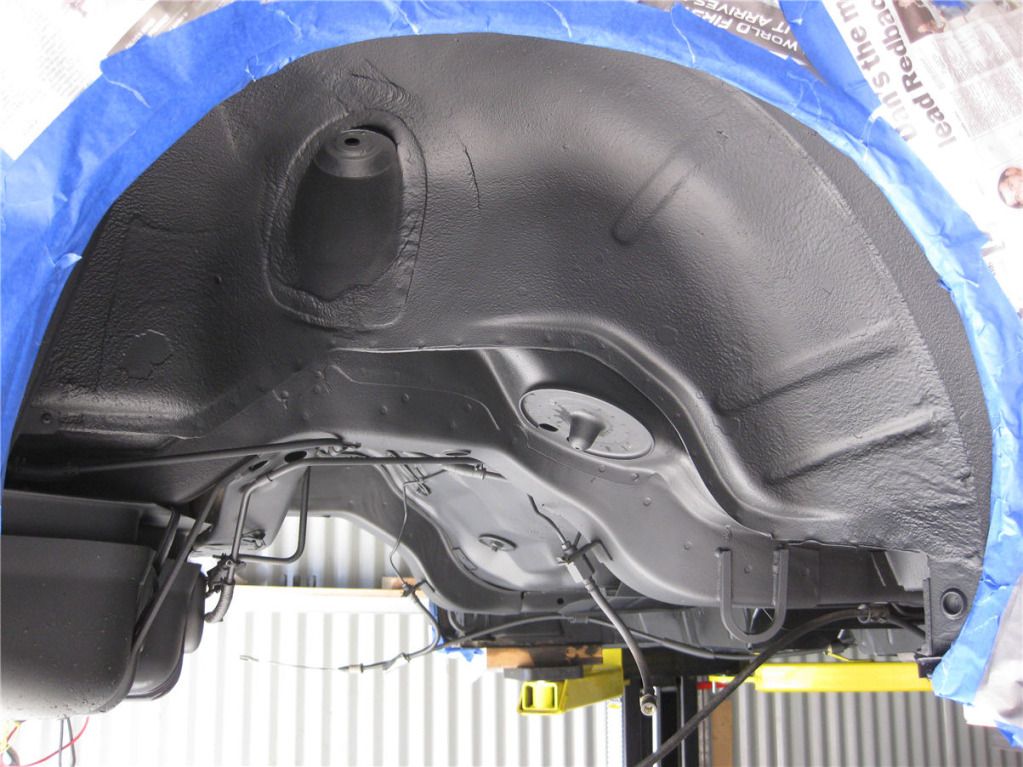
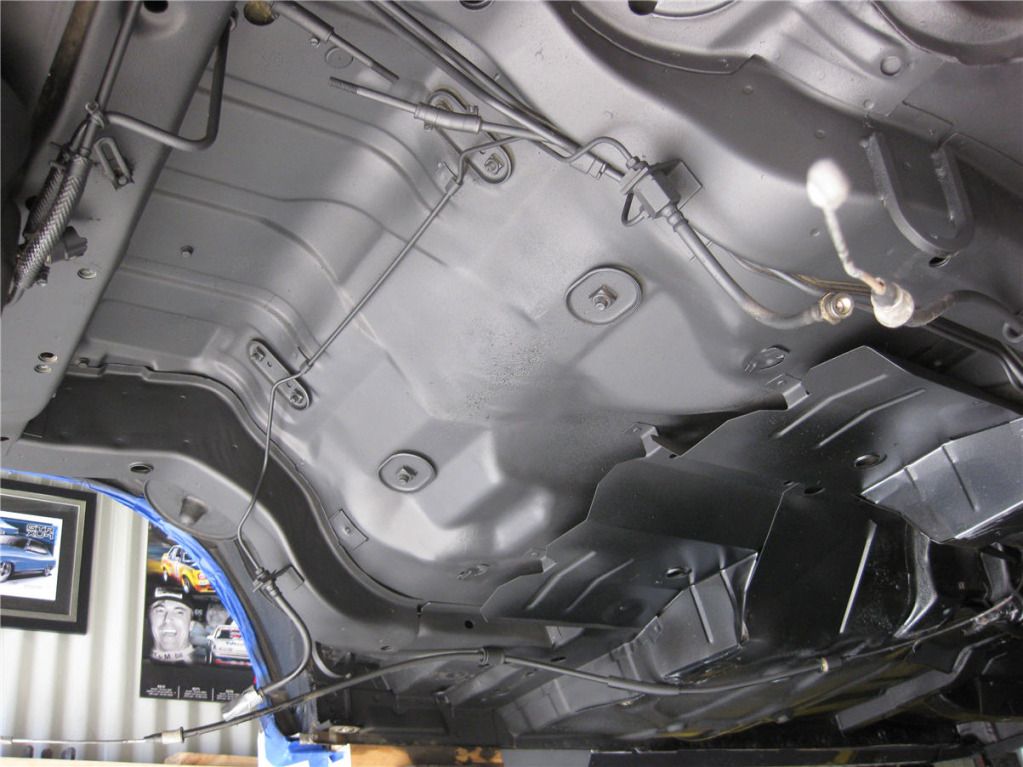
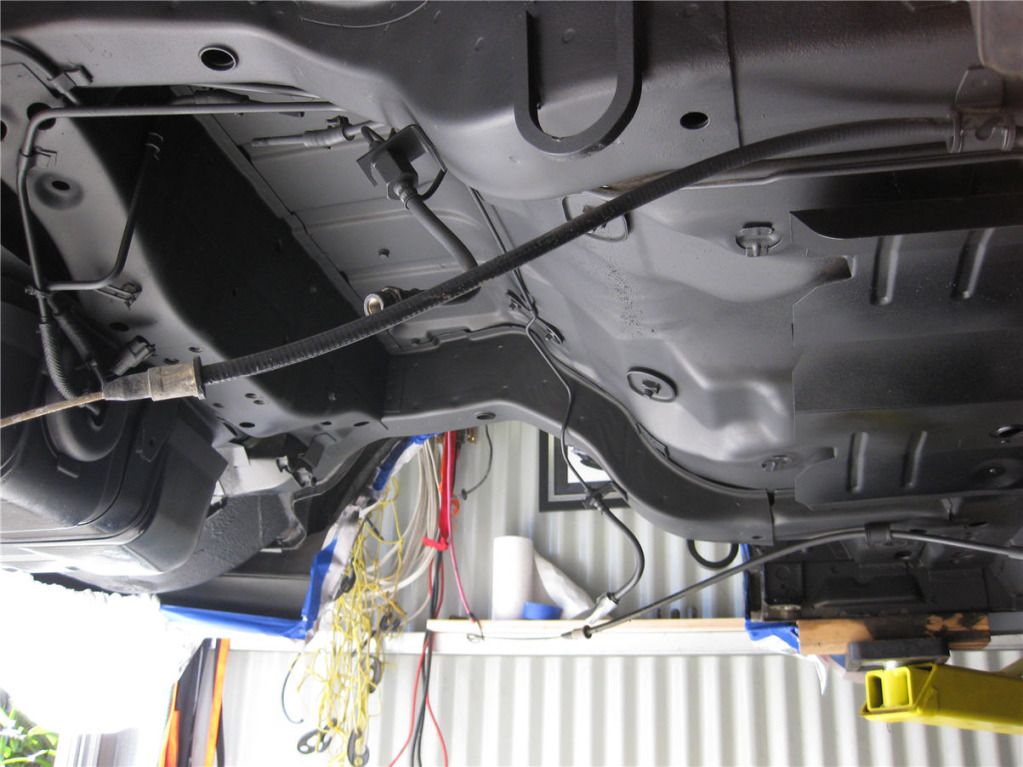
Posts: 5 777Well had a win, been sort of holding off painting the under-body where the sub frame sits as I thought it would be difficult, but got stuck into it this afternoon and actually was pretty easy. Spent bloody ages masking up, and probably went a little overboard, the textured under-body coating doesn’t seem to drift like a normal aerosol can. Really happy with it, although I thought it may have been a little more textured to match the rest Frank has done. Not sure its worth worrying about though. Not sure if other brands (I used Motorspray Textured Under-body Coating) are any more textured?? Anyhow, looks great I think.
 February 18, 2015 at 1:32 am #413
VRSenator065Participant- Adelaide SA
- VR Senator LSx454 1960 Kombi (project) 1921 Nash Hot Rod (future project)
View build HERE
Posts: 5 777February 18, 2015 at 1:33 am #414
VRSenator065Participant- Adelaide SA
- VR Senator LSx454 1960 Kombi (project) 1921 Nash Hot Rod (future project)
View build HERE
Posts: 5 777Really happy with how this turned out.
-
This reply was modified 6 years, 7 months ago by VRSenator065.
February 18, 2015 at 1:34 am #415
VRSenator065Participant- Adelaide SA
- VR Senator LSx454 1960 Kombi (project) 1921 Nash Hot Rod (future project)
View build HERE
Posts: 5 777Not a bad day today, got a fair bit done on the rear end, had bit of a moment putting the VY handbrake mechanism together as I accidentally mixed up two small parts from the VR and VY but once I worked it out I was ok. Not really photo material yet.
Couldn’t help myself though and did a quick fit up of the gearbox to the engine, I haven’t fitted the starter swap kit or anything so just to the a rough idea how it looks.
And just a random of the shed
-
This reply was modified 6 years, 7 months ago by VRSenator065.
February 18, 2015 at 1:35 am #416
VRSenator065Participant- Adelaide SA
- VR Senator LSx454 1960 Kombi (project) 1921 Nash Hot Rod (future project)
View build HERE
Posts: 5 777Thanks for that
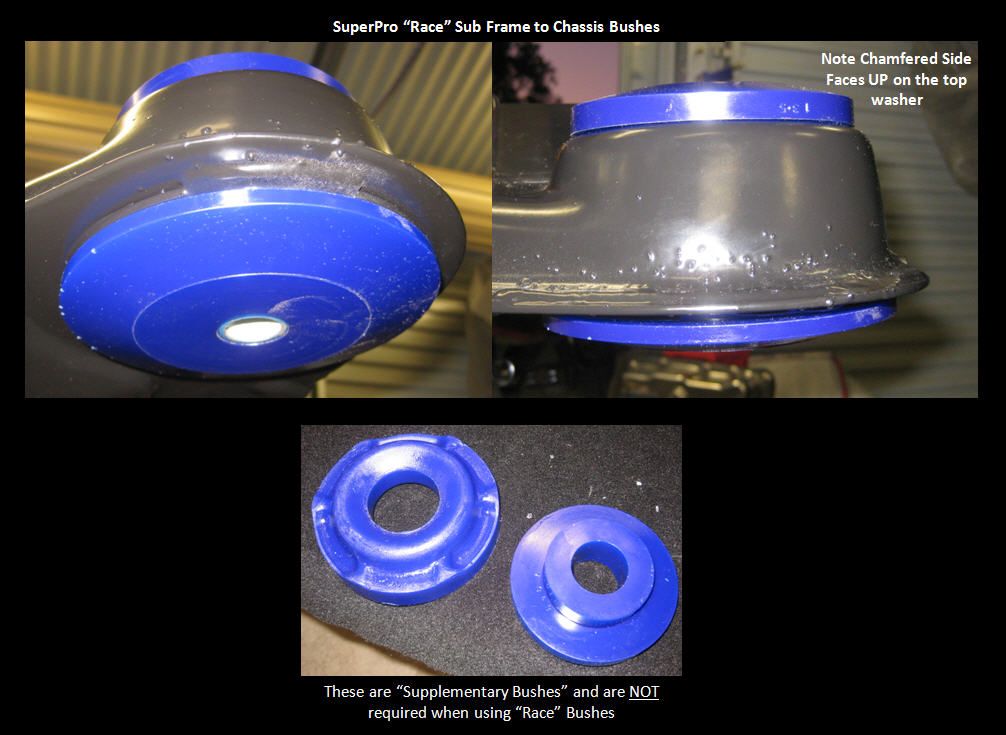
Have got the SuperPro bush issue sorted, thought I would put up a picture for future reference for posterity.
I am using the Race version of the sub frame bushes. The quote I had was “the next stiffest thing you could do would be weld the sub frame to the car”:)
First of all no information comes as to which way up they the top washer goes. A call to the SuperPro tech dept had them guessing too, the kindly phoned back a little later and advised the chamfered (sloped) side faces up.
Second thing was i was supplied “Supplementary Washers” I couldn’t fathom where or how they fitted. Again no diagrams. Bit of back and forth then turns out these are used when using regular style bushes to fill the voids to make it stiffer. Since the Race are a solid lump of urethane they aren’t required.
Diagram below
 February 18, 2015 at 1:36 am #417
VRSenator065Participant- Adelaide SA
- VR Senator LSx454 1960 Kombi (project) 1921 Nash Hot Rod (future project)
View build HERE
Posts: 5 777Got a fair way with the rear sub frame re assembly too. For now I am assembling it with the standard drive shafts, I am going to go HD from Diff Technics, but will wait until I get them to also do me a custom tail shaft once it all in. Have ordered a Whiteline 20mm sway bar, should be here Monday. Need to work out what I am doing with the spring insulators, then its pretty much ready to go back in. Really happy how its turned out. Very colourful i know but should look horn back under the car against the dark body colour and black under body.
-
This reply was modified 6 years, 7 months ago by VRSenator065.
February 18, 2015 at 1:36 am #418
VRSenator065Participant- Adelaide SA
- VR Senator LSx454 1960 Kombi (project) 1921 Nash Hot Rod (future project)
View build HERE
Posts: 5 777I have received a very detailed, comprehensive and lengthy reply back from my engineer re questions I have asked in relation to ABS and also the ECU system, in particular the potential of going after market.
I want to point out though, my engineer knows me, in fact he taught me engineering in my associate diploma. He knows my company and work history. I have been involved with mechanical engineering for a long time and so I am sure he is comfortable with how I will approach these things. I am just saying if your engineer wasnt as familiar he may take more convincing.
Also I am in SA, and I am learning a lot of this comes down to his interpretation. But as follows (in shortened form)
Am I able to delete the ABS?
-
[*]The ABS does not alter the performance of the braking system and your vehicle will be tested anyway.
[*]If you were wedded to deletion, I would be happy to provide an argument to do so.
[*]I suspect that it could be deleted but deletion is not my first choice.
Am I able to relocate the ABS module?
-
[*]Yes. We have done that previously and tested with good results.
[*]Protection of tubing is an issue.
[*]I am conscious of ABS control units tending to be close to the same height as the master cylinder. To minimise unpredictable effects, if possible it is better to keep the ABS manifold at a height similar to the original height.
Am I able to use an aftermarket ECU system on my car?
-
[*]I consider emission control as no different to brake system or chassis design. The principles are known, the intent of the regulations is known and cause and effect is understood.
[*]As long as the valve timing is set for emission control and does not lead to inlet fuel discharging through a still open exhaust valve.
[*]I suggest you carry on with the package you want, knowing that the emissions have to be addressed.
What restriction do I have on induction system? (plenum / individual runners / 4 barrel throttle body
-
[*]We are not here to stifle the flamboyance of individuals, or to curb their creativity. But I must be able to stand up in a Coroner’s Court and explain why I accepted your recommendations. You must be able to give evidence supporting those recommendations.
[*]So I encourage you to choose the system guided by your knowledge and intuition. I trust your knowledge and intuition and would hate to get in their way.
[*]So all the above can be made to work
All good
February 18, 2015 at 1:37 am #419
VRSenator065Participant- Adelaide SA
- VR Senator LSx454 1960 Kombi (project) 1921 Nash Hot Rod (future project)
View build HERE
Posts: 5 777Great week end all up, survived the work Xmas show so that was a start
Thought I would just just muck around to see how easy it would go back in and actually just kept working and got it all in and bolted up. Slight problem with the idea of going extra high tensile on the camber kit, the bolts I got don’t have the thread all the way up to the head, so they wouldn’t work. I ended up using the supplied bolts, I cleaned them all and used Loctite, I guess I will just keep an eye on them and see how it pans out.
Bloody happy with how the rear end has come together. Can start thinking about if/how/where to do a surge tank, think I will with duel pumps feeding each of the existing hard lines up to the front but will think a bit more about that. Still some stuff to do on the rear like the brake lines etc. but at least its in.
Have to say that the powder coating is awesome, its the way to go, cheap to get done and tough as, several times it got knocked or kit by a spanner etc and it doesn’t chip or scratch at all.
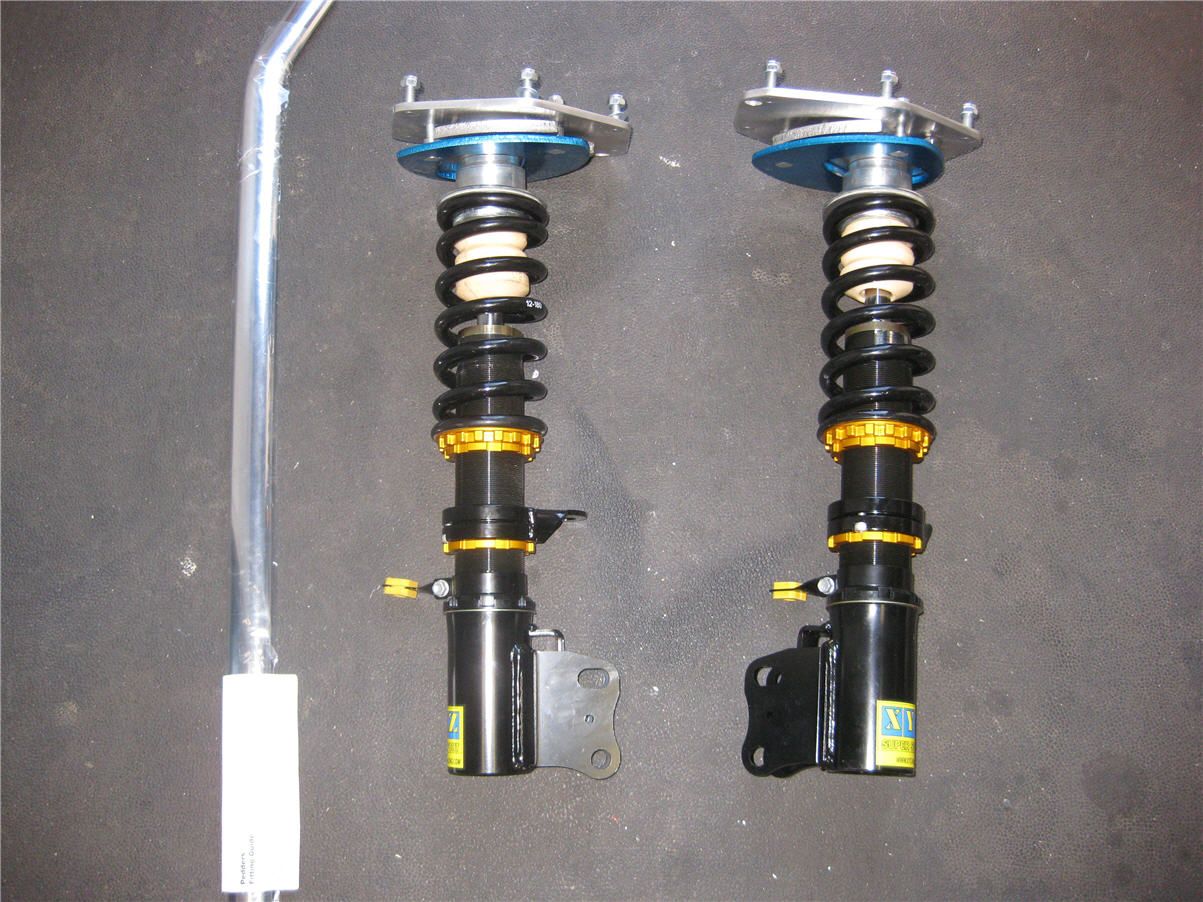
Not 100% sure of the springs that come with the XYZ coil over kit. They are specials made by King, I really like the adjustable height mounting base but unsure what the ride will be like. I do have a pair of SSL’s if they aren’t any good, again will suck it and see. Cant wait to get the wheels and see what it looks like on the ground.
A few photos, (actually a lot), but it needs a few to show it off.
-
This reply was modified 6 years, 7 months ago by VRSenator065.
February 18, 2015 at 1:38 am #420
VRSenator065Participant- Adelaide SA
- VR Senator LSx454 1960 Kombi (project) 1921 Nash Hot Rod (future project)
View build HERE
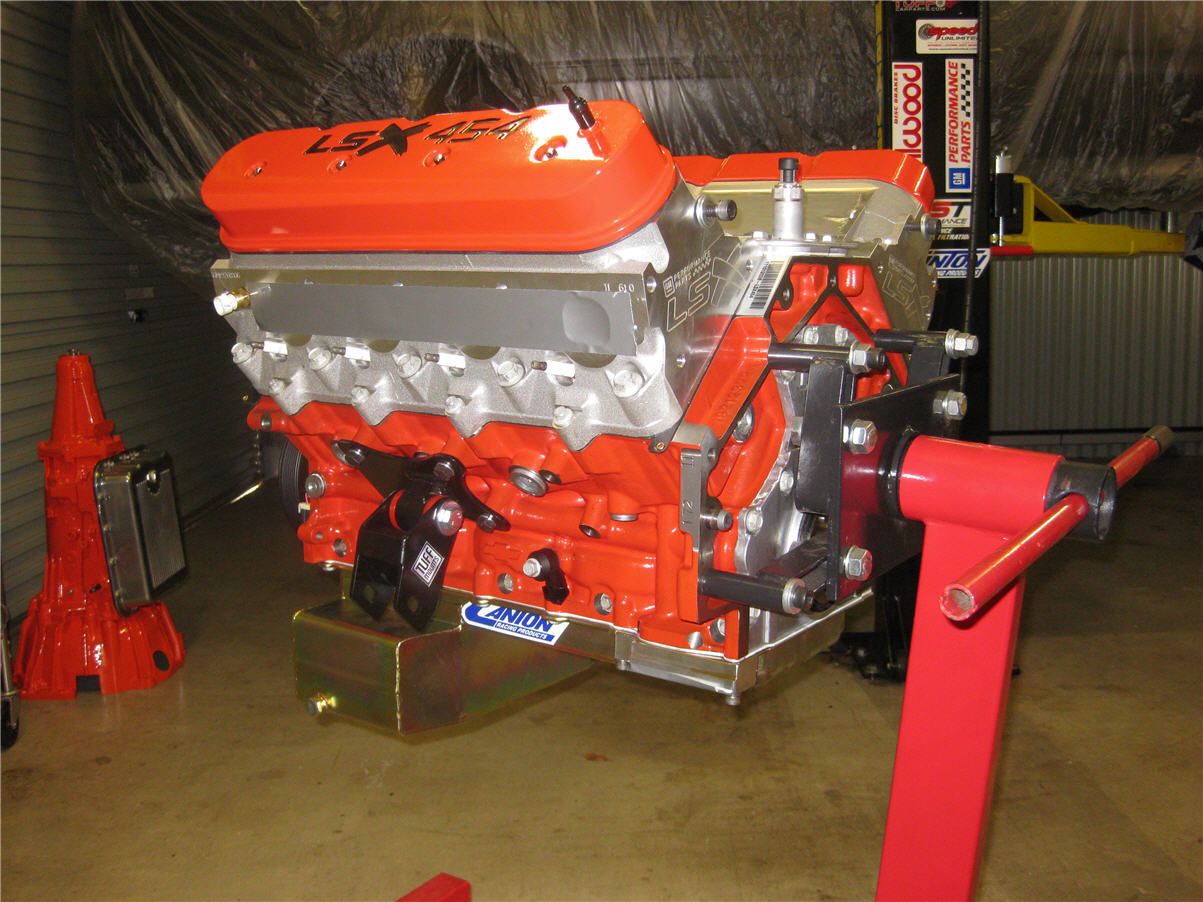
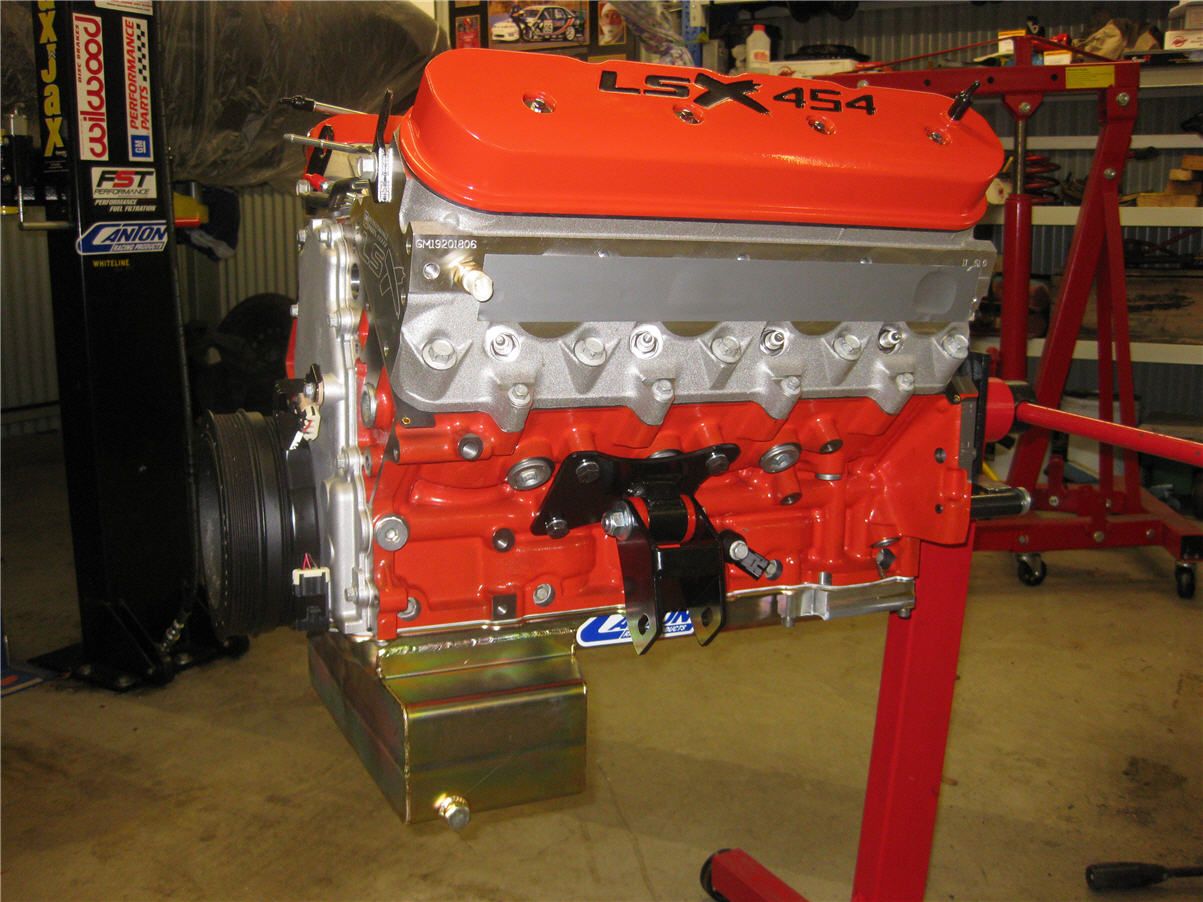
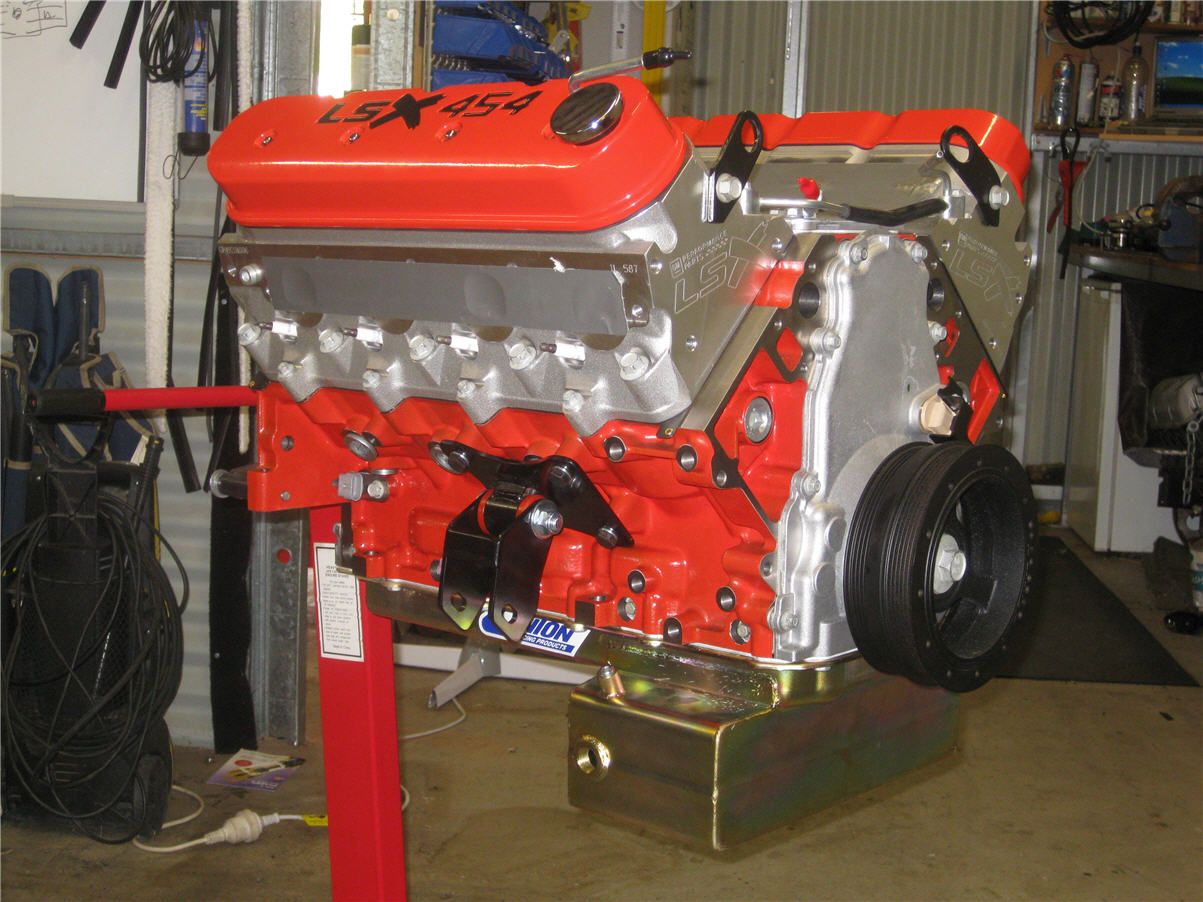
Posts: 5 777Got a little bit more done today, I want to try and make sure I have everything sorted before the break at Xmas so thought I would fit the oil feed and Canton sump. Have to say I think its going to be ace, I really like it. Its a race front sump with great internal baffling etc. Will go and get unbrako style bolts for it during the week, at this stage have just used the bolts that came with the LSx.
While I had it open I checked the bolts were torqued up on the main and big ends. Not sure how true it is but the rumour is there were a couple came from the factory that weren’t done up. Anyhow mine are fine.
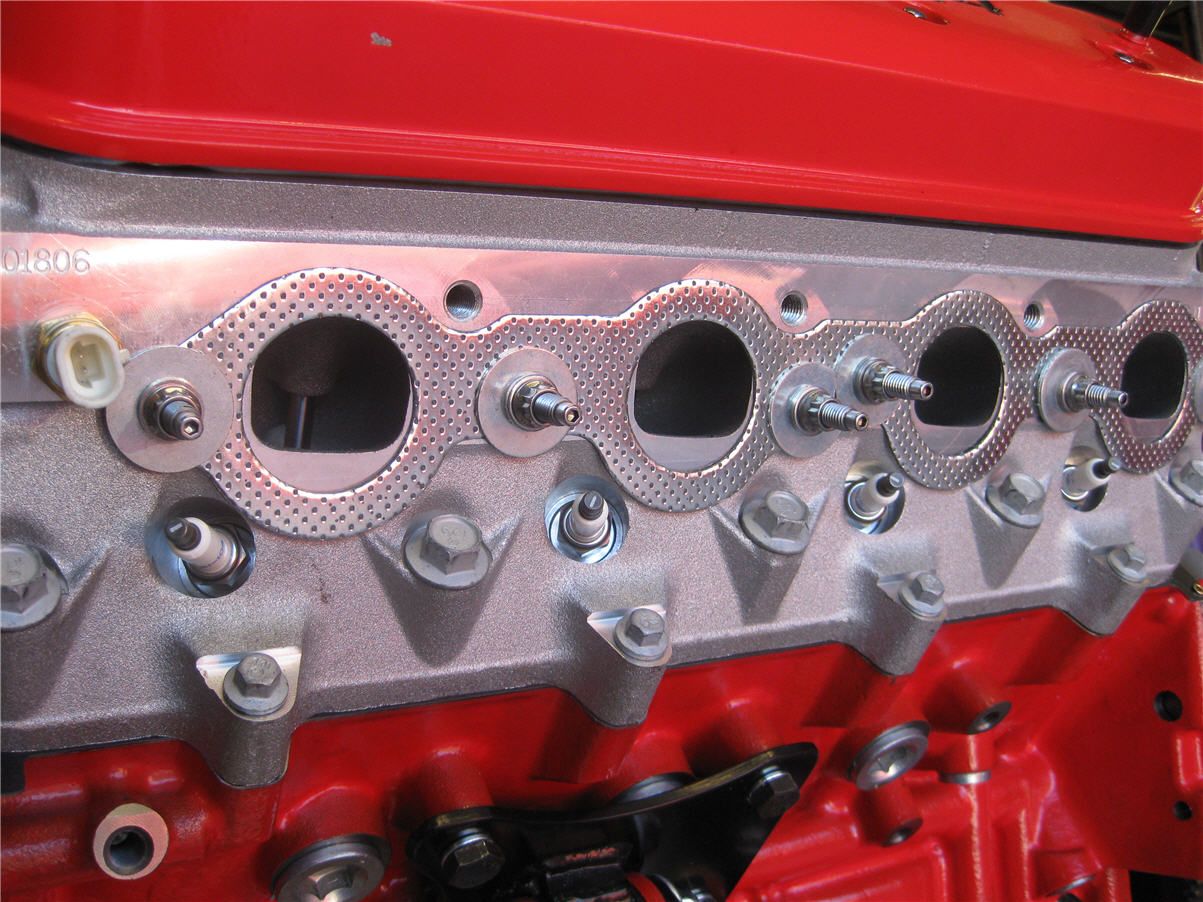
I have settled on going for a remotely mounted oil filter, I want to get it away from the heat of the pipes etc, will go braided lines. I have fitted the adaptor. Love the engraving across the front of the heads, would look pretty cool filled in in orange…
Getting very near the big drop in now
Few pics below
 February 18, 2015 at 1:38 am #421
VRSenator065Participant- Adelaide SA
- VR Senator LSx454 1960 Kombi (project) 1921 Nash Hot Rod (future project)
View build HERE
Posts: 5 777Yea I know, posting too many pictures
Gotta say I think I had a moment when I saw what the headers look like. Picked them up from ceramic coating today, will run heaps cooler than standard, which given the confined engine bay will be good. Also spoke to them about a different (black) ceramic coating specifically to radiate heat that’s supposed to be the ducks guts for sumps, may have it done, still pondering that.
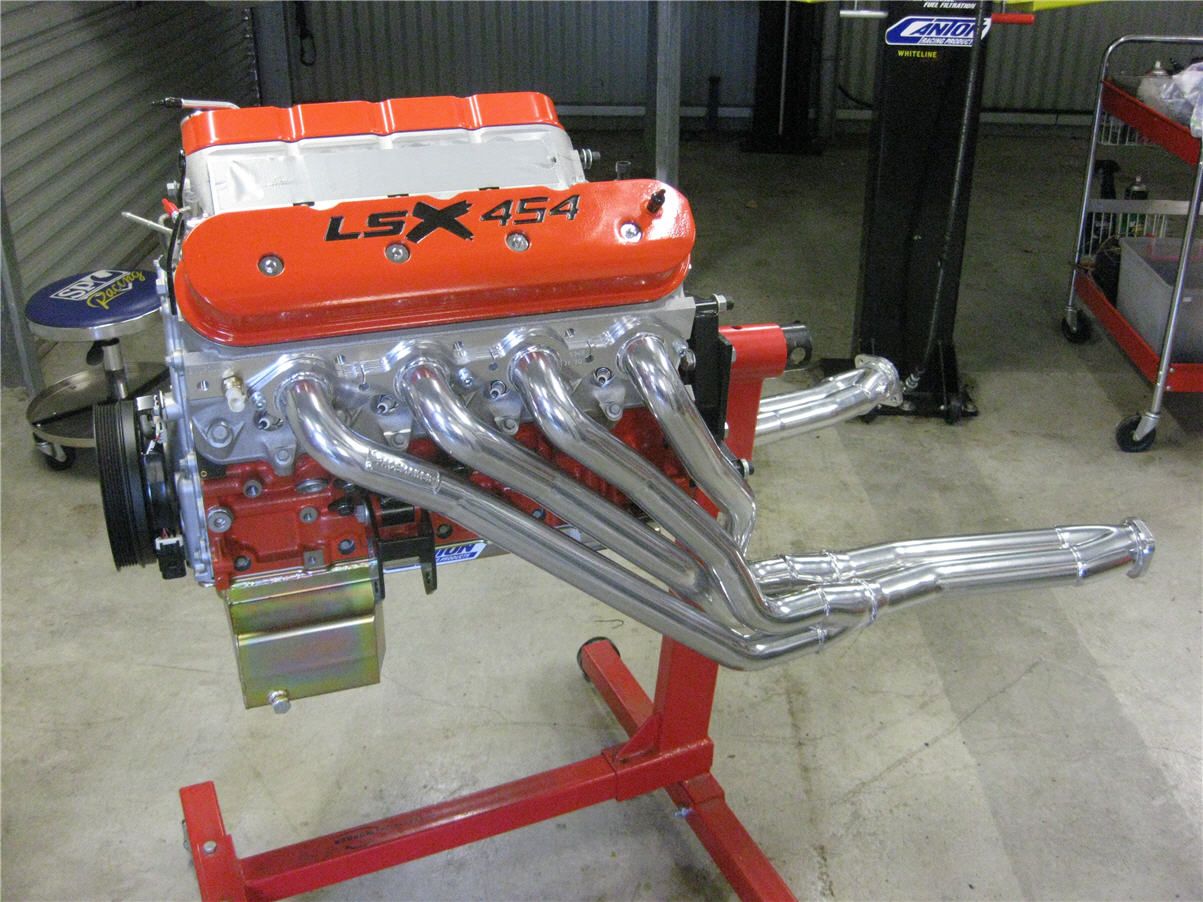
Also pleased to see that the headers seem to match the ports really well, I had planned on match porting them (still may) but if I do I don’t have a lot to do. Considering an ARP header stud set to bolt them up.
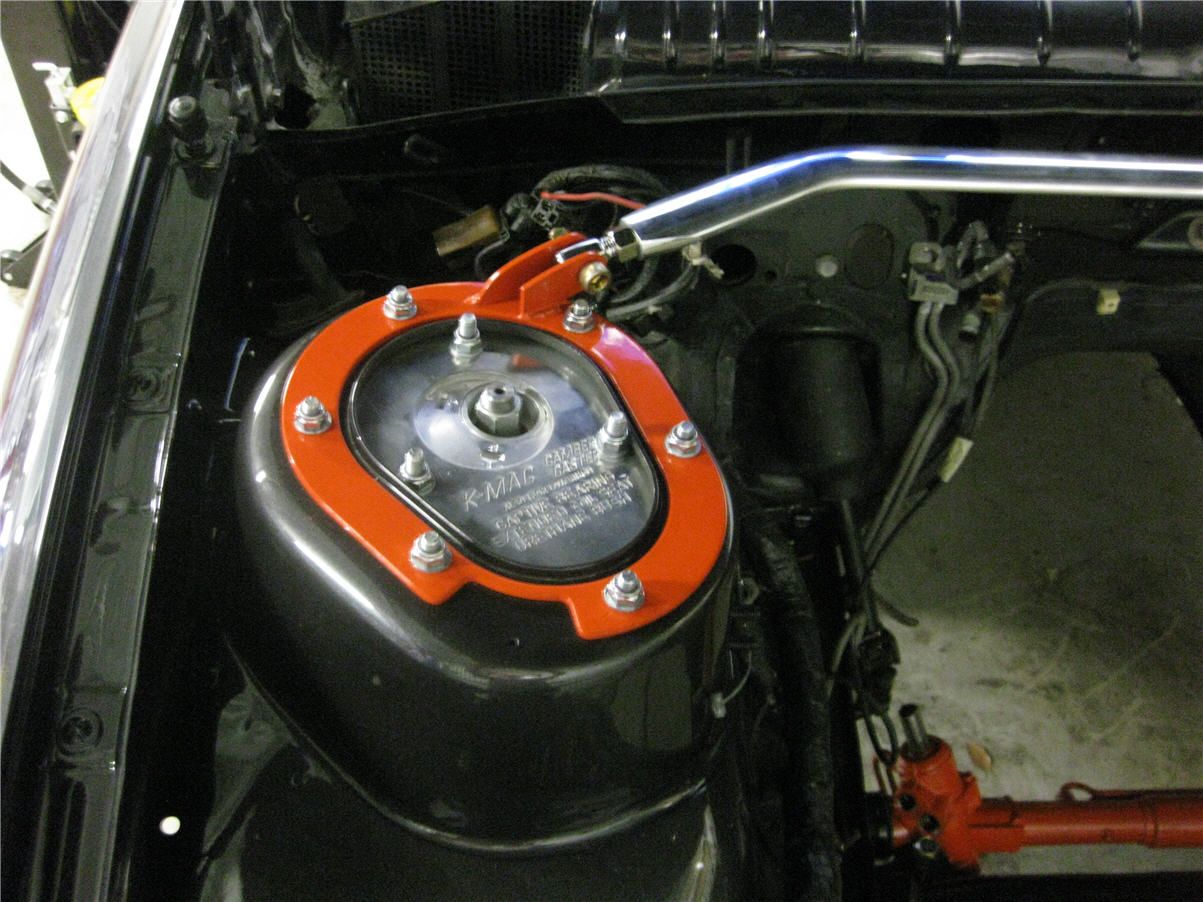
Also got the front coil overs from XYZ and also the Kmac strut tops and look really good.
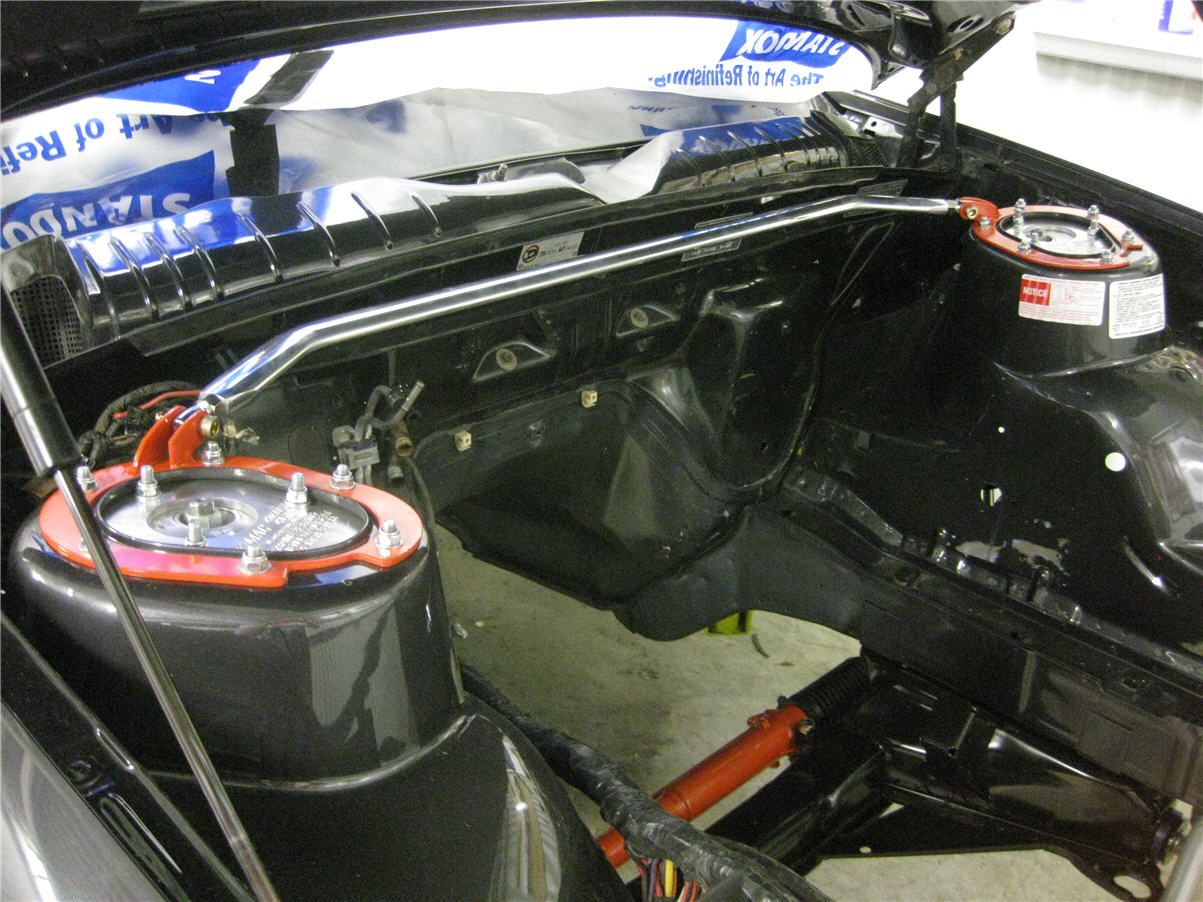
Went to Pedders and checked out the Whiteline, and Pedders strut brace as I wasn’t sure which one to get. Personal preference but I prefer the Pedders that completely circles the tower. Only thing I don’t like is the cut out on the passenger side as the use the same plate for both, and drivers side needs it to miss the overflow mount. I know its over the top but I think I am going to make up a filler piece and weld it in and smooth it over. I am going to try it in orange too as it seems to be a bit of a theme.
Still waiting on the front suspension powder coating, they have promised by Xmas break up (Thursday) hope to hell they keep their word or going to be a pain in the a@#$
February 18, 2015 at 1:39 am #422
VRSenator065Participant- Adelaide SA
- VR Senator LSx454 1960 Kombi (project) 1921 Nash Hot Rod (future project)
View build HERE
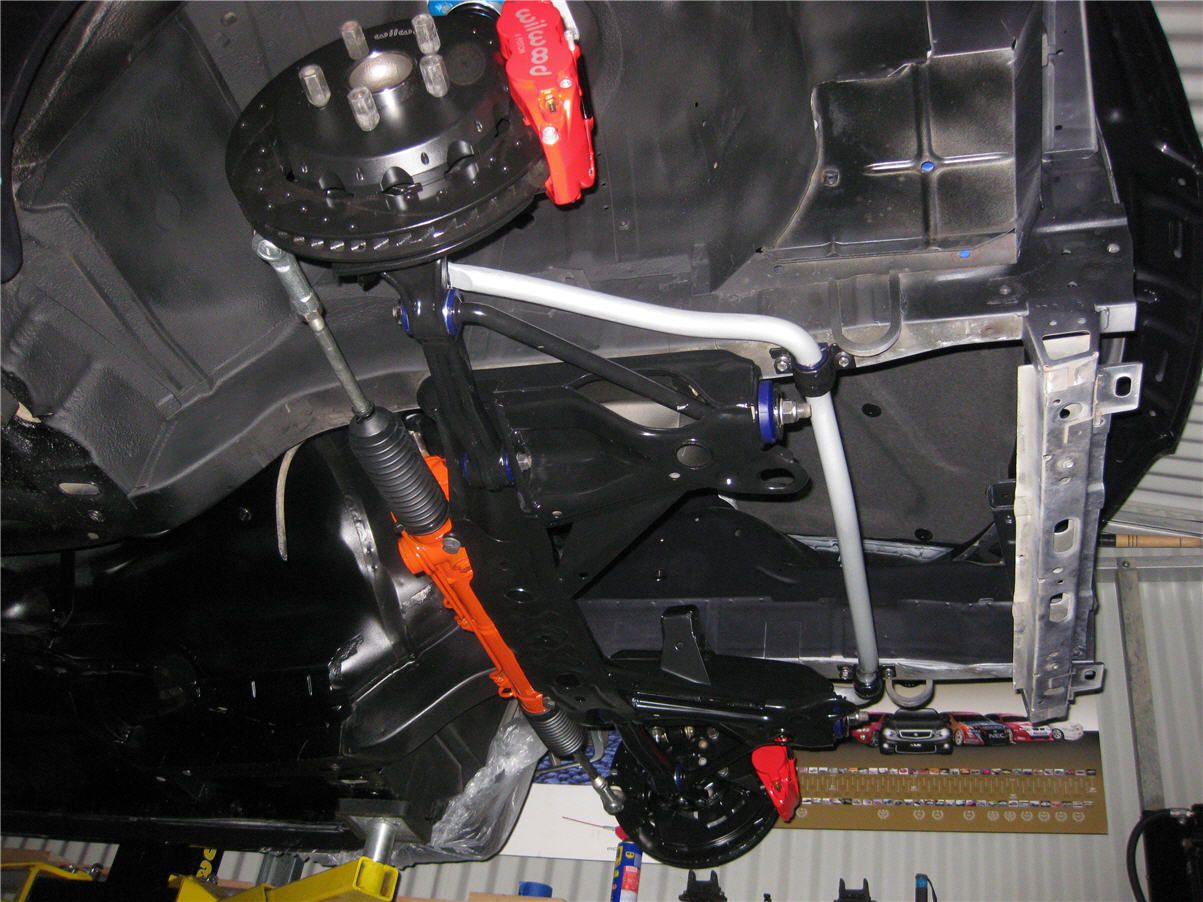
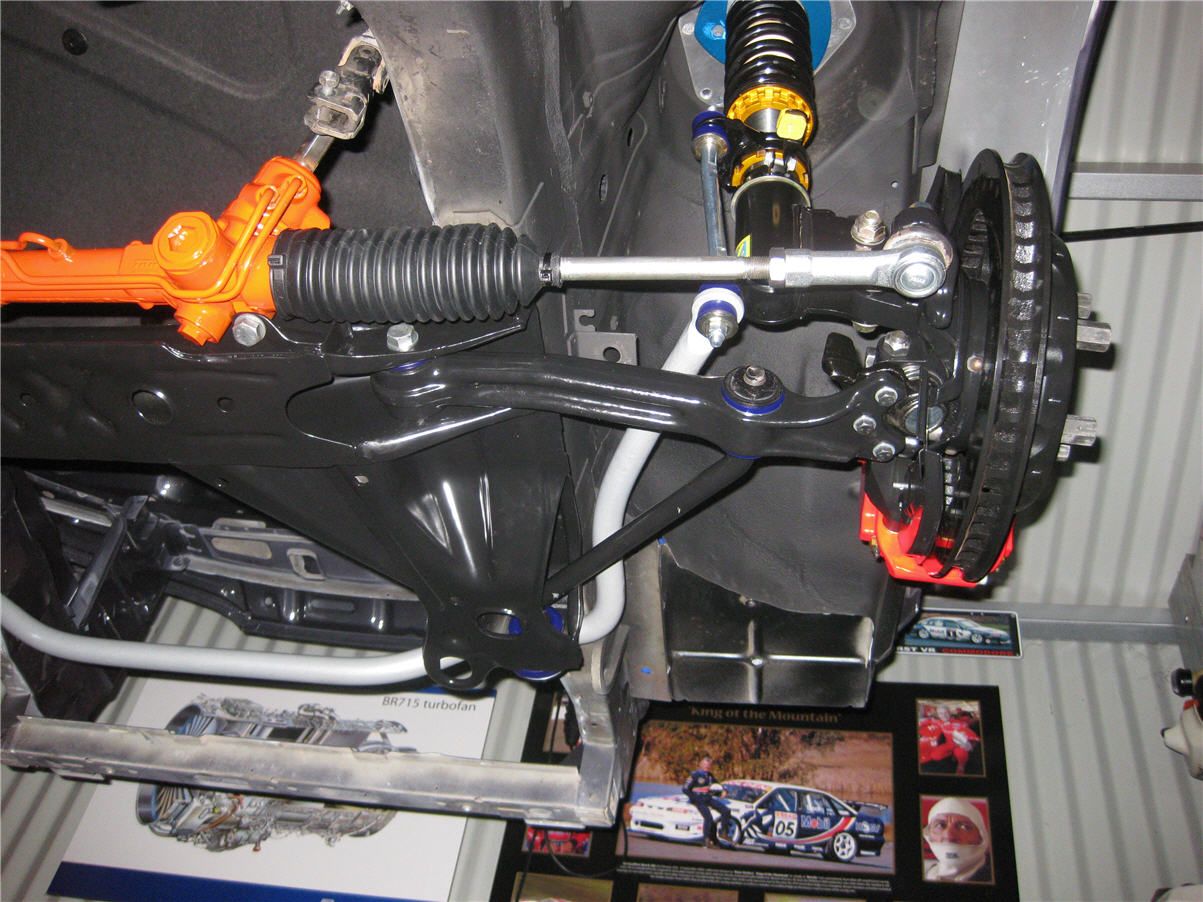
Posts: 5 777Couple of good days, front end is reassembled and in. Got the K-Mac struts sorted, luckily there was someone there today, spoke to the guy (very helpful), seems the reason there’s no instructions is it all depends how you want to set the car up. Apparently with VR’s typically you want to move the top of the strut in toward the engine and back toward the windscreen, so I have roughly installed it that way, I will need to take it to a suspension place to get it all dialled in anyway. Also cleaned up the underside and gave it a good cover with under body texture coat. It looks a bit dodgy under there in the pics with the flash but in real life looks great. Steering rack is only loosely in, as it needs to come out to fit the engine.
This is the list of the SuperPro bushes I have used:
-
[*]Lower inner control arm bushes – SPF0842K
[*]Z bar to lower control arm bushes – SPF0756K
[*]Z bar to chassis bushes – SPF0240K
[*]Heavy duty sway bar link kit – SPF0987K
[*]Sway bar to chassis bushes (28mm) – SPF1453-28KHave stuck with the OE 28mm sway bar, had it powder coated silver to match the rear Whiteline, Have also fitted new lower ball joints, new tie rod end and steering rack boots.
Went with a Pedders strut brace, painted the tops bright orange, decided it looks OK with the matching cut outs both side so have decided to leave it.
 February 18, 2015 at 1:39 am #423
VRSenator065Participant- Adelaide SA
- VR Senator LSx454 1960 Kombi (project) 1921 Nash Hot Rod (future project)
View build HERE
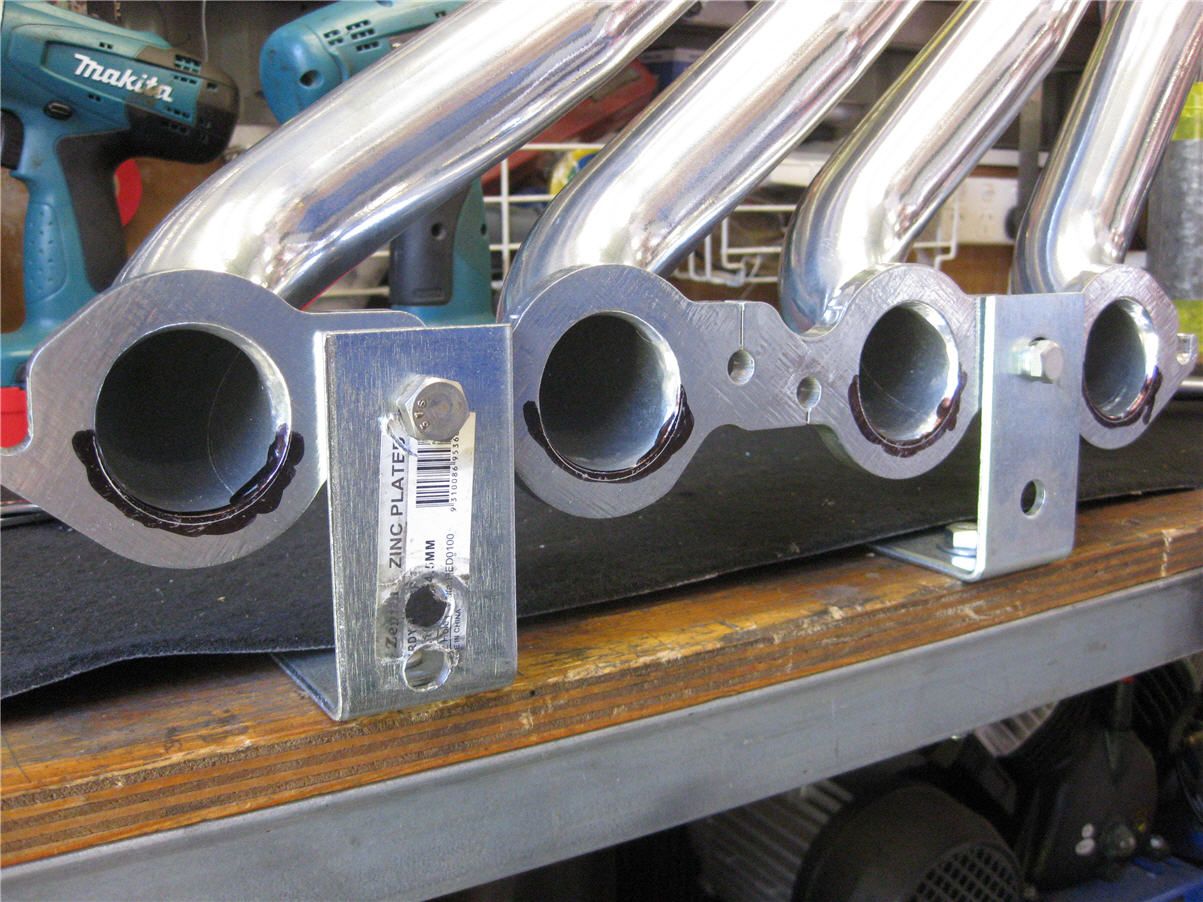
Posts: 5 777While I am waiting for the converter to be finished thought I would have a go at the headers. I have the larger gaskets coming so meanwhile thought I would have a close look at how well they are a match for the heads.
The gaskets I have for the Pacemakers are about 1mm bigger than the size of the pipes but dead central so I was able to use that as a template. As you can see below there is about a 1mm mismatch between the size of the gasket/pipes at the top of the port. Ideally you want the exhaust to be about 1-2mm bigger than the head port. So I needed to open up the pipes by about 2mm.
I then mounted up the headers to some angle brackets I had to hold it nice and still and marked the headers with black felt tip marker then scribed the port size plus about a 2mm
Given the flange thickness there was quite a bit of meat to work with. So I got into it with a die grinder and took it out to my scribed line and blended it into the pipe. There was also some internal lumps from the weld penetration so I smoothed them off also.
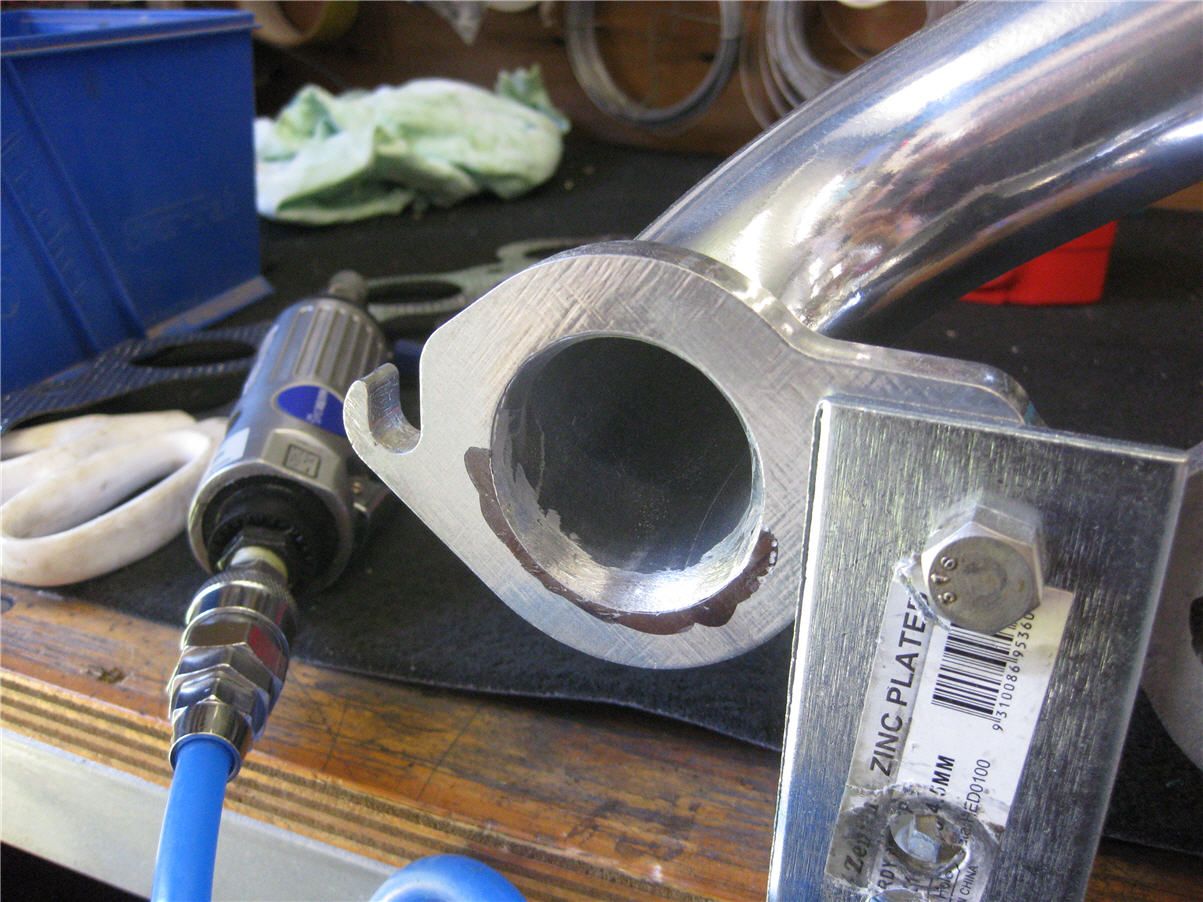
Lastly I used a sanding drum in my Dremel and polished it nice and smooth.

Pretty happy with the result, I guess in an ideal world I would get a complete new set of custom headers built up, but I think they should work pretty good as is.
February 18, 2015 at 1:40 am #424
VRSenator065Participant- Adelaide SA
- VR Senator LSx454 1960 Kombi (project) 1921 Nash Hot Rod (future project)
View build HERE
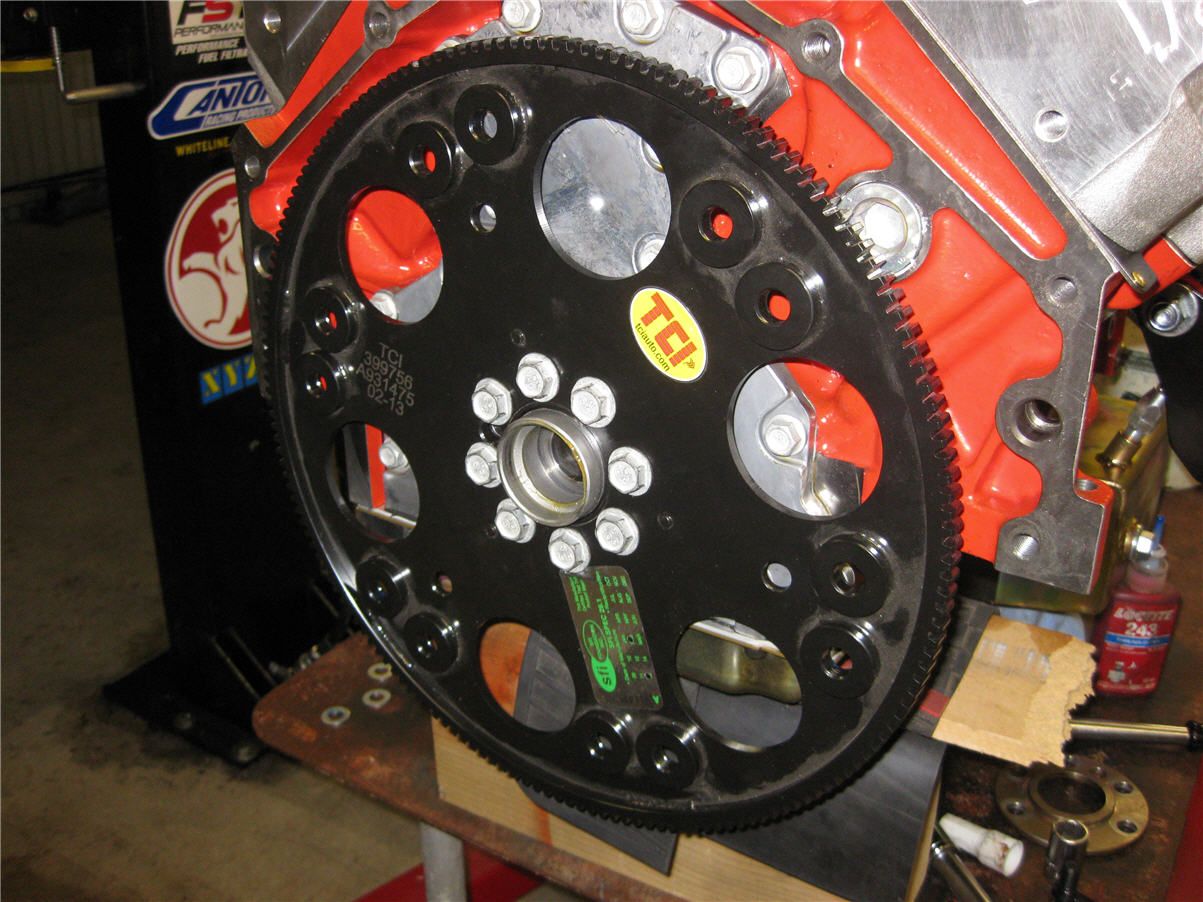
Posts: 5 777Woo Hoo, one trick converter fitted and engine/trans ready to drop in
I am using a really nice TCI flex plate specific to the LSx, its quite a bit different to the standard plate, consequently there’s some things that need to be done differently, ones a pretty important one.
Firstly the spacers supplied with the CRS kit aren’t the right length. My converter guy came out to my place yesterday and we trial fitted and measured what we needed. This morning he went to his shop and turned them up and tig’d them to the converter. We also had to use my lathe to trim down the supplied central bush.
He came out again today and we fitted it all (‘ken hot in the shed). Due to the differences you don’t need to run the CRS round adaptor ring for the centre of the flex plate at all. The TCI plate comes with a nice hardened and ground adaptor itself.
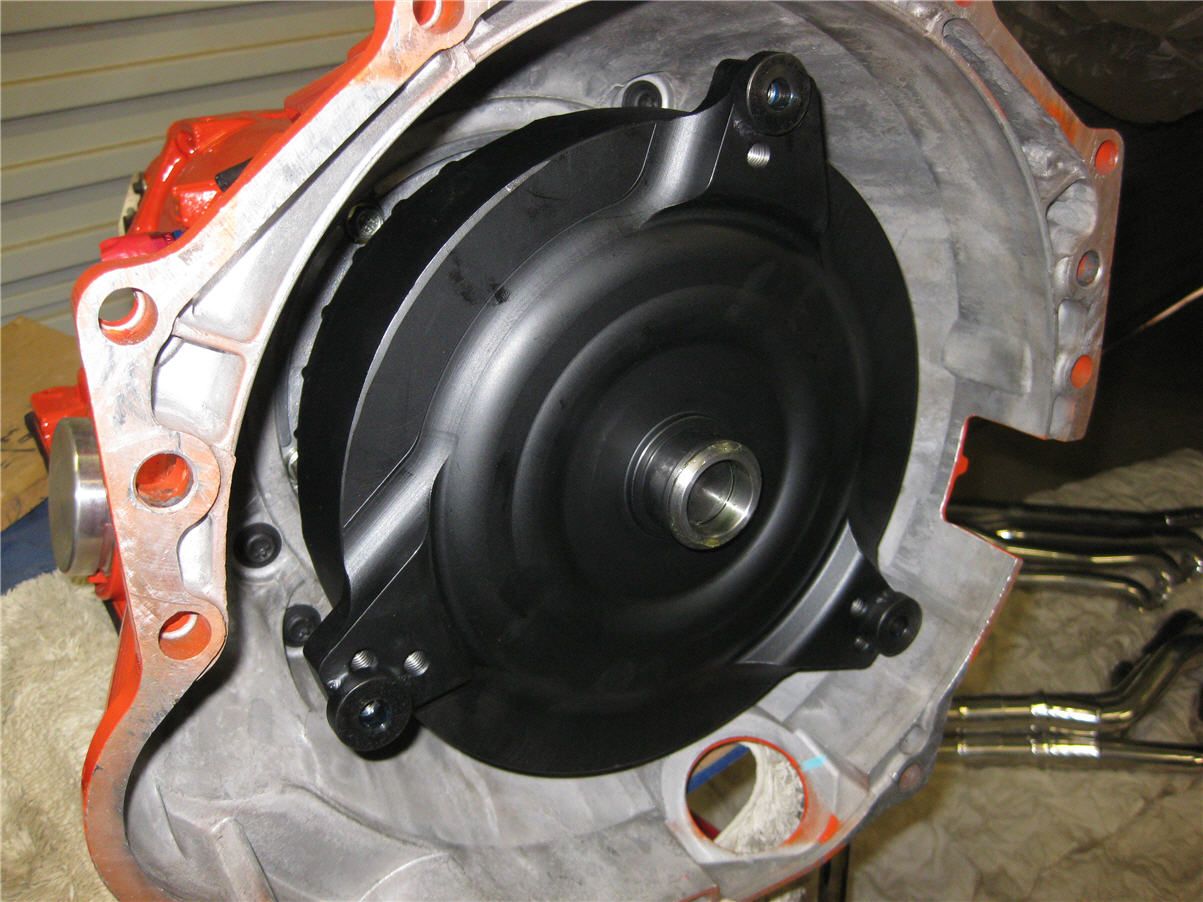
The big one though to be aware of is this…
When we were locking up the converter bolts I felt a small “nick” as I rotated the engine around on the harmonic balancer. Luckily we weren’t rushing and so we decided to pull it apart and investigate, it turns out the heads of the bolts that hold the torque converter on foul on the inner part of the profile cut adaptor ring supplied by CRS on the inside of the starter. We ended up reliving it, I took a photo. No doubt it’s the combo I am using but it may be worth checking carefully if your doing it yourself.
All set now ready to go..
Converter Details
TSI Billet, Damper Style Lock Up Clutch
Triple Torrington bearing
800 ft/lb
Sonnax Stator
Custom Sprag
3200-3400 StallFebruary 18, 2015 at 1:40 am #425
VRSenator065Participant- Adelaide SA
- VR Senator LSx454 1960 Kombi (project) 1921 Nash Hot Rod (future project)
View build HERE
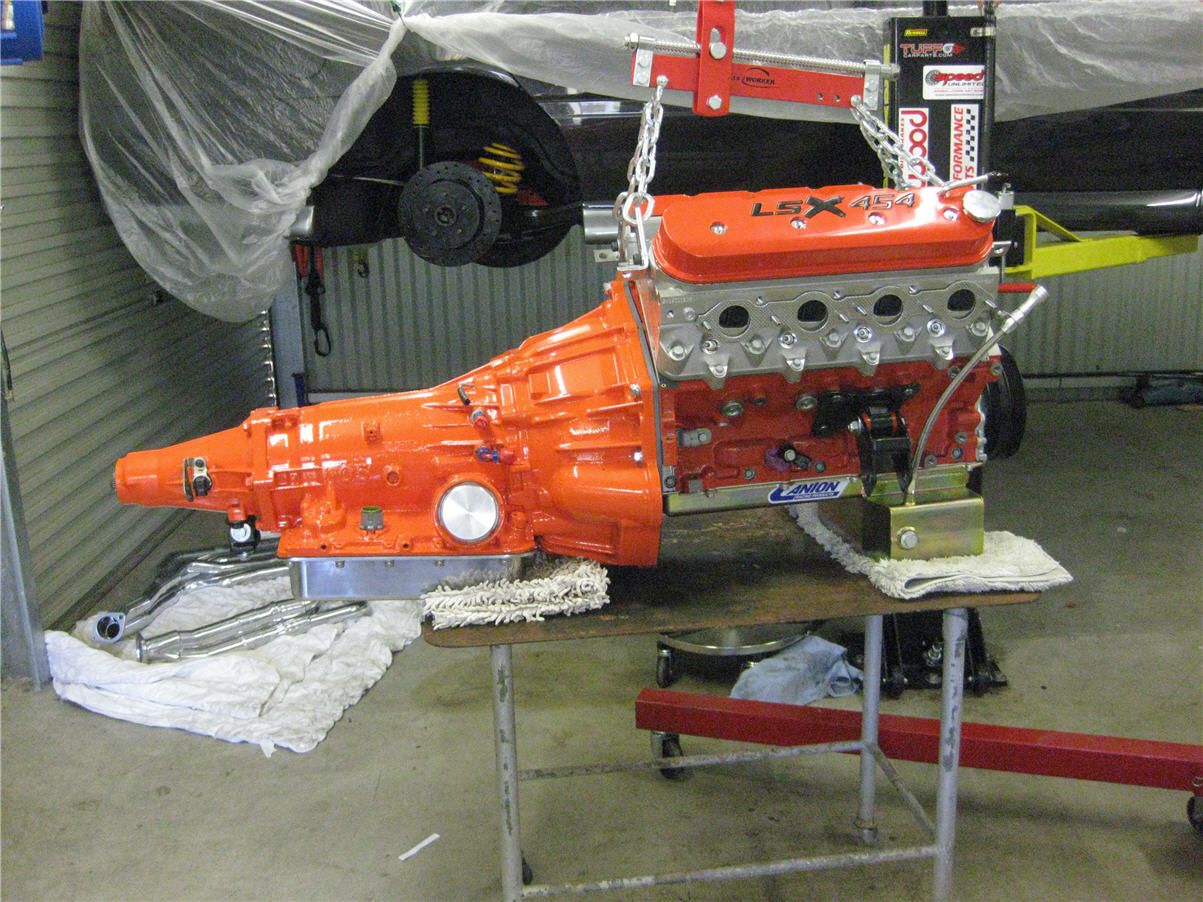
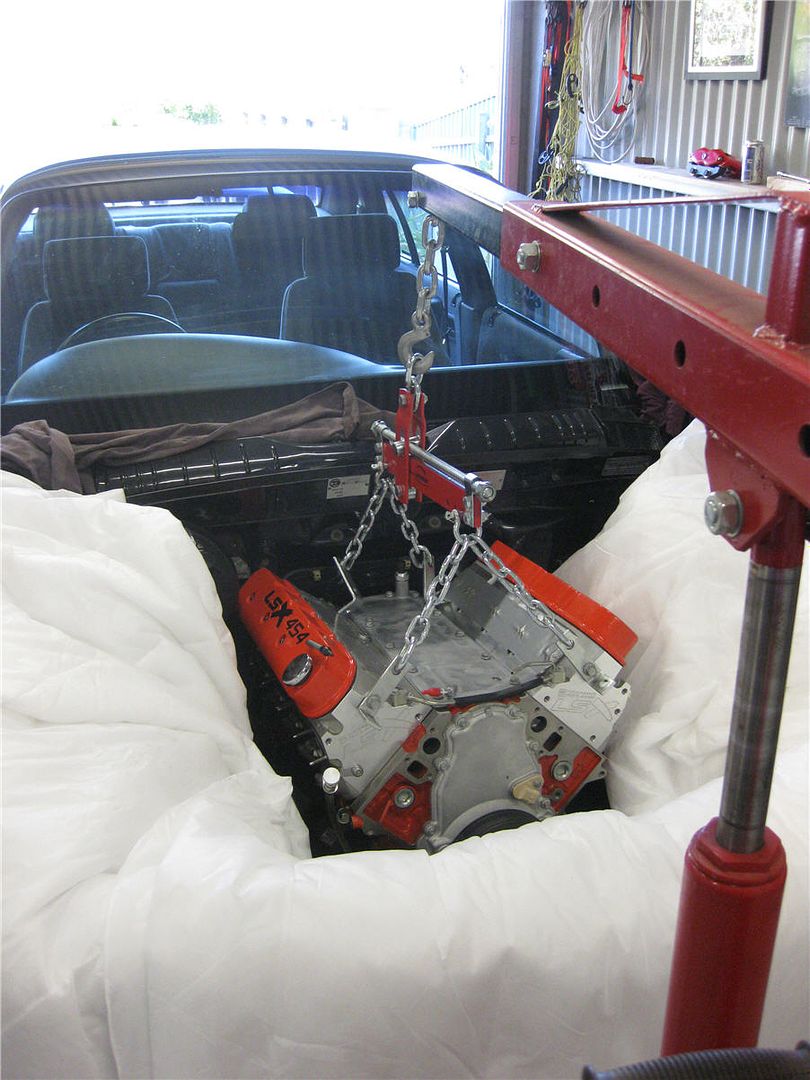
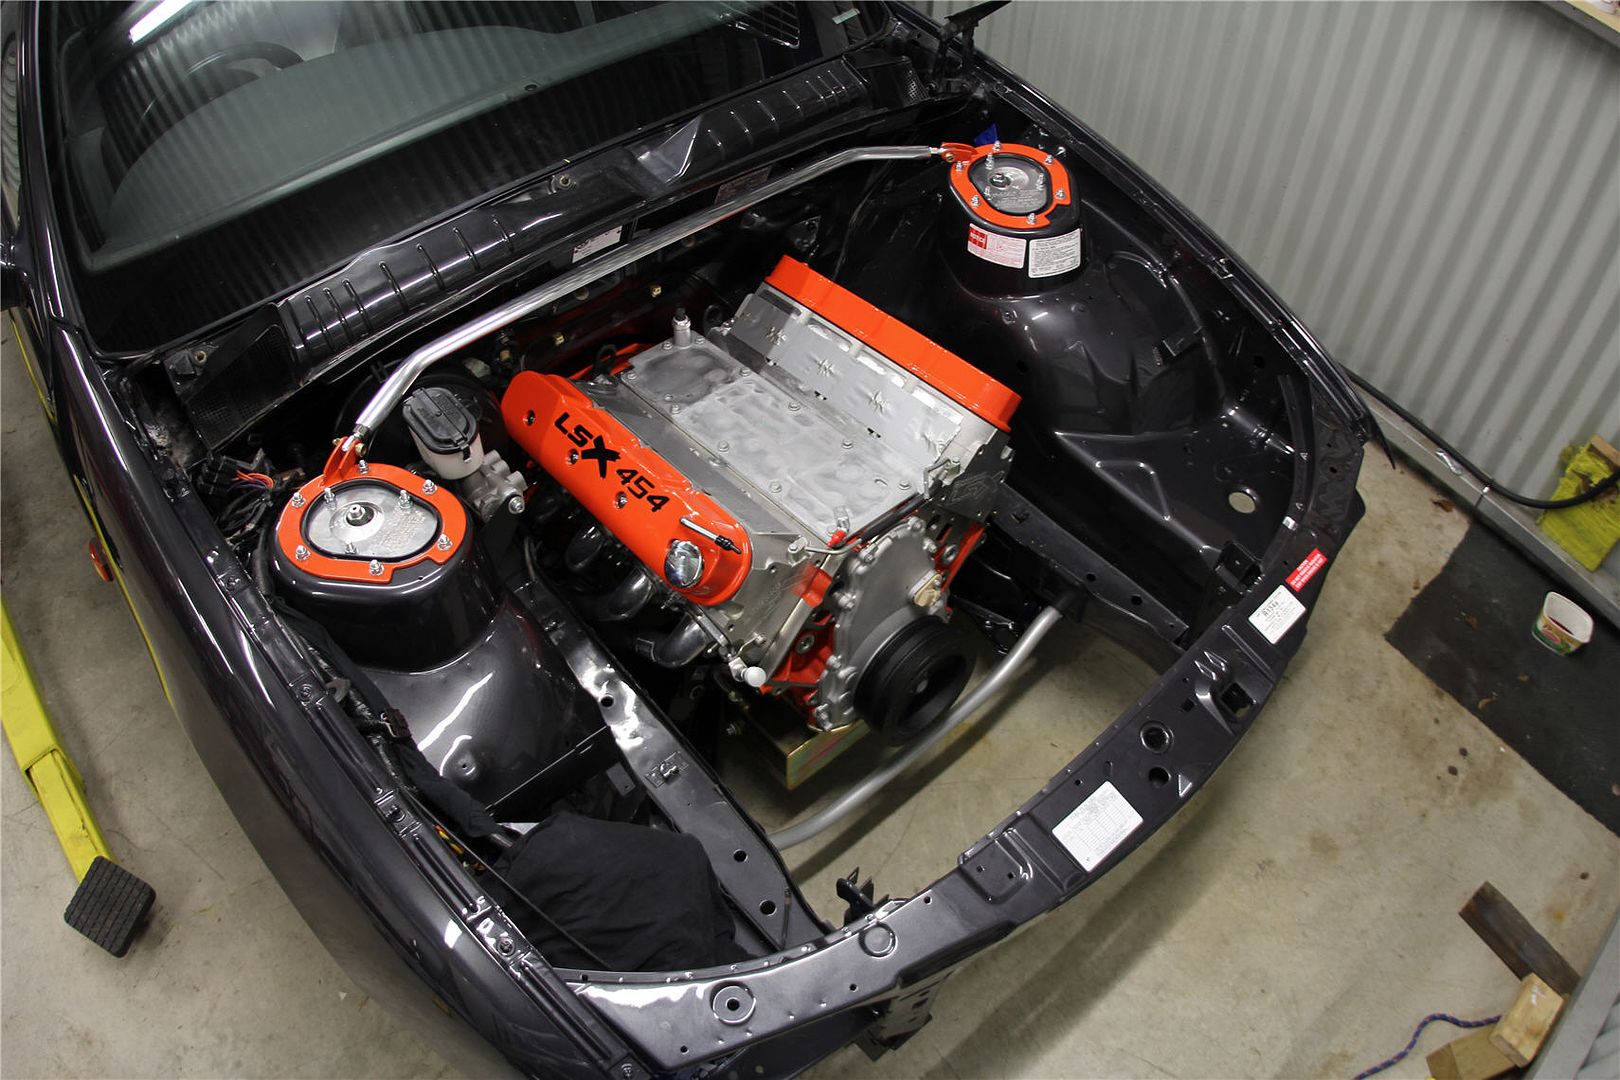
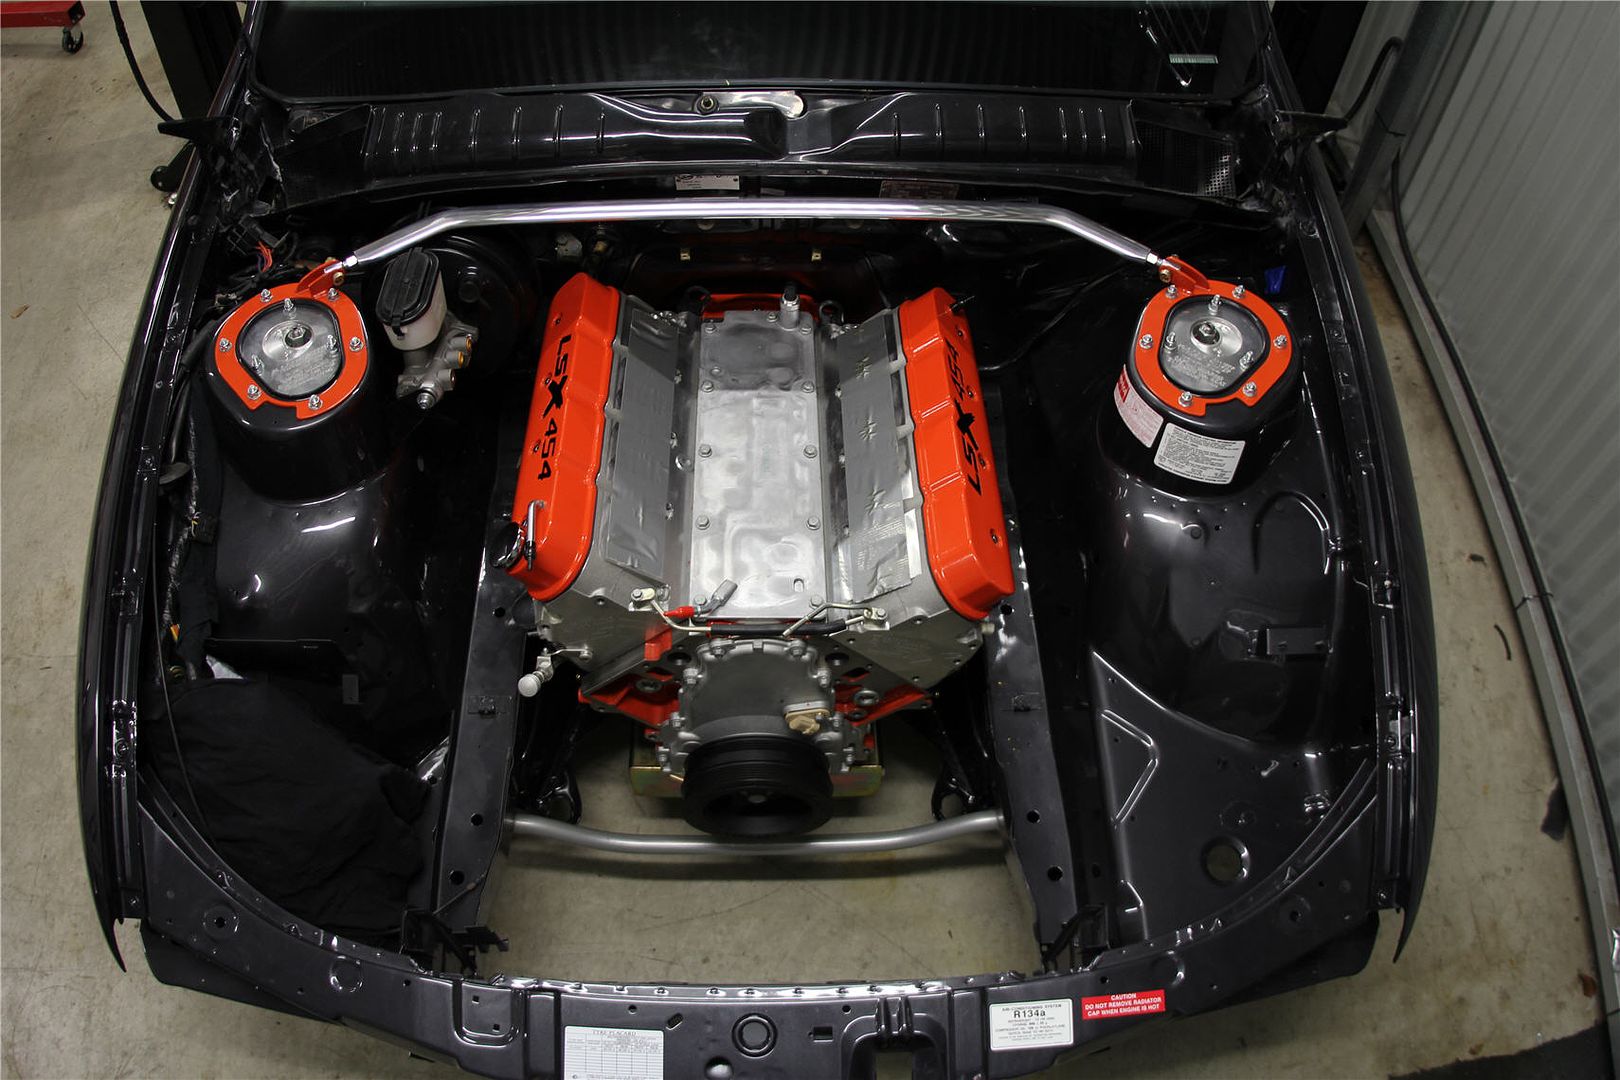
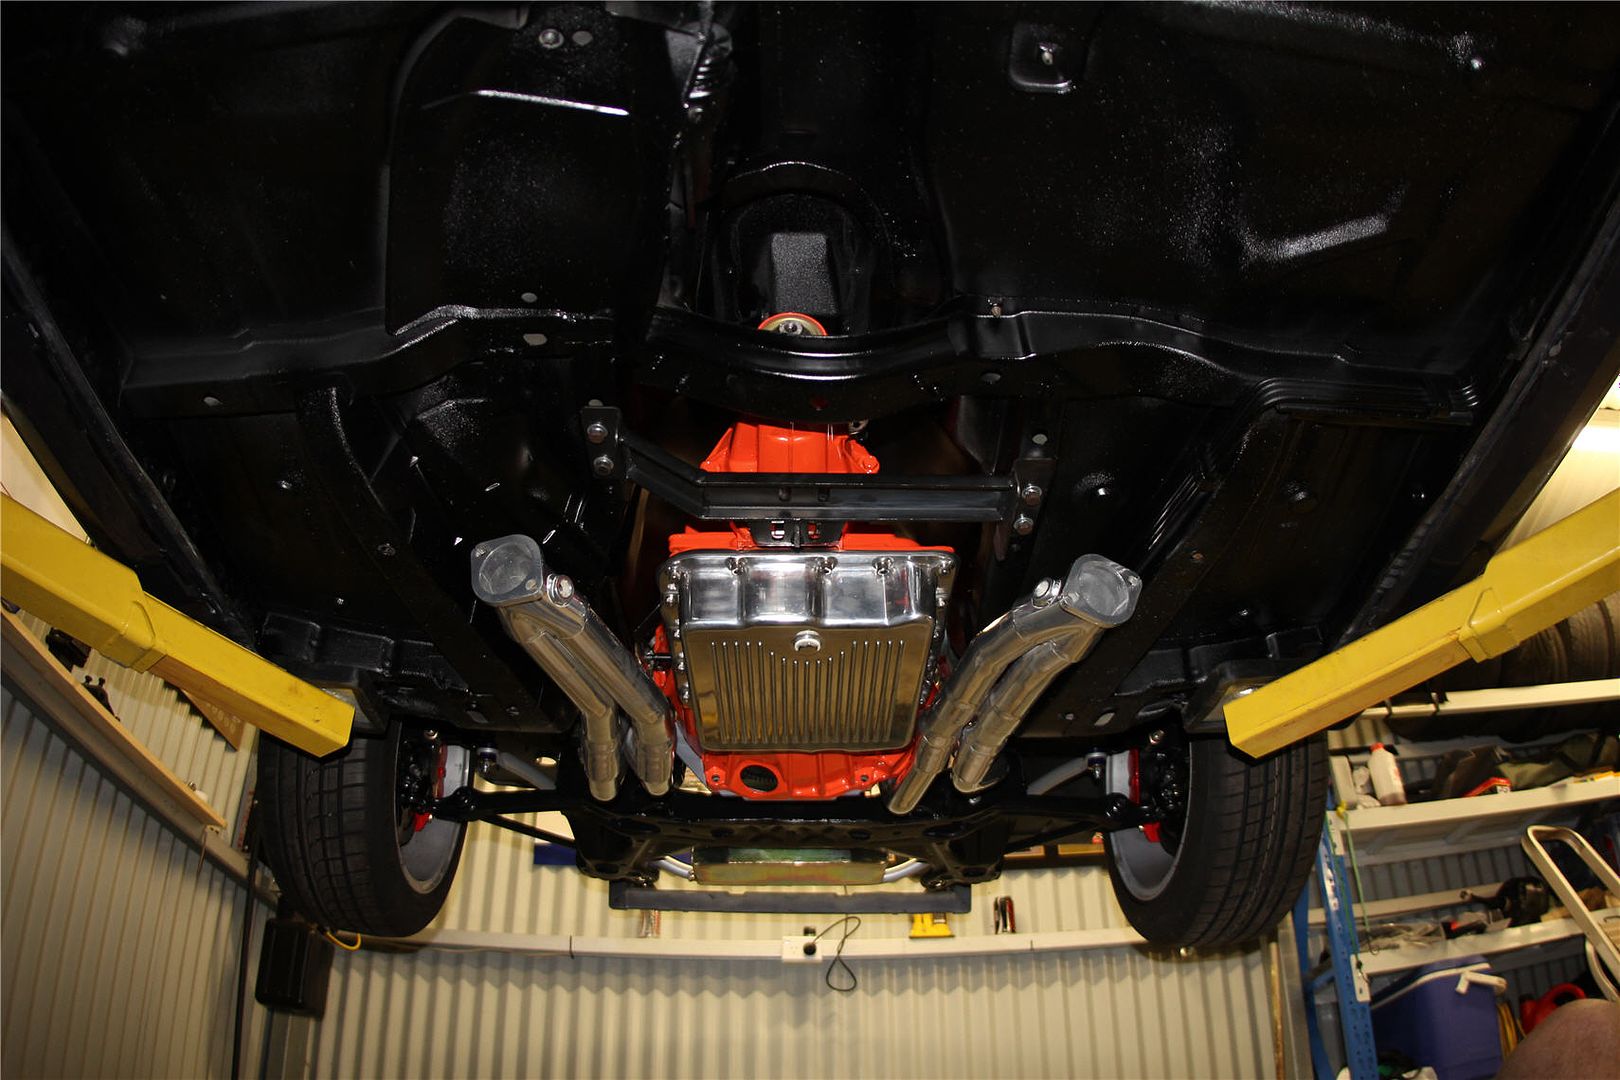
Posts: 5 777Its in
:) Love to say it’s an easy fit, but its quite a bit of in out, up down, and then shake it all around.
Firstly, much much easier if you just remove the steering rack from the get go, makes it easier to get it back then drop the flywheel/bell housing back behind the cross member and then go back.
Was a actually a bit more difficult with the LSx than the LS3 as the extra bolts on the heads foul the exhaust on the passenger side when you are trying to feed it through. Ended up removing the PS engine mount completely, then moving the drivers side up out of the way and brought the engine forward, fitted the headers. Fed the passenger side down from above, but fed the drivers side up from underneath. Then moved the engine back and down in place. Apart from that relatively straight forward, just fiddly.
Having a nice coldy to celebrate then might go out when its cooler and just look at her. Honestly can say its looks way way better in real life than the photos show, the orange is a great contrast against the Anthracite.
If it cools down later on may fit the rack and starter. few pics

 February 18, 2015 at 1:41 am #426
VRSenator065Participant- Adelaide SA
- VR Senator LSx454 1960 Kombi (project) 1921 Nash Hot Rod (future project)
View build HERE
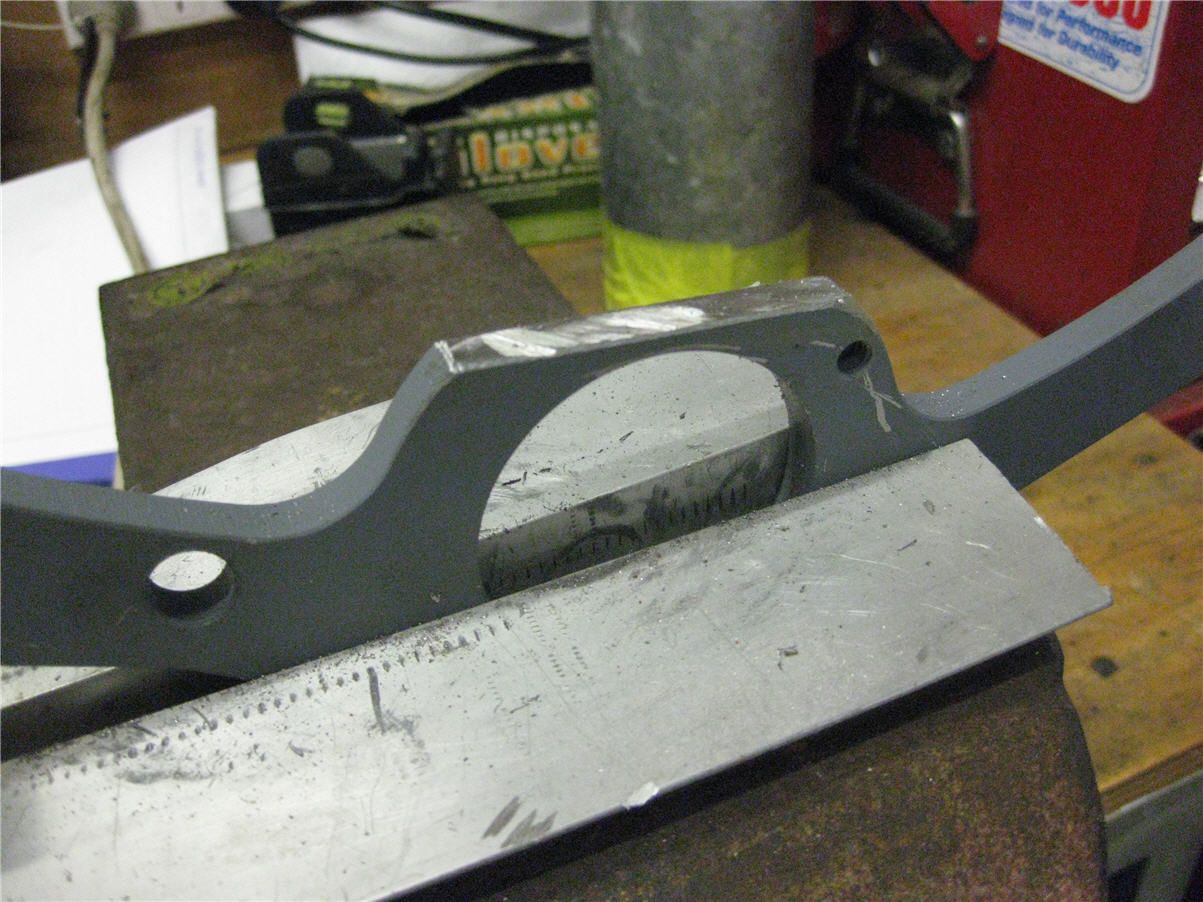
Posts: 5 777So got the Tuff Mounts slotted, also have removed the front sub frame ready for welding so thought I would take some pics. The area in yellow I removed, I then used as a base some 100x50x2.5 channel, and cut out the triangular boxes, bit of work in getting it to sit perfect, the lip on the channel tucks up really nice against the underside of what I left of the factory brace. Tomorrow I will get it welded, I think i might hand paint it satin black for now, then fit it. Its very easy to remove. I think I will wait until its all in properly and fitted properly then I can pull it out once I am sure and get it re powder coated. I probably should have done that from the start but, hey live and learn. Should look nice painted up.
-
This reply was modified 8 years, 4 months ago by VRSenator065.
-
This reply was modified 6 years, 7 months ago by VRSenator065.
-
AuthorPosts
You must be logged in to reply to this topic.
