
Home›Forums›Members’ Builds and Rides›VQ – WN Statesman›Atlas Grey VQ Statesman 304
This topic contains 133 replies, has 16 voices, and was last updated by McDriveit 6 years, 2 months ago.
-
AuthorPosts
-
January 28, 2016 at 10:08 am #13688
OK So back in the country from my work trip.
Whilst away I managed to source some steam pipe and 5mm plate so I can hopefully start my diff mount this weekend. I’ve also marked out my 1/8″ plate for the trailing arm mounts so (assuming I don’t run out of gas, which I think I will) I should have some progress to show for a change!
I was also thinking while away, I have a 4.11:1 live axle diff that has been sitting around for 2.5 years which I picked up for a ‘future project’ which I don’t think will eventuate. If it’s not a VL length Borgy (which it possibly could be) I was thinking of slotting the 4.11’s in place of the 3.89’s. If it’s a VL length I’ll leave it as is and sell it (with or without a spool) as I feel it’s a bit of a waste to pull apart. If it’s a VN width then out they come.
If I do go 4.11’s then my 3.89 spooled IRS diff will be for sale.
February 8, 2016 at 8:37 am #13903Finally did something.
Ignore the spatter. I was out of MIG gas and had to weld gasless. :(
Not finished that one. Also still need the trianguler pieces and to finish the welding (I had a really small amount of 1/8″ plate so I couldn’t cut complex shapes without wastage).
Also I’m basically out of gas for the TIG now too…..
February 8, 2016 at 7:32 pm #13913
VRSenator065Participant- Adelaide SA
- VR Senator LSx454 1960 Kombi (project) 1921 Nash Hot Rod (future project)
View build HERE
Posts: 5 777
Neat work mate, looking great.
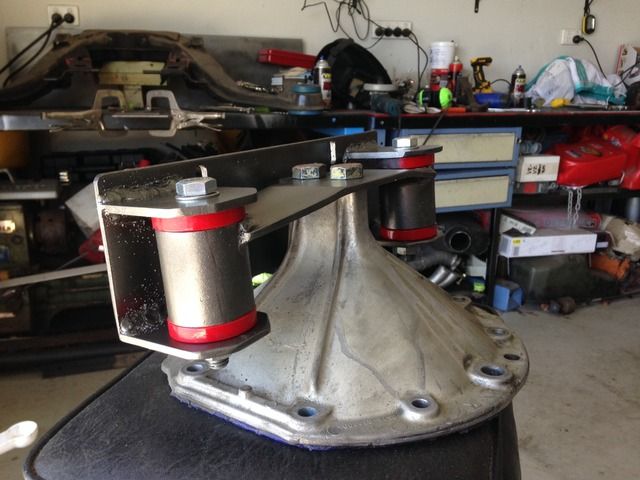
February 9, 2016 at 9:21 am #13926It’s pretty much a ghetto harrop cover for about $100 complete.
I have to modify the n-tank fuel pump carrier outlet to clear the diff mount, but that’s OK as I was going to braze on a dash 6 steel fitting anyway. Although I do have some speedflow 5/16″ to -6 adaptors on hand – anyone have some tips for these?
Might try and work on the k-frame a bit more tonight.
February 10, 2016 at 2:34 pm #13980Diff mount and Trailing arm mount mods look good. Be interested to see how it goes on the street
 February 17, 2016 at 11:19 am #14199
I keep getting distracted with the house and life in general.
Anyway I’ve bought an outright E-size Argon bottle (ouch) and some fittings and clips, 37* flare tool and 2 x Flowmaster mufflers from Summit (USD double-ouch).
This is turning into the definition of Scope Creep…February 17, 2016 at 4:31 pm #14212
exec24Participant- 2004 VY S2 Berlina 1996 VS 5L Sedan
View build HERE
Posts: 435It’s pretty much a ghetto harrop cover for about $100 complete. I have to modify the n-tank fuel pump carrier outlet to clear the diff mount, but that’s OK as I was going to braze on a dash 6 steel fitting anyway. Although I do have some speedflow 5/16″ to -6 adaptors on hand – anyone have some tips for these? Might try and work on the k-frame a bit more tonight.
ive currently got some of those fittings on ebay
February 18, 2016 at 3:16 pm #14256I have on hand both the speedflow adaptors and steel -6 weld ons so all OK there.
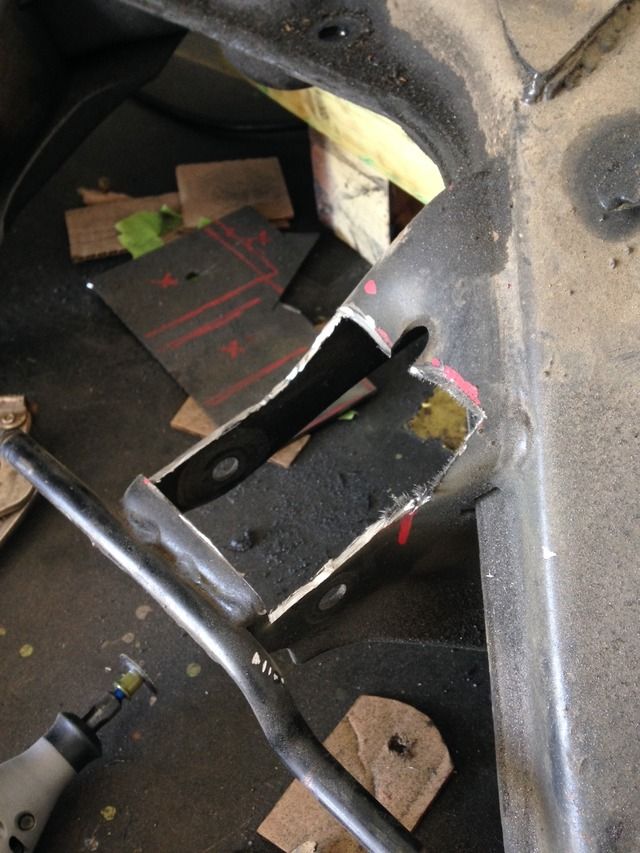
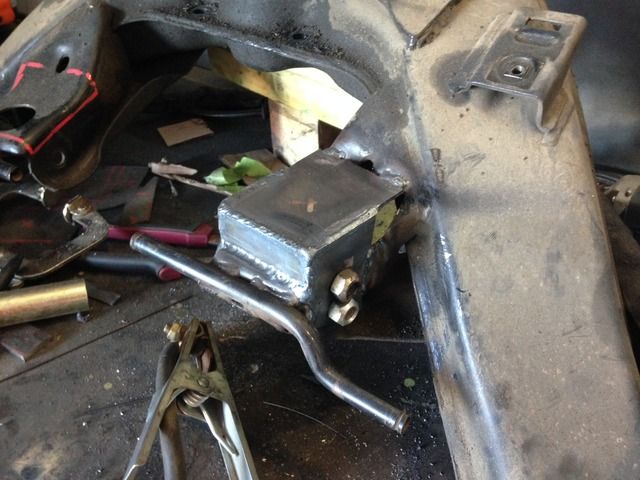
Two steps forward one step back, had a clearance issue with the camber bush clearance on full adjustment, will have to rework it a bit. Otherwise one side is basically done and I’ll start welding in the other side.
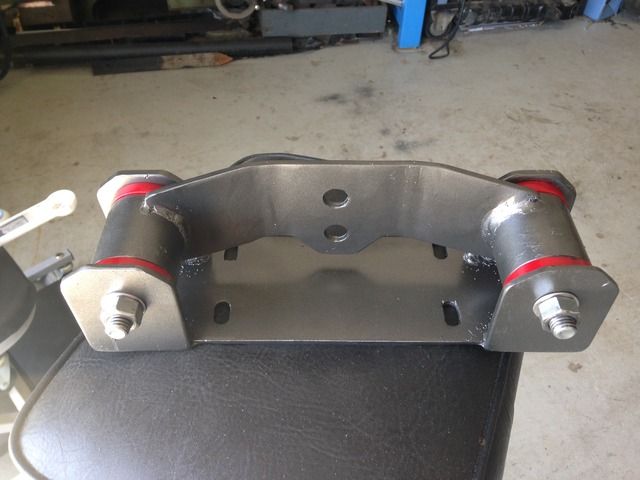
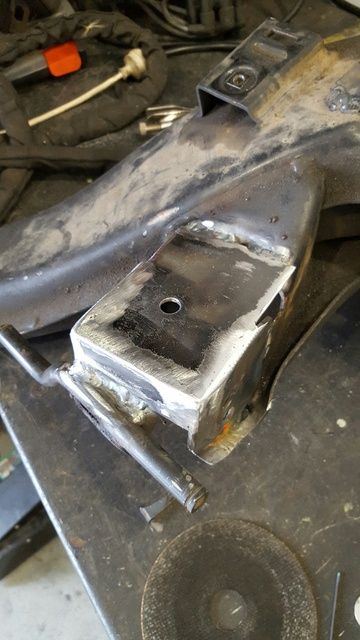
February 26, 2016 at 11:17 am #14592Some progress is better than none.
I really underestimated the time taken to get these mounting points right. You really wouldn’t think it would be that hard but it is very fiddly. I’m no fabricator/tradesman but I’m not a nuff either, so I’m surprised that it’s taken this long. But maybe an hour or two more and they’ll be done. Not pretty but done.
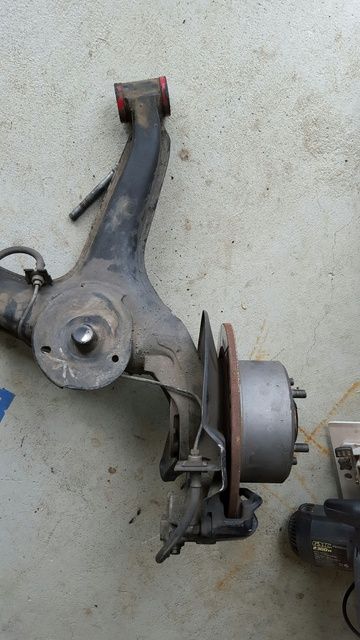
Also modified one of the control arms to give extra tyre clearance should I ever fit wider tyres. Not a lot of work but easier to do now that it’s out.
Summit order arrived also, haven’t checked to see if the Flowmasters will fit yet….


Modified.
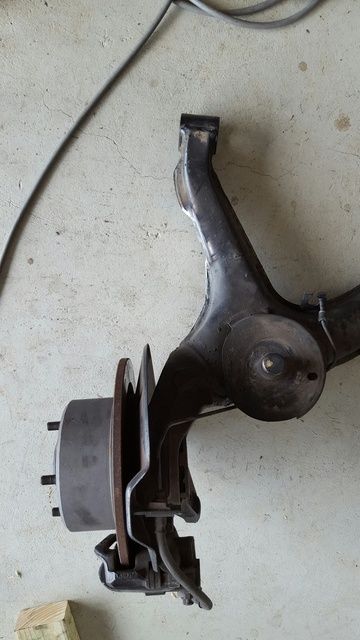
Unmodified.
 March 1, 2016 at 4:10 pm #14723
K-frame and control arms completed.
Fuel pump out, need to braze on a new fitting and install a new lift pump.
March 2, 2016 at 2:33 pm #14752Bought a Pierburg 200LPH E85 low pressure in tank lift pump. Should be here by the weekend hopefully so I can really crack into the fuel system.
March 2, 2016 at 9:18 pm #14762Where u get that from?
March 3, 2016 at 11:42 am #14766The Electronic Bay.
$138 delivered from “Dirt Devil Ind.” Should have arrived today so I’ll let you know how I go.
March 3, 2016 at 11:54 am #14768The Electronic Bay. $138 delivered from “Dirt Devil Ind.” Should have arrived today so I’ll let you know how I go.
Bought a lot of my stuff from DD , good guys to deal with!
Interesting choice using a Statesman as the basis Tuff! :XD:
March 3, 2016 at 1:03 pm #14770I kinda fell into it really. 10-odd years ago finding a decent Atlas Grey VN SS was $12-15k territory, and many had a lot of km’s and had been thrashed mercilessly. At the time I didn’t have the skill set (and mostly the money) to afford to fix major mechanical items. I still wanted one but couldn’t justify it, so picked up this with 160km on it for just under $9k. Still decent money for a first year uni student, but I got my paint colour and the engine I wanted.
Then I grew attached to it and here we are.
March 3, 2016 at 1:33 pm #14772Have to love the skills you pickup along the way doing it yourself!
March 3, 2016 at 3:12 pm #14773
VRSenator065Participant- Adelaide SA
- VR Senator LSx454 1960 Kombi (project) 1921 Nash Hot Rod (future project)
View build HERE
Posts: 5 777^roger that, and the satisfaction factor…
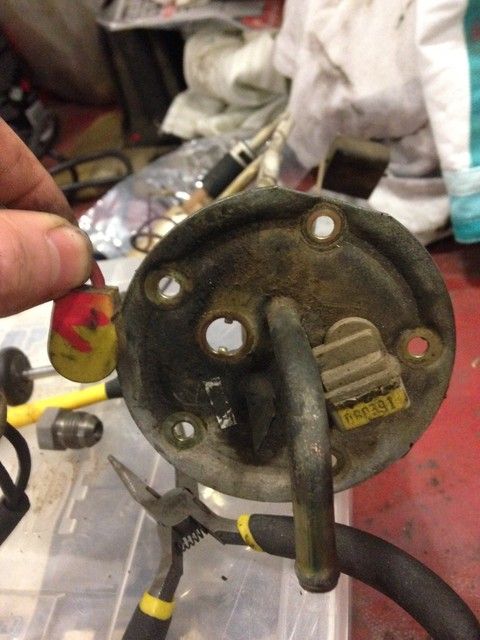
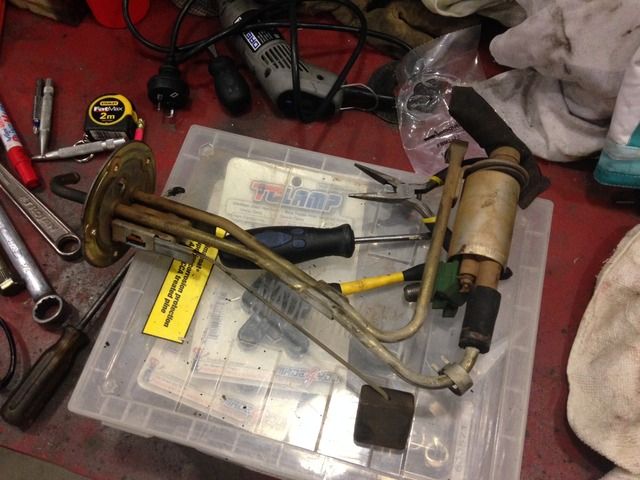
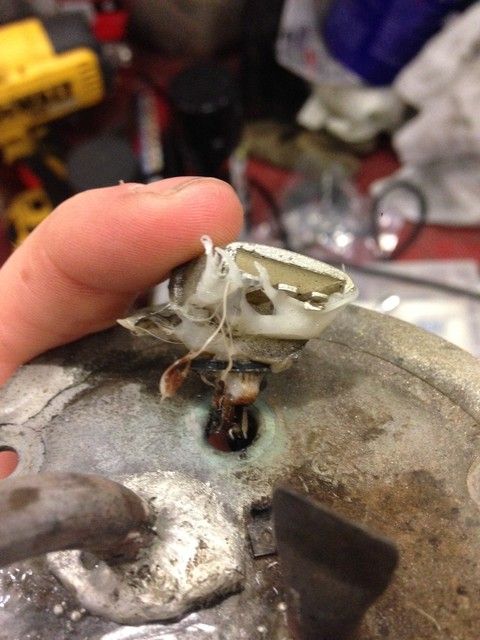
March 4, 2016 at 9:04 am #14788Bit of a failure last night. Started modifying the in-tank pump outlet by cutting the 90 deg bend off, brazing on a steel -6 male fitting and then bringing the bend closer to the tank and rotate 90deg clockwise.
Fitting on the bend, great success. Bend to pump carrier…. not so much. The silver solder didn’t want to adhere to the plate, eventually got it but then i had an air leak. Second attempt and I melted the level sensor connector. Sigh.
Does anybody know if the 65L pump assembly is different to the 80L carrier assembly?
Think I need a new one.Change of approach – More speedflow
 March 4, 2016 at 9:45 am #14789
Factory carrier and piping config, pump power supply removed.
80L tank pump carrier assembly. Standard low pressure pre-pump.
Whoops. This is also my first attempt at brazing and clearly I didn’t have the right filler material or prep for the main plate.
Ordered one of these in the hope to sort it out. Will run new 3/8″ (in lieu of 5/16″) outlet tub in the tank, then 200 series hose to the boot to supply the surge tank.
 April 27, 2016 at 1:49 pm #16370
OK – It’s been a while. In between working interstate/overseas basically every weekday for this year and trying to maintain a marriage/social life outside of this, the Stato has been neglected. SOme progress now though as I’ve found a few days after work that I could do stuff.
Diff Build
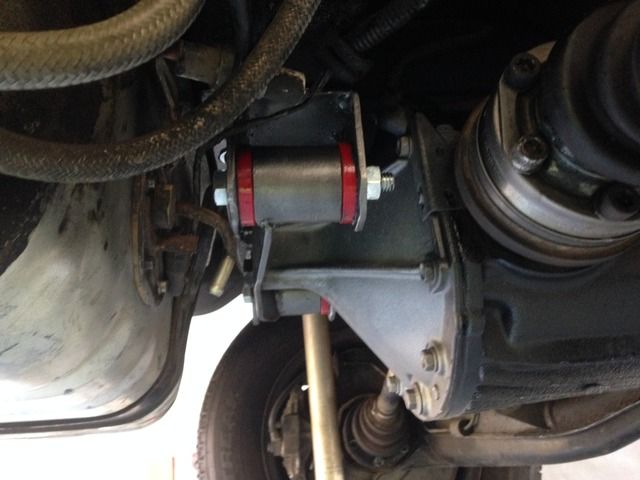
SO I couldn’t really do much more on the rear suspension until the diff was built. Cue a phone call to Luke and MDR Diffs on a Monday resulting in an appointment ot build it on a Saturday. Champion. I decided to keep my 3.89 spool diff intact and build another RIS diff with 4.11’s and the Torquelock centre. This meant I had to pull a spare diff out of one of the donor VQ’s sitting at my old man’s place (he caught the bug and we bought on complete VQ with average paint and one good condition VQ without an engine to piece together one good one for him).
So I spent one afternoon down at his place on ramps in the dirt (not fun) but ran out of daylight as I had to remove the two bar pack, entire subframe assembly and fuel tank to get to the diff bolts. I went back a week later, spoke to the old man and we decided to take a short cut – cordless angle grinder to the rear floor made for easy access. Job done.
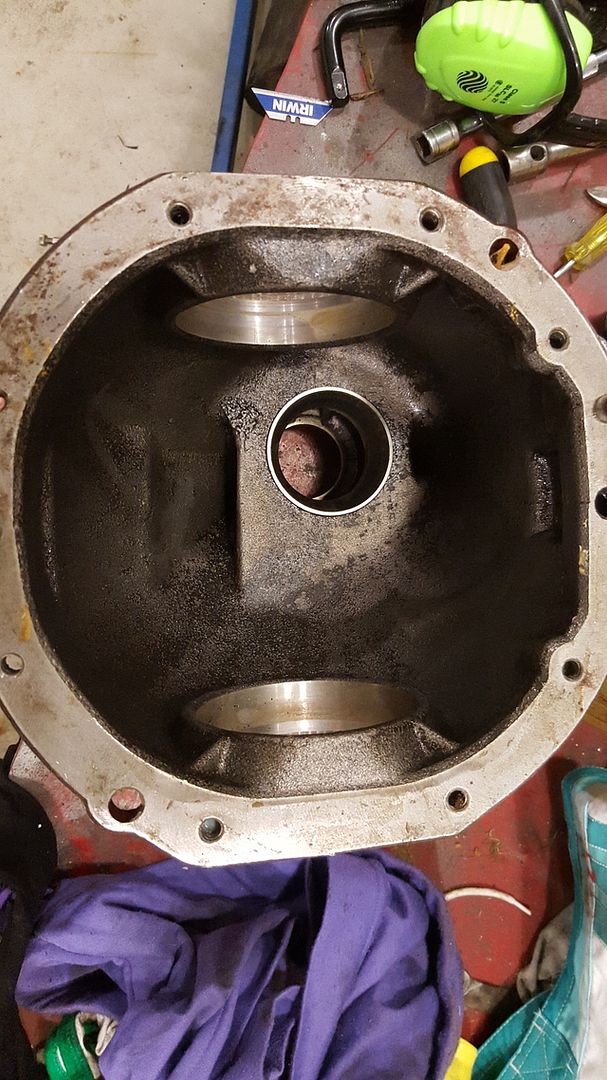
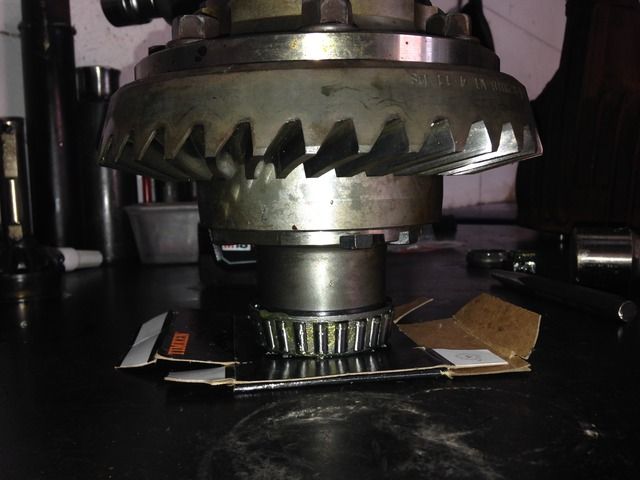
Next, I had to strip this diff centre down to a bare casing.
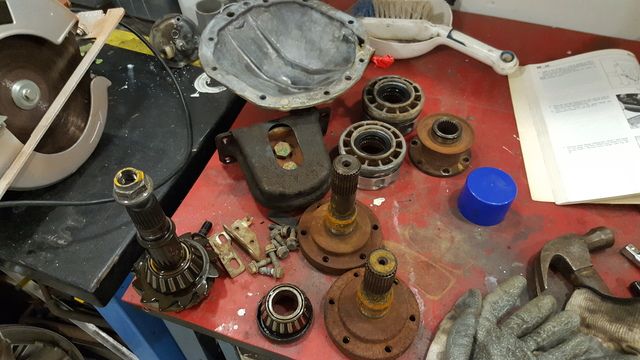
Job done.
Next, I had to strip down the 4.11 open centre VN diff I had. Once I measured that it was VN width I wasn’t worried about pulling it down. It’s not worth enough to sell as is. Plus, I want a 3.45 diff in my VN when I (eventually) go 304 T5 as 4.11 gears are too short. No photos of this but think of the above with a different housing.
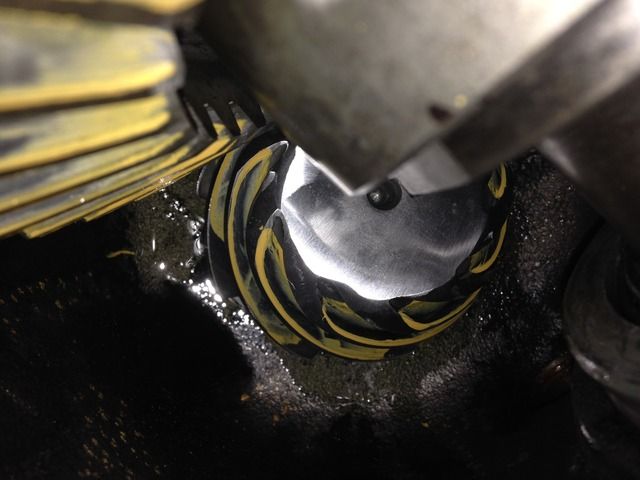
Saturday rolled around and I went and saw Luke at his shop in Dandenong. We had a chat about the parts I’d brought him and it mostly centred around the Torquelock centre. Something I think I’d mentioned earlier in here is that due to the size of the Torquelock centre itself, with shorter gear sets (3.89/4.11) the top of the pinion gear may need to be ground down. By the third assembly of the diff we got this right, as we were hesitant to grind off any more than we really needed to. I don’t think this will affect the life of the diff (particularly given the very low km I do in this case) but something to keep in mind.
You can see the top of the pinion gear with the adjustment in the below photo.
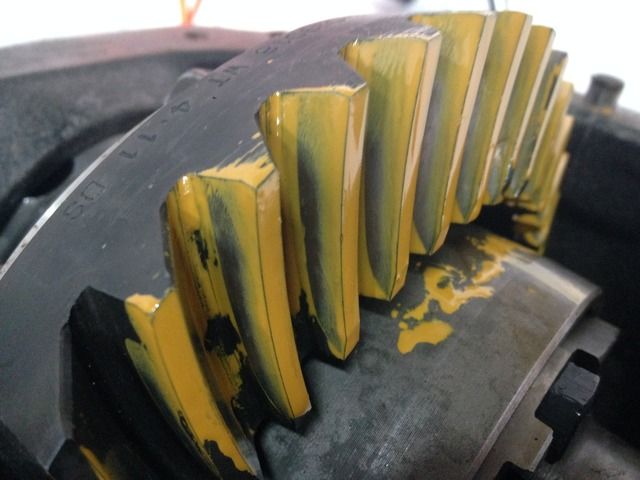
Luke was really accommodating and took me through the whole build, how he R&R’s the bearings, how he sets up pinion crush, mesh pattern etc. Assuming the whole thing doesn’t explode on its first drive I do recommend him. I’ll get my VN diff built there when I eventually get to it.
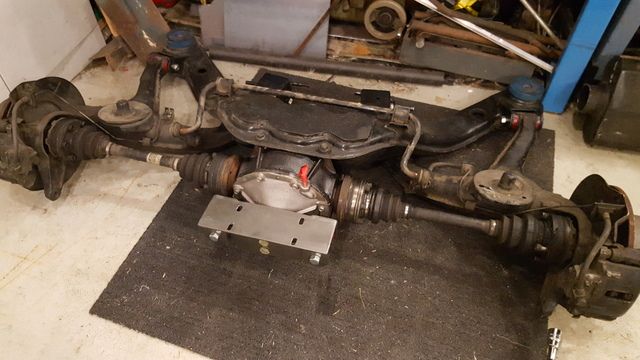
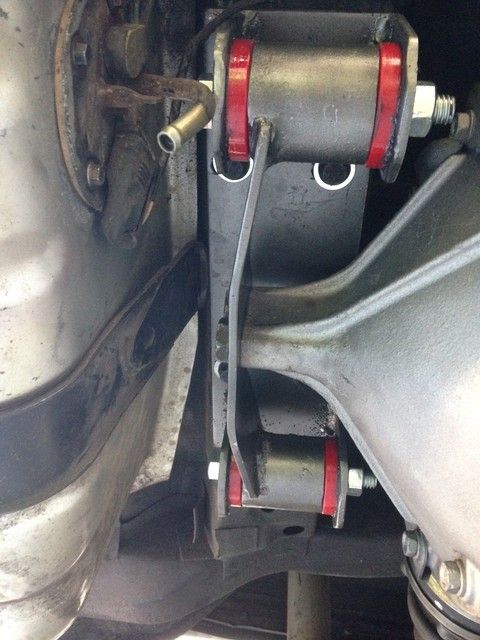
Next step, I put the rear end back together. I started to clean the components but really lost interest halfway through. I’ve fully detailed the rear end a few years back but it just gets dirty. You can’t see it on the road. Who cares.
Fast forward to me putting it all back together. I still had my issue with the fuel pump outlet fouling the diff mount. I thought long and hard about a solution.
Then I just bent it.
The Pierburg pump seems to be working well on static tests. Makes some noise unlike the factory pump but minimal. Appeared to fill the surge tank pretty quickly.
All back together. Eyeball alignment resulted in this. Victory.
I still have to bleed the brakes tonight (although finally installed my VT master to stock hardline adaptors. Previously was running a double flare pipe to a bubble flare master cyl… maybe for some years…), adjust the speedo corrector and take it for a test drive. Fingers crossed it doesn’t end in a trailing arm falling out and me spearing into a pole.
Things I didn’t do as I was sick of not driving the car for 3.5 months:
– Any improvement in the fuel system lines and fittings as planned, except for the fuel pump. That’ll come later in winter when it’s too miserable to want to drive.
– The new exhaust. I have Flowmaster 2.5″ mufflers from the states to go on with new 2.5″ piping, but also have a better set of extractors to go on as well. I’ll wait till the engine comes out to do all that. -
AuthorPosts


You must be logged in to reply to this topic.
